Documentation on Startup
Using this documentation you'll be able to easily customize your template.
Getting Started
In Startup we're using Bootstrap v.5.1 that will help you create layouts quickly and minimize using CSS styles.
There were a lot of additional classes in previous versions of Startup but now we're using the default Bootstrap classes as much as possible. In the end the CSS styles become lighter and the workflow becomes easier - you can use familiar Bootstrap classes.
Startup editor allows you to change these classes without accessing the source code - they are all available in the editor as visual, understandable settings.
In general, you don't even need to know Bootstrap classes anymore.😃
Project and Page Actions
Create New Project and New Page
If you're working with Startup app for the first time you already have a "Demo" project with the "Demo page" in it. You can use it or create a new project. To do that, click on the "Projects" button in the top navigation and then "Add new project." After that, create a page (the "New page" button) and open the newly created page. You're ready to go!
Create Page Layout
You have a blank page. Choose blocks from the left panel by clicking on them, or hover on the page name in the top navigation panel, click on "Randomize" and choose the number of blocks that you want to have on your page and click "Generate" - it will create a page generated from randomly chosen blocks. This will be a good starting point.
Project Actions
You can group your pages into projects, which you can duplicate, rename or remove. You can also move page from one project to another.
The important notice is that styles (fonts, colors, animations) are applied to all pages of the project. That means if you move page from one project to another, the styles of a new project will be applied to this page.
Page Actions
As you can see in the dropdown in the top navigation panel, you able to:
- Randomize (add randomly chosen blocks to your page)
- Rename
- Duplicate (clone)
- Move to another project
- Share (shared page can be viewed only by registered users)
- Clear (removes all blocks from the page)
- Delete (deletes page)
Some features are disabled for not-registered users.
Device Preview
You can preview your page directly in Startup app. Just choose the screen width in the top navigation panel. If the chosen width is larger than the preview area, the page will be scaled down to fit.
Preview
The "Preview" button opens a new tab where you can preview your page. Also, the page will be saved before the preview.
Auto Save
The auto save feature is enabled by default and will save your page every 30 seconds. To disable auto save, hover on the "Save" button and toggle auto save off.
Export
The "Export" button generates an archive with all pages of your project and all assets, including images, JavaScript, CSS, SCSS sources, .htaccess file with images caching directives for your server (it improves page loading speed) and "form-handler.php" for receiving data from forms.
Note that only the "Agency" plan allows unlimited exports. In the "Business" plan you are limited 20 exports per month.
Project Styles
Please note that styles are applied to all pages of the project.
So, all pages of one project have the same styles set.
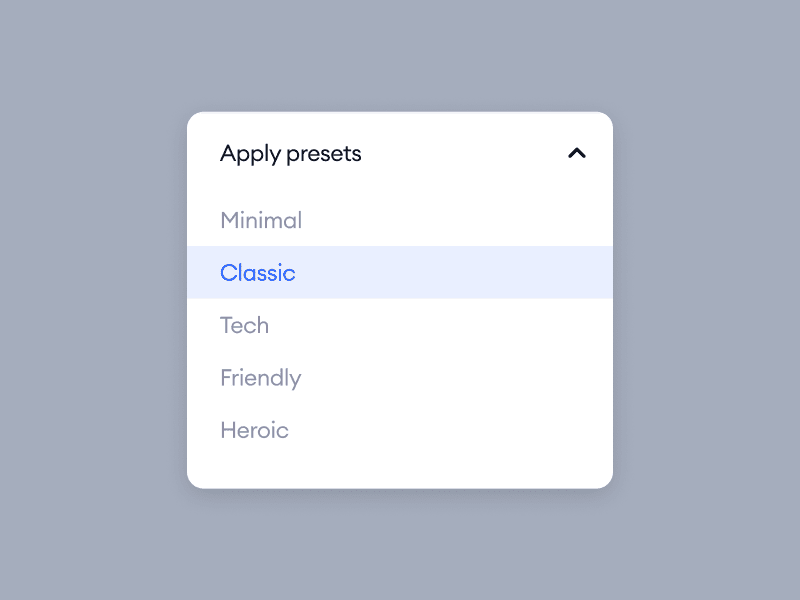
Use Presets
We've made 5 predefined design styles to show you all the power of the Startup generator. Simply choose some of them in the "Apply preset" block and it will dramatically change the style of the whole page!
Change Fonts
We use Google Fonts - "DM Sans" font family by default. It can be simply changed in the "Fonts" block of the generator app:
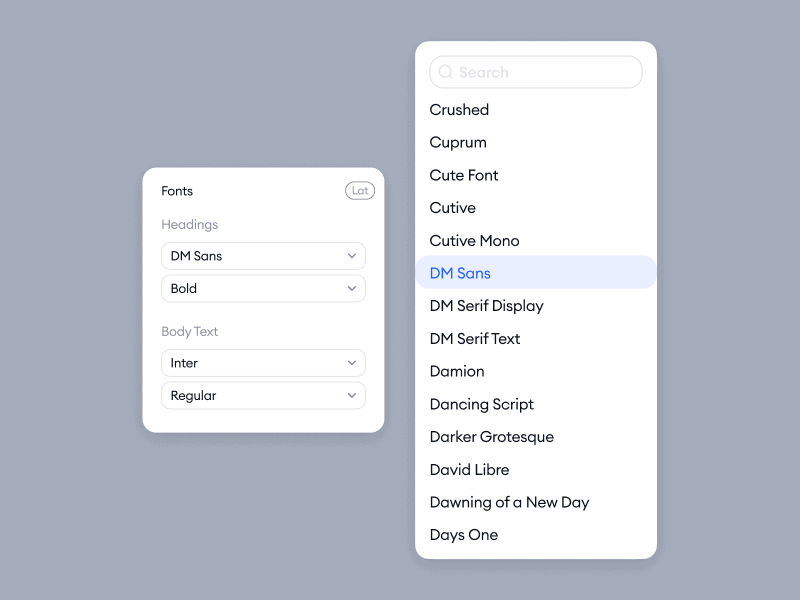
Choose the subset in the top-right corner (in case you need to use not Latin subset). After that, you can choose your main font ("Body font") and font for headings ("Headings font"). Also, you can choose the font-weight of both of them.
But if you want to change your font manually in the HTML code after project export, you can simply replace
<link href="https://fonts.googleapis.com/css?family=DM+Sans:100,200,300,400,600,700,800,900" rel="stylesheet">
in the <head></head> section of project pages to your new link from Google Fonts.
If you want to use a not Latin subset, add to the end of URL above &subset=cyrillic-ext. e.g. for the Cyrillic subset it will be:
<link href="https://fonts.googleapis.com/css?family=PT+Sans:200,300,400,600,700,800,900|Open+Sans:200,300,400,600,700,800,900&subset=cyrillic-ext" rel="stylesheet">
After that, replace the old font with a new one in /css/styles.css:
"DM Sans" -> "Open Sans"

								"DM Sans" -> "PT Sans"
or if you use SCSS, replace the variables value in /scss/_custom-variables.scss:
$font-family-heading: DM Sans;
$font-family-sans-serif: DM Sans;
and then rebuild the /scss/styless.scss file to /css/styles.css
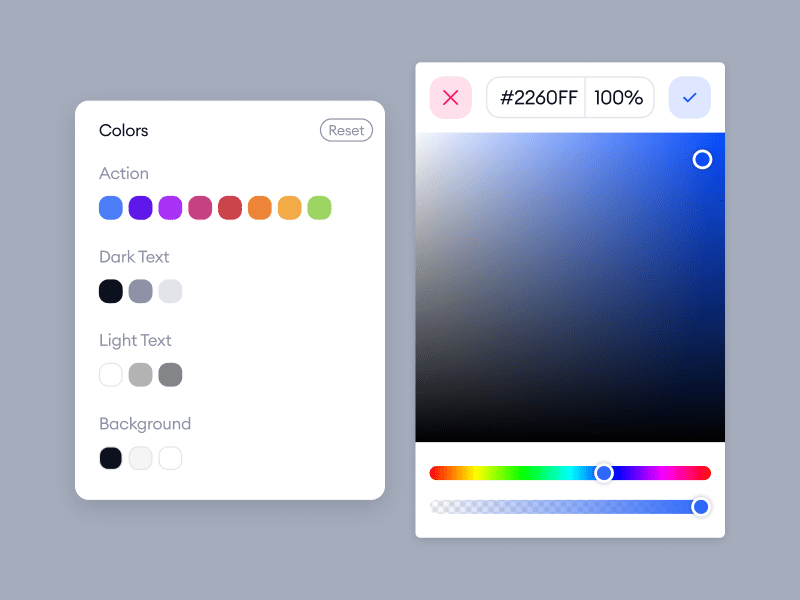
Change Colors
You can change the colors of all elements in our generator. Just go to the Colors block and change them!
First-row, Action: set colors of buttons and links (there are 8 possible styles of these elements).
Second-row, Dark text: set colors of the dark-colored texts. There are 3 settings, left to right:
- The darkest color - set the color of headings and text that should draw the reader’s attention;
- The dark color - set the default text color to all elements;
- The disabled color - set the color if the element has a "disabled" state. Also set the color of borders, dividers etc.
Third-row, Light text: the same as Dark text row, but for light texts. These colors are mostly used in the dark version of blocks.
Fourth-row, Background: set colors of black, light and white backgrounds.
Also, you can click on the Random button and for a unique color scheme instantly!
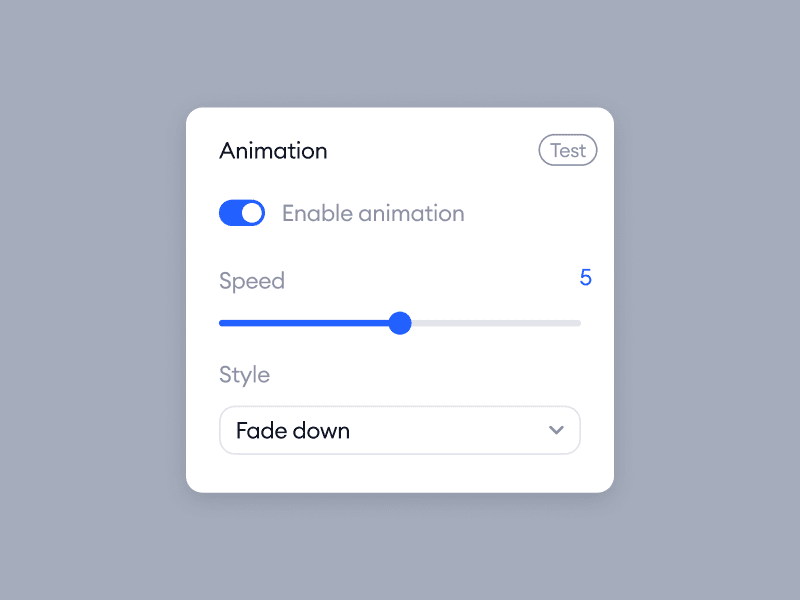
Set Animations
You can set on-scroll animations for your project in 1 click!
Go to the "Animation" block and set the toggle "Enable animation" to "on" (enabled by default).
It will enable animations in your project.
After that, you can choose animation speed (0 is the slowest and 10 is the fastest) and style (there are 27 animation styles available now).
There's more information about setting animations here.
Change Images
Startup uses two versions of images - regular and 2x for high-resolution retina displays. So don't forget about it, when you change images.
If you don't want to use 2x images, leave the "2x" field empty in editor or, if you change it in the HTML code after project export, remove srcset="..." attribute from <img> tag:
<img srcset="i/image@2x.png 2x" src="i/image.png" alt="" />
Bootstrap Changes
Startup supports all Bootstrap 5 classes, nothing was removed, so you can check Bootstrap 5 documentation.
We've made some customization of Bootstrap, extended some classes and added some new ones that you should know about.
This part of documentation is for experienced users that need deeper customization. We believe that our Startup editor covers 95% of front-end developer needs in terms of making HTML layout.
Additional SCSS Files
We decided to leave all the default Bootstrap SCSS files unchanged for easier updating of the Bootstrap version. So, we've added 3 new SCSS files in /scss/ directory:
-
_custom-variables.scsscontains variables fromvariables.scssfile that we've changed.
These custom variables overwrites the default Bootstrap variables. -
_custom.scsscontains custom styles, Bootstrap utilities extensions -
styles.scsscreated to be compiled to/css/styles.cssand includes all Bootstrap SCSS files + our additional files.
Compile to CSS
If you've made some changes in SCSS files you should re-compile them to /css/styles.css file or /css/styles.min.css (if you use minified CSS styles).
Just compile the /scss/styles.scss as a source file to the /css/styles.css as the dest file using your favorite SCSS compiler. Here is a short list of mostly known SCSS compilers:
- Dart Sass (Free, recommended by Bootstrap dev team)
- Koala (Free)
- Compass (Free)
- Gulp (Free)
- Grunt (Free)
- CodeKit
- Prepros (our choise)
Update Bootstrap
When working on a project for a long time, it becomes necessary to update the Bootstrap manually. We've tried to make it as easy as possible. All you need to do is:
- Download the latest Bootstrap source files;
- Replace all files in your project's
/scss/folder with the new ones from the/scss/folder of the downloaded archive with sources; - Open
/scss/styles.scssin your existing project and add these lines: @import "custom-variables";right before the@import "variables";line@import "custom";right before the@import "helpers";line- Re-compile
/scss/styles.scssfile
Variables Values
Here is the list of values that were changed compared to the default Bootstrap variables values.
Spacers (margin & padding classes)
We've increased the number of available spacing values.
You are able to use margin and padding utilities with values up to 20.
The step between adjacent values is 4px (0.25rem).
It means:
mb-1 class adds margin-bottom:0.25rem; // 4px value;
mb-2 class adds margin-bottom:0.5rem; // 8px value;
mb-3 class adds margin-bottom:0.75rem; // 12px value;
...
mb-20 class adds margin-bottom:5rem; // 80px value;
The same works with paddings (p-X classes).
New theme-colors (color classes names)
$theme-colors: (

    "action-1":       $action-1,

    "action-2":       $action-2,

    "action-3":       $action-3,

    "action-4":       $action-4,

    "action-5":       $action-5,

    "action-6":       $action-6,

    "action-7":       $action-7,

    "action-8":       $action-8,


    "dark-1":     $dark-1,

    "dark-2":      $dark-2,

    "dark-3": $dark-3,

    "light-1":     $light-1,

    "light-2":     $light-2,

    "light-3":$light-3,


    "bg-1":       $bg-1,

    "bg-2":       $bg-2,

    "bg-3":       $bg-3

) !default;
It means that Bootstrap colors utility classes were changed, so classes like text-primary, text-secondary, text-success, text-warning, text-danger, etc. classes are no longer available.
Please, use these classes with new color names instead:
text-action-1
text-action-2
btn-action-3
text-dark-1
text-light-1
bg-bg-1
etc.
Full list of changed variables available in /scss/_custom-variables.scss file after exporting your project.
Deeper Optimization
You can make your CSS files weigh even less if you remove Bootstrap components that you don't use.
-
Open the
/scss/styles.scssand comment@importstatements of components that you don't use in your project. -
Open the
/scss/_custom-variables.scssand comment the values inside the$spacersvariable that you don't use or use rarely. -
In the end, re-compile
/scss/styles.scssfile to/css/styles.cssfile and minify it.
These simple practices reduce the size of CSS styles up to 2x.
How to Include jQuery
Since Bootstrap 5 jQuery is no longer required, we didn't include jQuery into the HTML.
But if you want to use it, open .html file of your page in the exported archive and uncomment this line:
<!-- <script src="https://cdnjs.cloudflare.com/ajax/libs/jquery/3.6.0/jquery.min.js"></script> -->
So, it will be:
<script src="https://cdnjs.cloudflare.com/ajax/libs/jquery/3.6.0/jquery.min.js"></script>
(the <!-- and --> symbols removed).
Forms Integrations
Email Integration
* Note: your hosting must support PHP and php mail() function
to receive emails from our script.
We included a PHP script that allows you to receive data from any form of your project to your email.
All you need to do is open form-handler.php in the root of your exported archive and set your email:
$to = "my@email.com";
Also, we recommend setting your "From" email address - it will be better if it will be on the same domain that your website.
$from_email = "robot@domain.com";
Telegram Integration
* Note: your hosting must support PHP to make this integration.
You can receive data from your page forms directly to your Telegram app (on your phone or desktop).
This method is preferable to receiving data via email because:
- It's free
- You'll be notified immediately
- The message will not be flagged as a "spam"
- Most of the hostings have a small quota on sending emails
To set integration with Telegram messenger you have to follow four steps:
-
Create Telegram bot, get access token
The easiest way to do that is to find bot @BotFather and send a message to him. This is a bot made for creating new bots in Telegram 😉
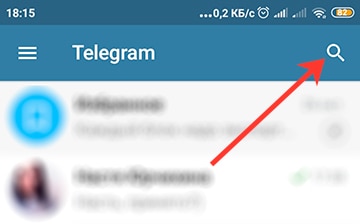
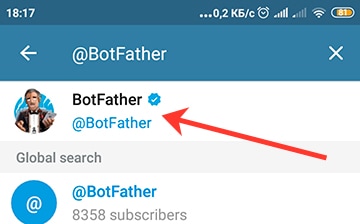
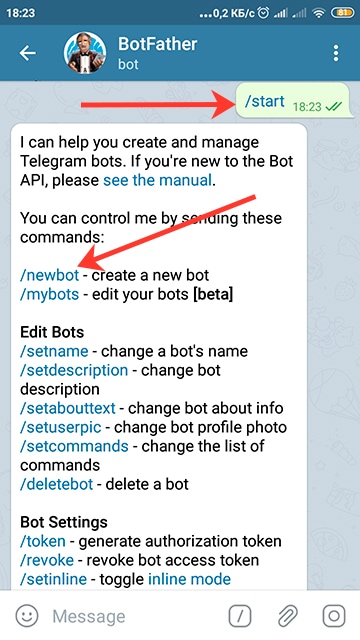
Press the Start button. You'll see the list of available commands.
We need to create a new bot, so type the /newbot command.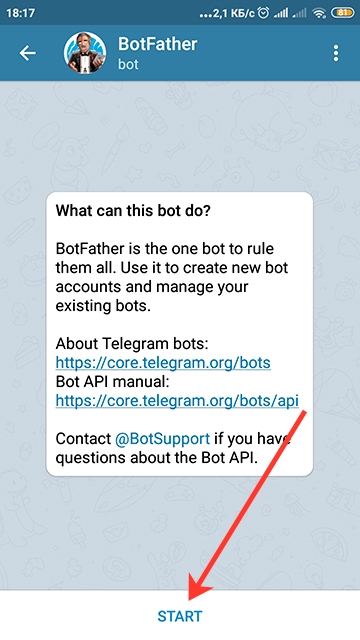
BotFather will ask you: what are you going to call your bot? That's the shown name, you'll see it later in your contacts list. Enter a name.
After that, BotFather will ask you to set the username of your bot, which must end in bot. Enter some unique_name_bot username. In our example, it's StartupTelegramTestBot
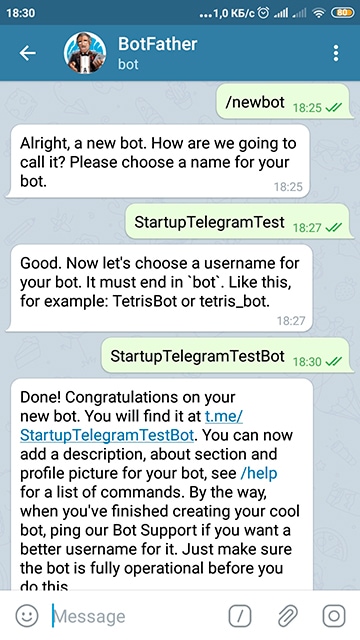
If a username is not already in use, BotFather will create a new bot for you.
Also, it will show your token to access the HTML API. Save this string and we're ready for the next step.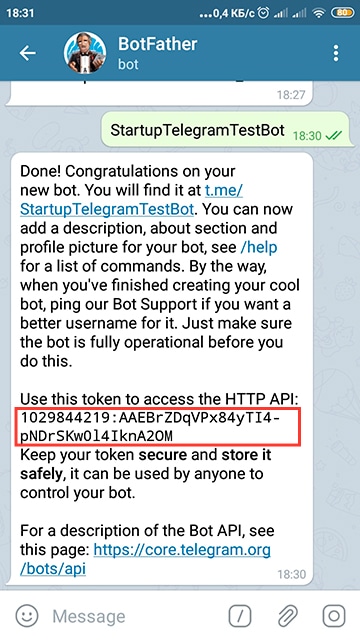
-
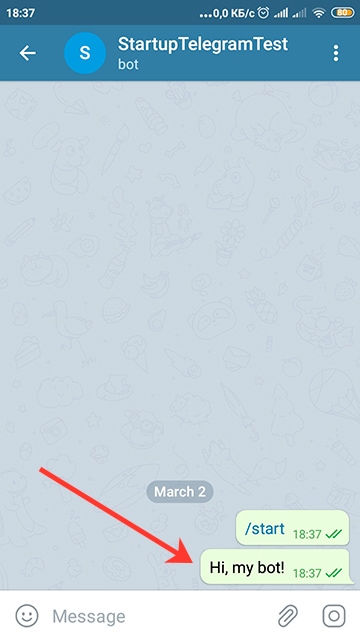
Send a message to the bot
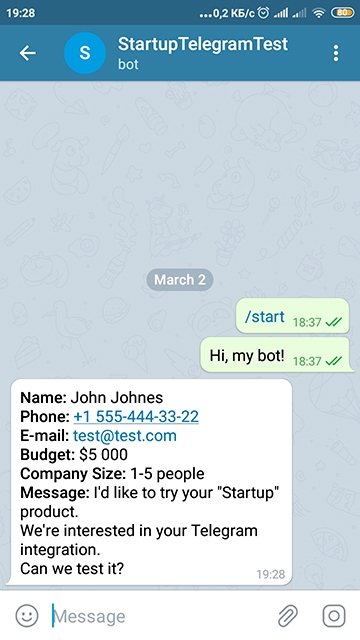
Now you've got your telegram bot. In this step, you need to send it a message with any text. To do so, find your bot in the search panel or just open the link https://t.me/YourBotUsername (in our example it'll be https://t.me/StartupTelegramTestBot) and write any message to it.
-
Get your Telegram Chat ID
Now you need to get your Telegram Chat ID.
The easiest way to do that is to find bot @userinfobot and send a message to him (just type /start command).
The bot will return your user info including Id.
Save this and go to the next, last step. -
Set Token and Chat ID in the form-handler.php
You've got a token and chat id - that's all the settings we need. Now open the
form-handler.phpfile in the root of your exported archive from our Generator app in any text editor.
Put your token and chat id in this file:$telegramToken = 'PUT_YOUR_TOKEN_HERE';$telegramChatId ='PUT_YOUR_CHAT_ID_HERE';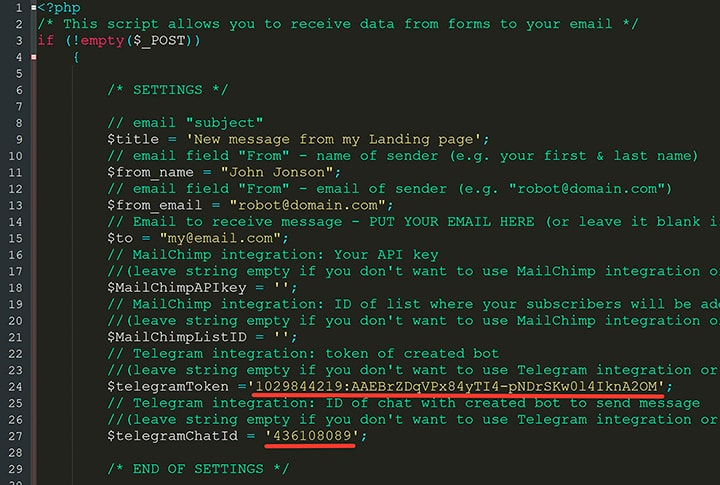
Upload this file to your website and we're done!
You can fill any form on your website and you'll receive data from it directly in the Telegram app.
Viber Integration
* Note: your hosting must support PHP to make this integration.
* Note: your website must have an SSL certificate (should be available to open using "https:// protocol") and your SSL certificate must be not self-signed to make this integration.
You can receive data from your page forms directly to your Viber app (on your phone or desktop).
This method is preferable to receiving data via email because:
- It's free
- You'll be notified immediately
- The message will not be flagged as a "spam"
- Most of the hostings have a small quota on sending emails
To set integration with Viber messenger you have to follow these steps:
-
Create Viber bot, get access token
First, you need to have a Viber account. If you haven't, install the "Viber" app from Google Play Market or App Store and follow instructions in the Viber app.
Next, we need to create a Viber bot.
Open this link, Log in, fill all the fields in the form and click the "Create" button. You'll see a popup with your bot private token. Copy it.Open
form-handler.phpfile in the root of your exported archive from our Generator app in any text editor.
Put your token in this file:$viberToken = 'PUT_YOUR_TOKEN_HERE';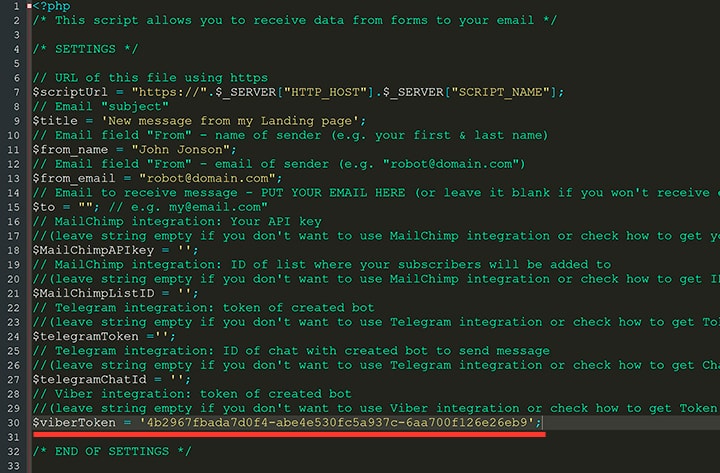
Upload this file to your website and go to step 2.
-
Set up webhook
Now you need to set up a webhook for your bot. Webhook is a code that receives a callback from Viber bot and makes some actions, depending on received data.
But don't be scared, we already include all the necessary code in the
form-handler.phpfile!All you need to do is open any page of your website built with Startup Generator and containing any form. Just fill out the form and submit it. You'll see notification popup with the following text:
Viber webhook successfully set! Now you need to subscribe to your Viber bot and send it a message.
Done!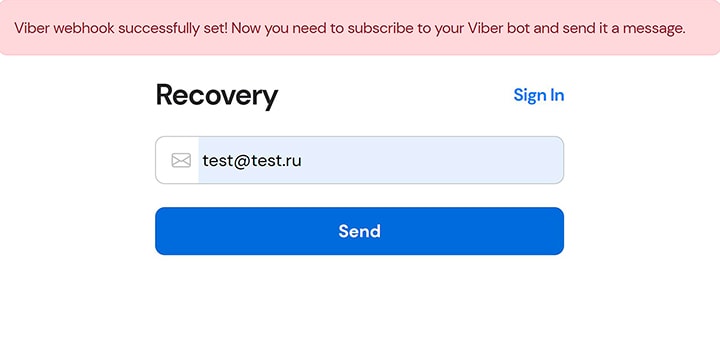
* Important Note: you may notice that after setting webhook it's been created
viberWebHook.txtandviberUserID.txtin the same directory where yourform-handler.phpfile is.
Do not remove them!
Otherwise, you'll need to set up Viber again! -
Subscribe to your bot
Now you need to subscribe to your bot to receive messages from it.
Open the Viber app on your phone, tap on the "More" icon, scroll down and tap on the "Discover" section. You'll see your bot.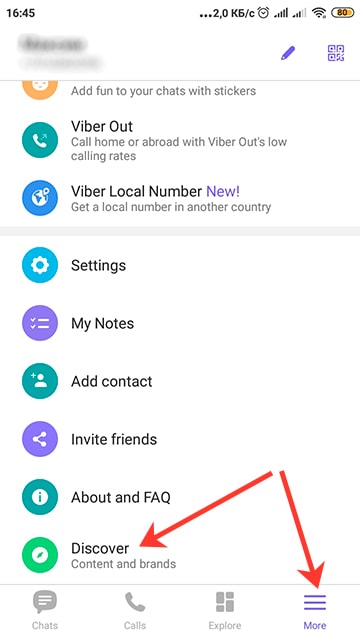
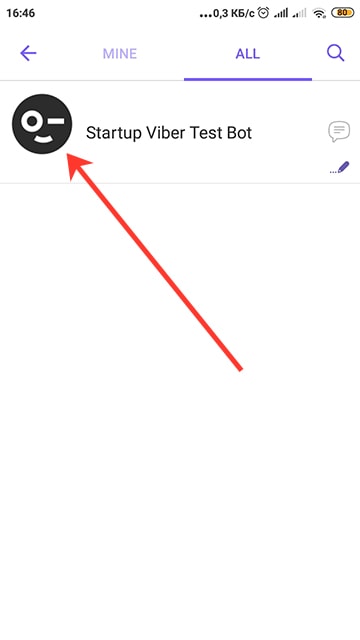
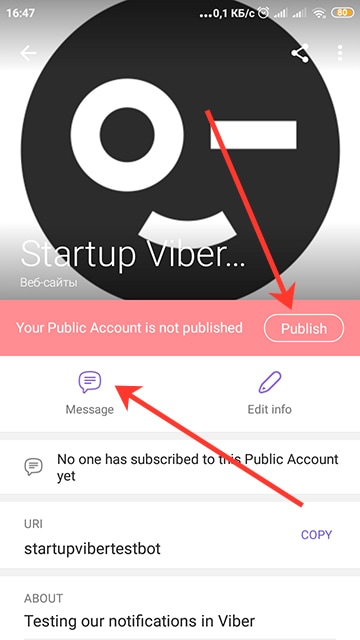
Open it and you'll see that it's not published. Tap on the "Publish" button and then to the "Message" icon. You'll see a chat with your bot. Just send any message and you'll be subscribed to your bot. Your bot will send messages to the first subscribed user.

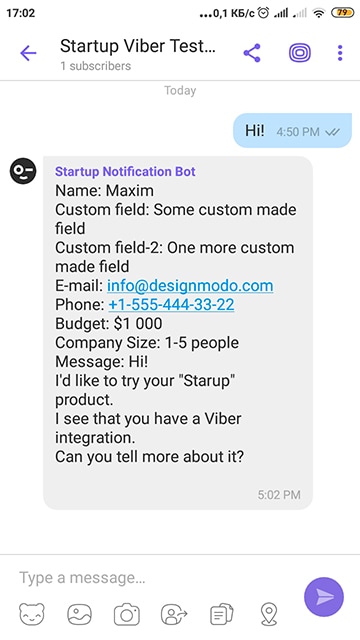
We're done! Just check that everything works correctly. Fill any form on your Startup built page, submit it and you'll get a message with data from this form from the Viber bot!
MailChimp Integration
You can send clients contacts directly to MailChimp and subscribe them to your newsletter using our API integration.
* Note: your hosting must support PHP to make this integration.
All you need to do is:
-
Go to the https://admin.mailchimp.com/account/api/ and create an API key:
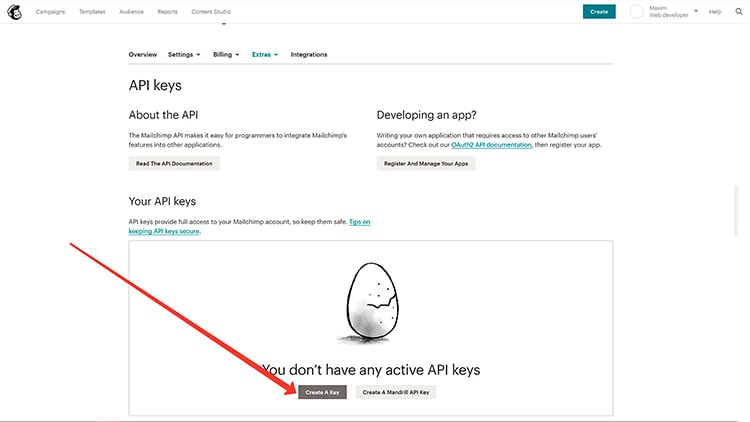
For more info check the MailChimp's help page.
-
Go to your "Lists" folder: https://admin.mailchimp.com/lists/.
Then choose the list where your subscribers will be added to, click to "Settings" tab in dropdown near the list name: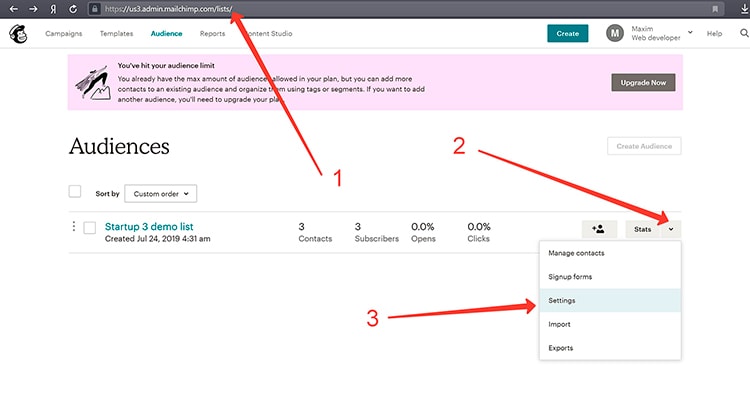
Scroll down the page and copy your "Unique id for audience {your_list_name}" field:
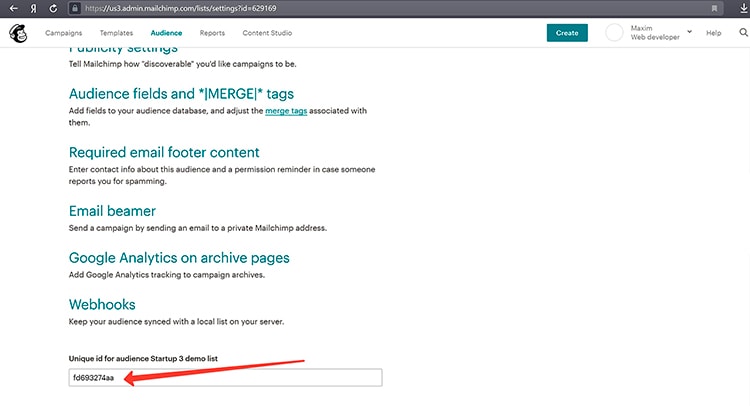
This is your list ID.
-
Put your API key and list ID to your
form-handler.phpfile in the root of your exported archive:$MailChimpAPIkey = 'PUT_YOUR_API_KEY_HERE';$MailChimpListID = 'PUT_YOUR_LIST_ID_HERE';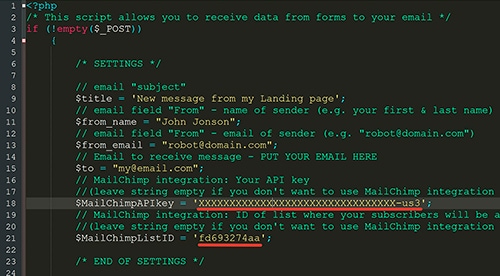
That's it! Now all contacts from forms will be added to the chosen list in MailChimp.
Brevo (ex. SendInBlue) Integration
Send clients contacts directly to Brevo and subscribe them to your newsletter or SMS campaign using our API integration.
* Note: your hosting must support PHP to make this integration.
All you need to do is:
-
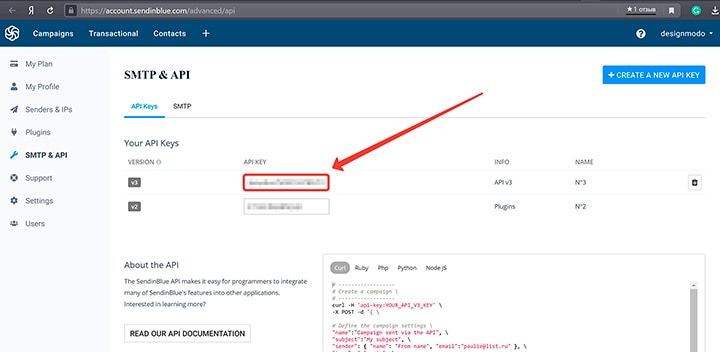
Go to the https://account.brevo.com/advanced/api and get an API key for API v3:
-
Go to the "Contacts" tab: https://my.brevo.com/users/list.
Then choose the list where your subscribers will be added to, click to "All Contacts" dropdown menu. You'll see all of your lists. The ID of the list is a number in[...]before the list name. In our example, we've got lists with ID=2 and ID=3.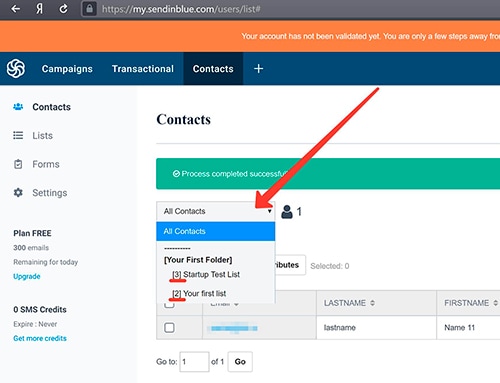
-
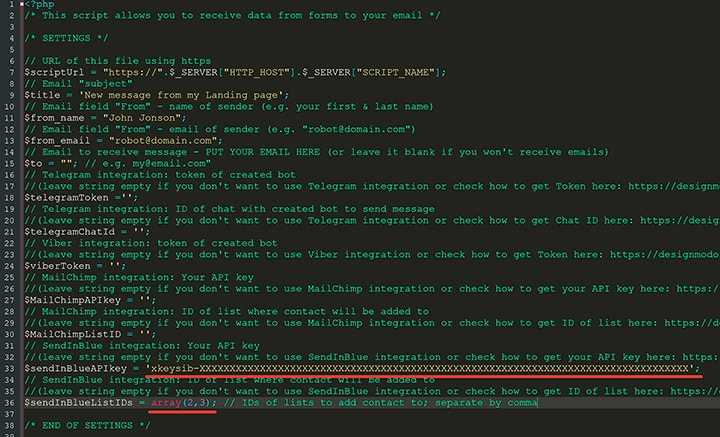
Put your API key and list ID to your
form-handler.phpfile in the root of your exported archive:$sendInBlueAPIkey = 'PUT_YOUR_API_KEY_HERE';$sendInBlueListIDs = array(2,3);As you see, you can add contacts to more than one list. Just separate list IDs by a comma.
That's it! Now all contacts from forms will be added to the chosen list(s) in Brevo.
HubSpot CRM Contacts API Integration
You can send client contacts directly to HubSpot using our API integration.
* Note: your hosting must support PHP to make this integration.
All you need to do is:
-
Go to the https://app.hubspot.com/l/integrations-settings/api-key and click on "Create key" button:
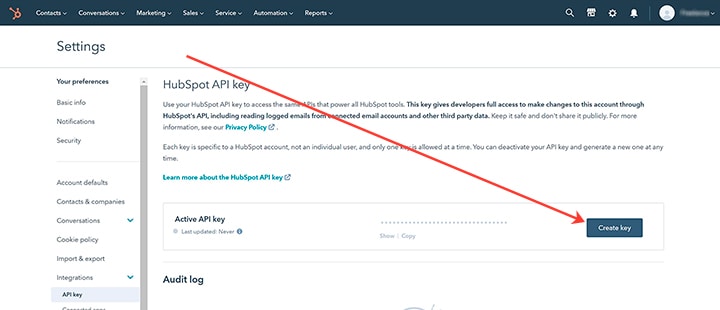
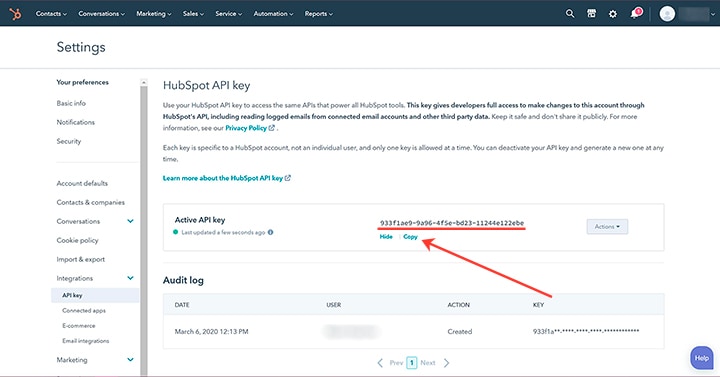
You'll see your API key. Copy it.
-
Put your API key to your
form-handler.phpfile in the root of your exported archive:$hubSpotAPIkey = 'PUT_YOUR_API_KEY_HERE';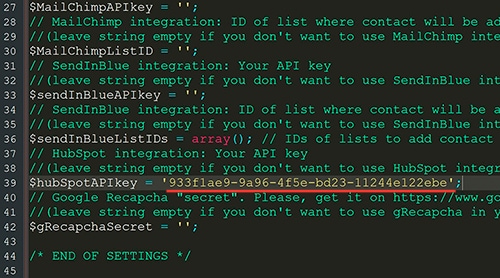
-
By default, the user preview card in the HubSpot interface shows only 4 fields: First name, Last name, Phone, Email. Our script can send any field from your form, but they will not be visible in the user preview card until you add them to the HubSpot interface.
Here is a list of properties supported by our script:
- City
- Company Size
- Country/Region
- Email (added by default)
- First Name (added by default)
- Last Name (added by default)
- Membership notes (data from any other form field will be added to this property)
- Message
- Phone (added by default)
- Postal code (ZIP)
- Street address
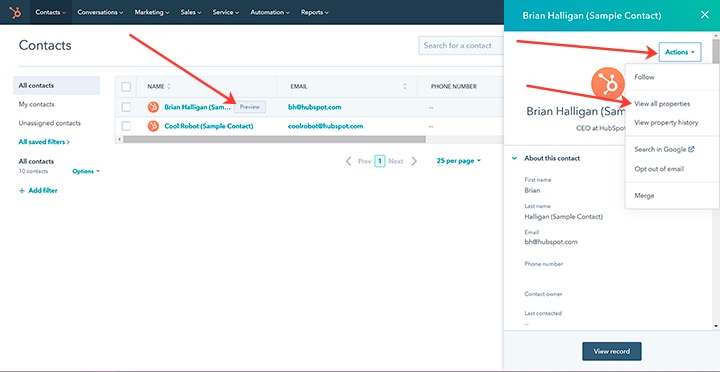
To see them in the user preview card, choose any of your contacts, click on the "Preview" button; you'll see a user preview card; click on the "Actions" dropdown and choose the "View all properties" link.
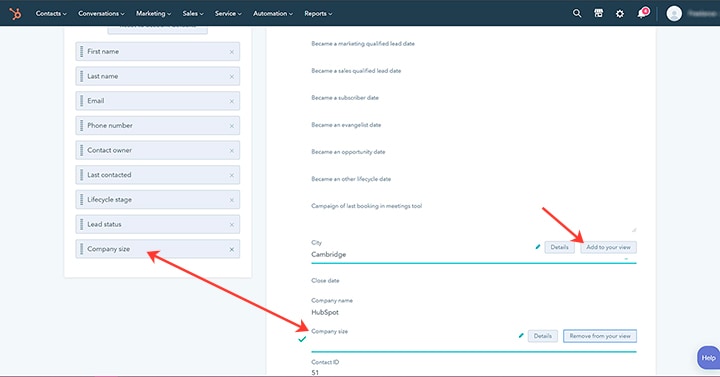
You'll see the page with all available properties in the right column and all properties that will be shown in the user card (in the left column). Just choose properties you'd like to see in the user preview from the right column by clicking on the "Add to your view" button. Property should be supported by our script (check the list above).
Google ReCaptcha Integration
* Note: your hosting must support PHP to make this integration.
You can protect your website forms from spam with Google ReCaptcha (captcha). Manual installation could be a bit difficult; that's why we made it for you.
To set ReCaptcha integration you need to do the following:
-
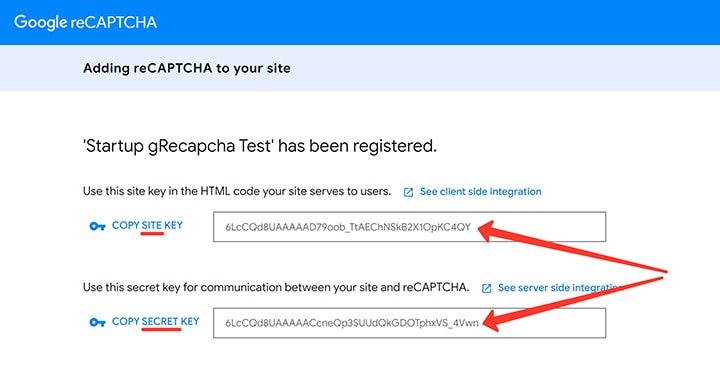
Open https://www.google.com/recaptcha/admin/create. You'll see "Register a new site" page.
Fill all the fields:-
Label:
Title of your project -
reCAPTCHA type:
Choose "reCAPTCHA v3" -
Domains:
Add your domain (e.g. my-website.com) -
Send alerts to owners:
You can remove this flag to avoid receiving Google alerts to your email
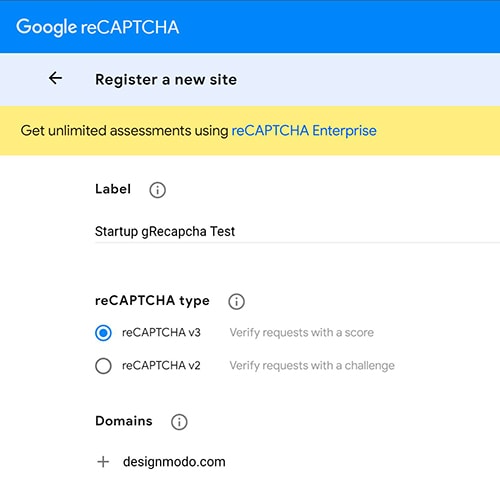
And click the "Submit" button.
-
Label:
-
You'll see the page with your Site key and Secret key. Copy them.
-
Go to the block editor, find your form, open the Advanced tab and add attribute
data-sitekeyand fill it's value with your Site key.Protect all forms of your project by adding
data-sitekeyattribute.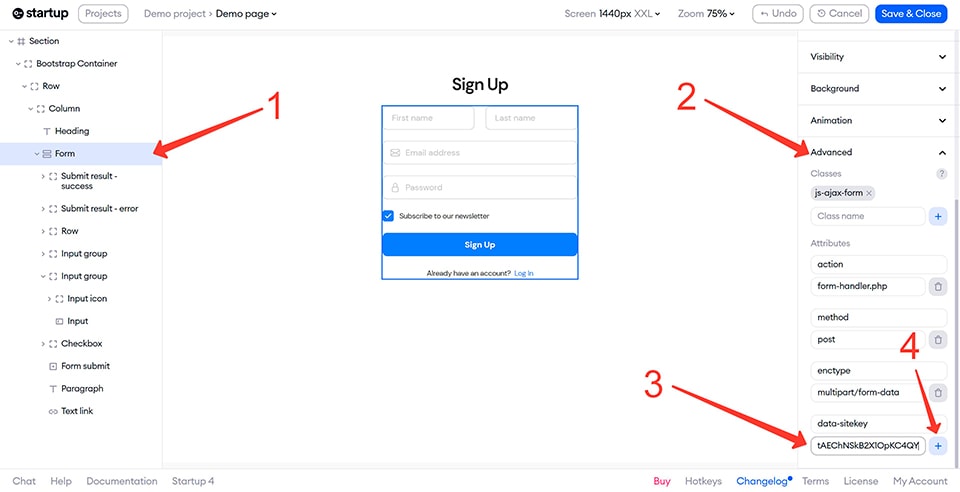
-
Export your page from our Generator app and open the
form-handler.phpfile in any code editor.
Find$gRecapchaSecretvariable and put your Secret key as a value of this variable:$gRecaptchaSecret = '6LcCQd8UAAAAACcneQp3SUUdQkGDOTphxVS_4Vwn';
-
Done! Just upload an archive to your hosting, unzip it and test 😉
ReCaptcha v3 does not show "I'm not a robot" checkbox - it scores user behaviour and returns whether he is bot or not.
Animations
To create beautiful on scroll animations simply, we included the "AOS" library in Startup.
It has lots of effects and settings.
All you need to do is add data-aos="ANIMATION_NAME" to elements that you'd like to animate.
It could be a whole block or only its title and text.
Also, you can set the data-aos-delay="XXX" parameter, where XXX is a delay of animation start in milliseconds.
It can be useful to create "cascades" of animations when you want some elements to animate after another (e.g. two blocks in a row).
Check all available animations and settings on the AOS website or check the full parameters list on their GitHub repository.