How to Build Public & Private Status Pages for Websites
Status pages are essential for many online businesses, applications, and platforms in today’s fast-moving technology. They provide a transparent way of communicating up-to-date incidents, website status, and downtimes to a certain level. They build trust between the business owner and the users while preventing unnecessary incident-related emails, chat support, and tickets through modern communication features.
A website status page can either be public or private. Both can provide historical performance timelines, including uptime and downtime real-time updates, scheduled maintenance reports, and incident analytics management for internal teams and users. This leads to a reduced volume of queries during incidents and provides more time for business owners and their teams to focus on diagnosing and fixing each incident in an efficient and timely manner.
What is a Website Status Page?
A status page displays website information, including the website’s uptime, downtime, performance metrics, and incident messages or reports. It is commonly known as an outage tracker to keep users or website visitors up-to-date on your website status.
Today, having a status page is an industry-standard. Website and online platforms such as Reddit, Dropbox, and Apple, among others, are examples of renowned companies using status pages as vital components of their incident management process. The idea behind every status page is very straightforward: users or website visitors should be fully updated on the incidents happening on your website, especially when there are any problems or outages of service being addressed whenever they visit your website or platform.
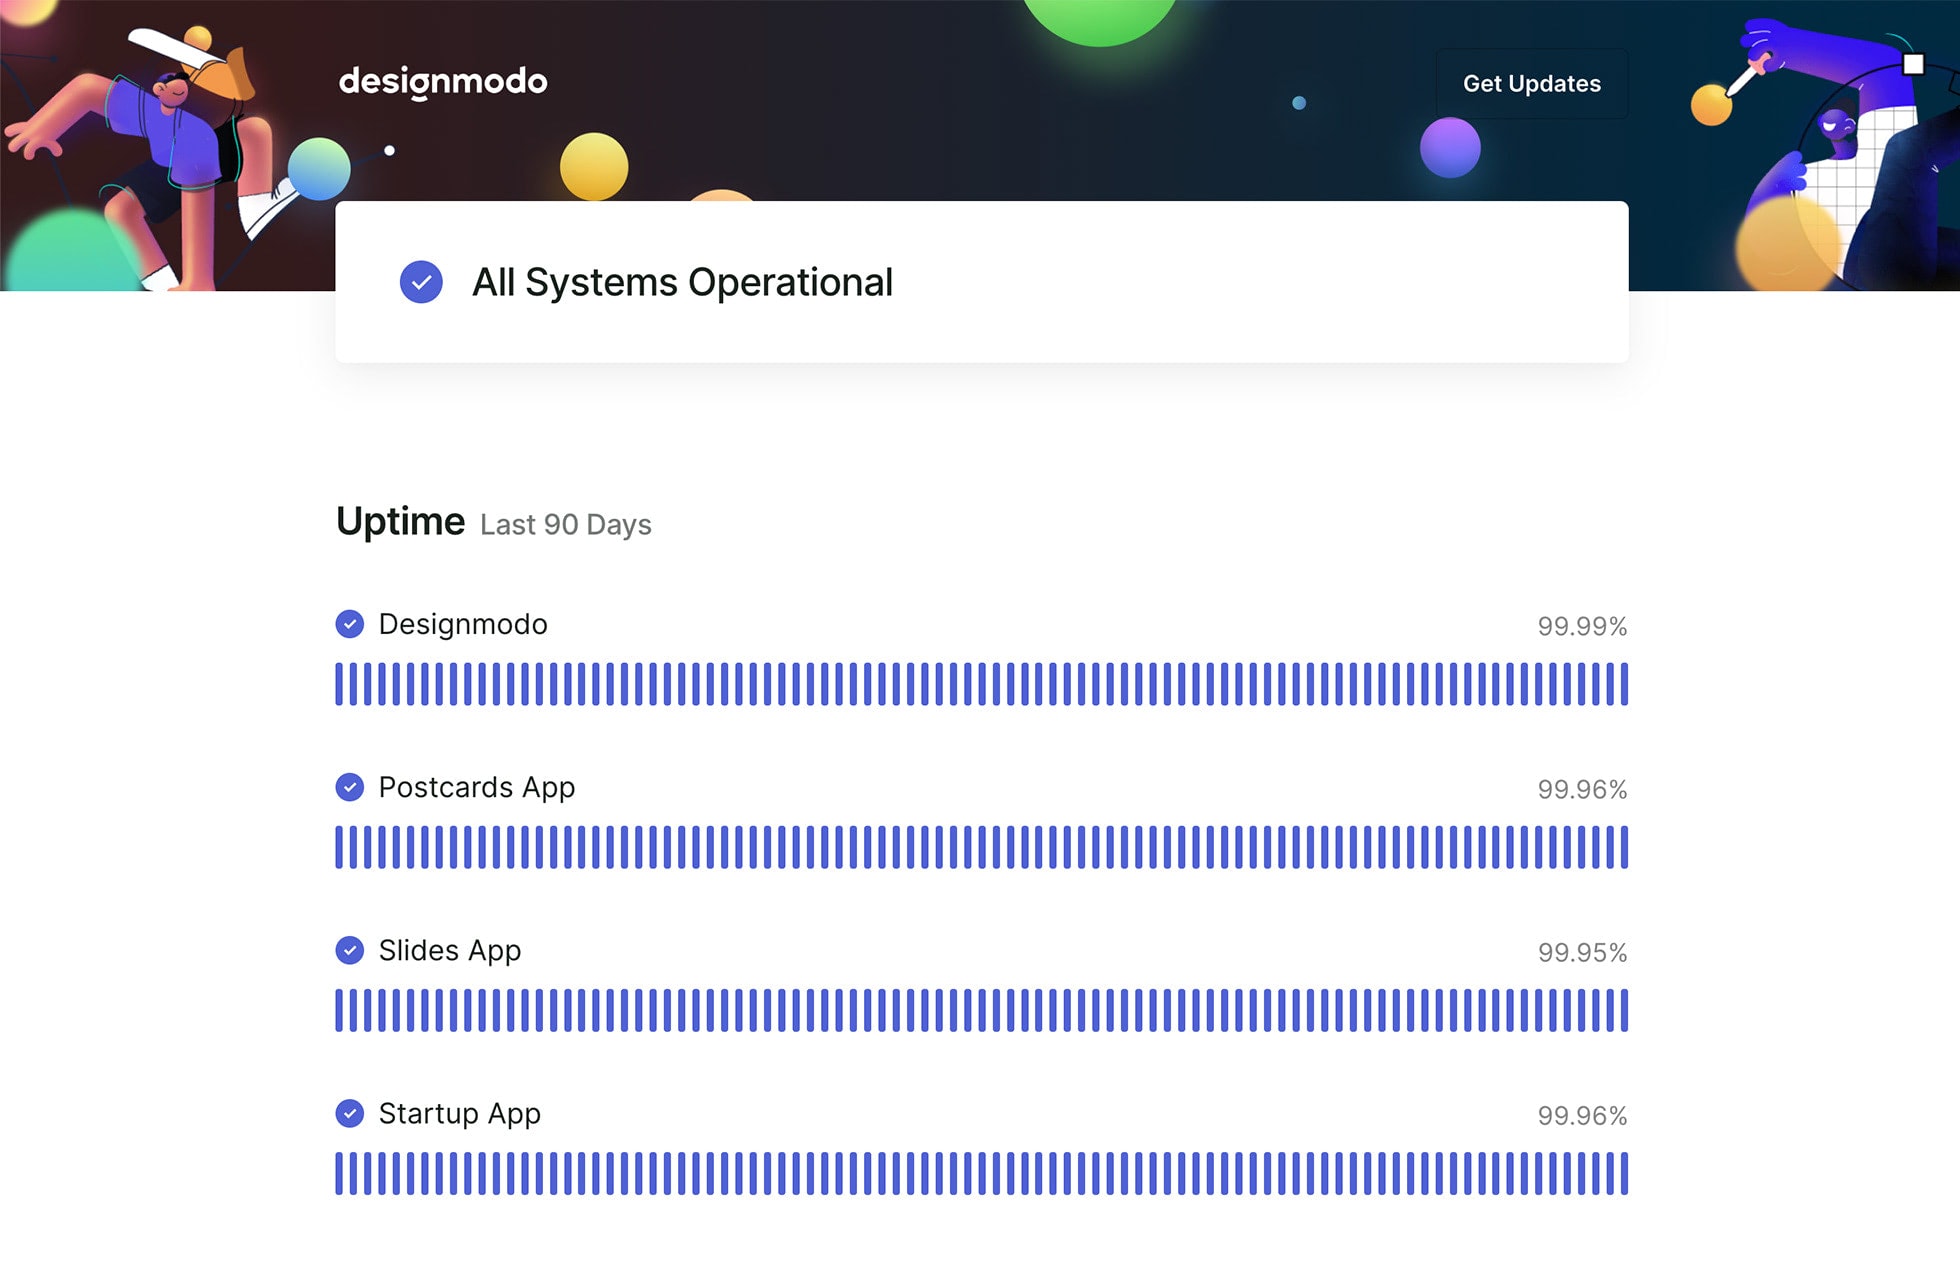
Designmodo Status Page Example
Whether your website is experiencing hosting failure issues, website updates, hacking, or even development errors, you can avoid the conventional email-user response, which is very time-consuming, especially if you have many users to inform. Using a status page simplifies all of these, including chat and email support costs, as all information is presented within the page and real-time incident updates.
With Postcards Email Builder you can create and edit email templates online without any coding skills! Includes more than 100 components to help you create custom emails templates faster than ever before.
Free Email BuilderFree Email TemplatesBenefits of Maintaining Status Pages
There is always the possibility of service outages in any business. When incidents happen, business owners must ensure that the impact on their users is as small as possible. Communication is the most effective way to accomplish this through creating status pages. Status pages can highlight your dependability and effectiveness by displaying your incident management tools and uptime metrics.
Whether you want to communicate to your users or wish to inform your team about your real-time website problems actively, your website status page can serve as an assurance that specific incident reports are being addressed.
Below are some of the explicit benefits of using a status page examples for your online business:
- Provides and monitors transparent and real-time information on your website or service status.
- Test your website and server performance from different locations across the world.
- Displays historic uptime/downtime metrics to demonstrate website or platform efficiency.
- Minimize customer impact whenever there are incidents.
- Easily schedule planned maintenance and service status updates manually.
- Provides better problem-solving and preventive maintenance.
- Send automated alerts when a problem with your website occurs.
- Avoid high volume of chat or email support about each incident or website status issue.
- Build trust and credibility with customers.
While there are various tools, platforms, and services available online to help you get started with your status page, Pulsetic offers more than just a status page as it provides lots of excellent pre-built, in-depth insight and customizable features to better control your incident management process in a very efficient and time-saving manner.
Pulsetic: All-in-one monitoring and website status page platform
Pulsetic is an all-in-one monitoring and website status page service platform that allows users to monitor and manage incident reports by providing downtime alerts via phone call, SMS, email, or Slack when a service outage occurs. It comes with four pricing plans which can be subscribed to monthly or annually.
Pulsetic offers reliable monitoring with customizable frequency checks from different data centers worldwide to ensure no false-positive reports come out as it shows you in which part of the world your website is down or slow. Along with its simple and intuitive interfaces, it also sends users an alert notification via email, SMS, and Slack, where users can access incident history, uptime percentage, metrics, and real-time website status.
G2 reviewers have awarded Pulsetic an impressive 4.8-star rating, highlighting its standout performance in comparison to its competitors.
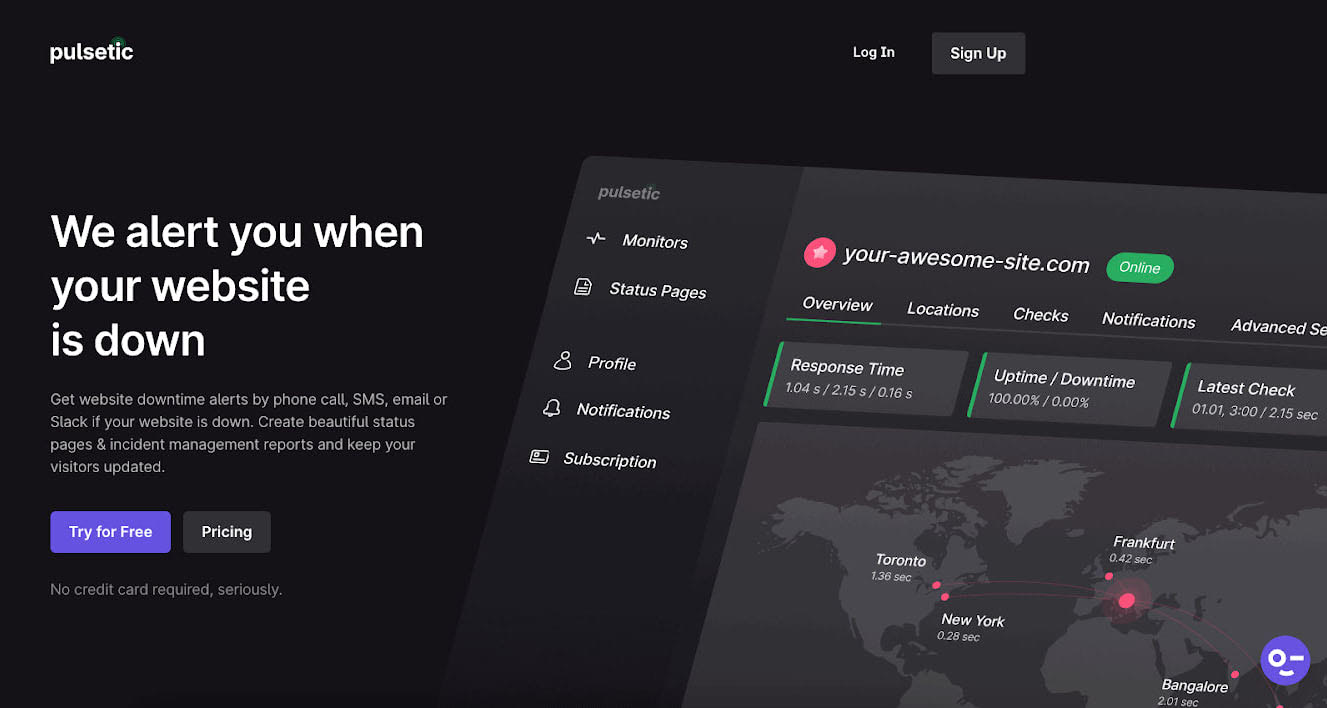
With Pulsetic you’ll be instantly notified the moment your website, API, or server becomes unavailable. Monitor uptime from multiple global locations and respond to incidents before your users are affected.
Create beautiful status pages in minutes to keep customers informed during outages and build trust with transparent communication.
Start Monitoring for FreeCreating a Pulsetic Account
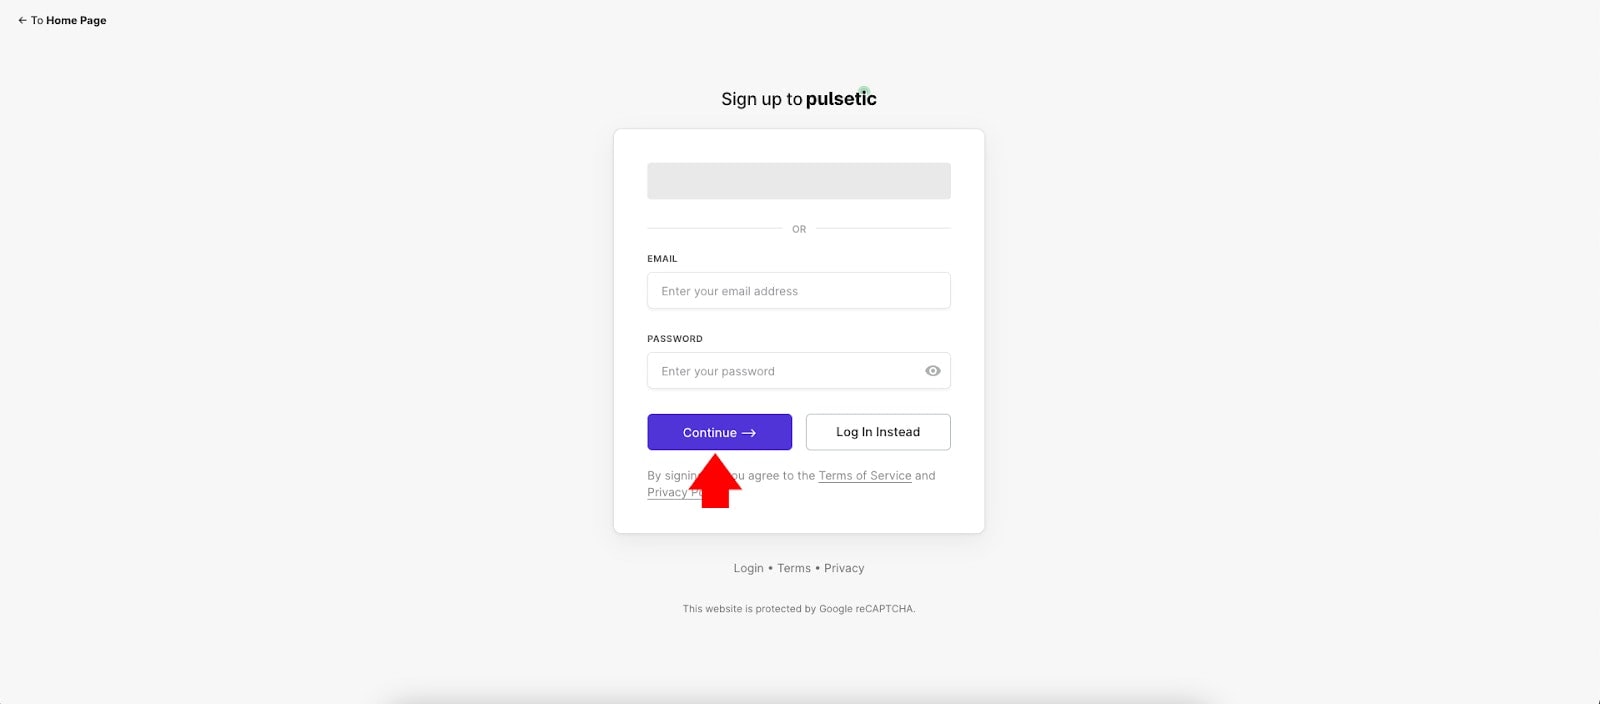
To begin creating our status page for the demo WordPress website, we must first create a free account. Go to https://pulsetic.com/ and click the Signup button in the upper right corner of the homepage to be taken to the signup page.
Fill out the signup form with your information. Please keep in mind that you must verify your email address when you sign up.
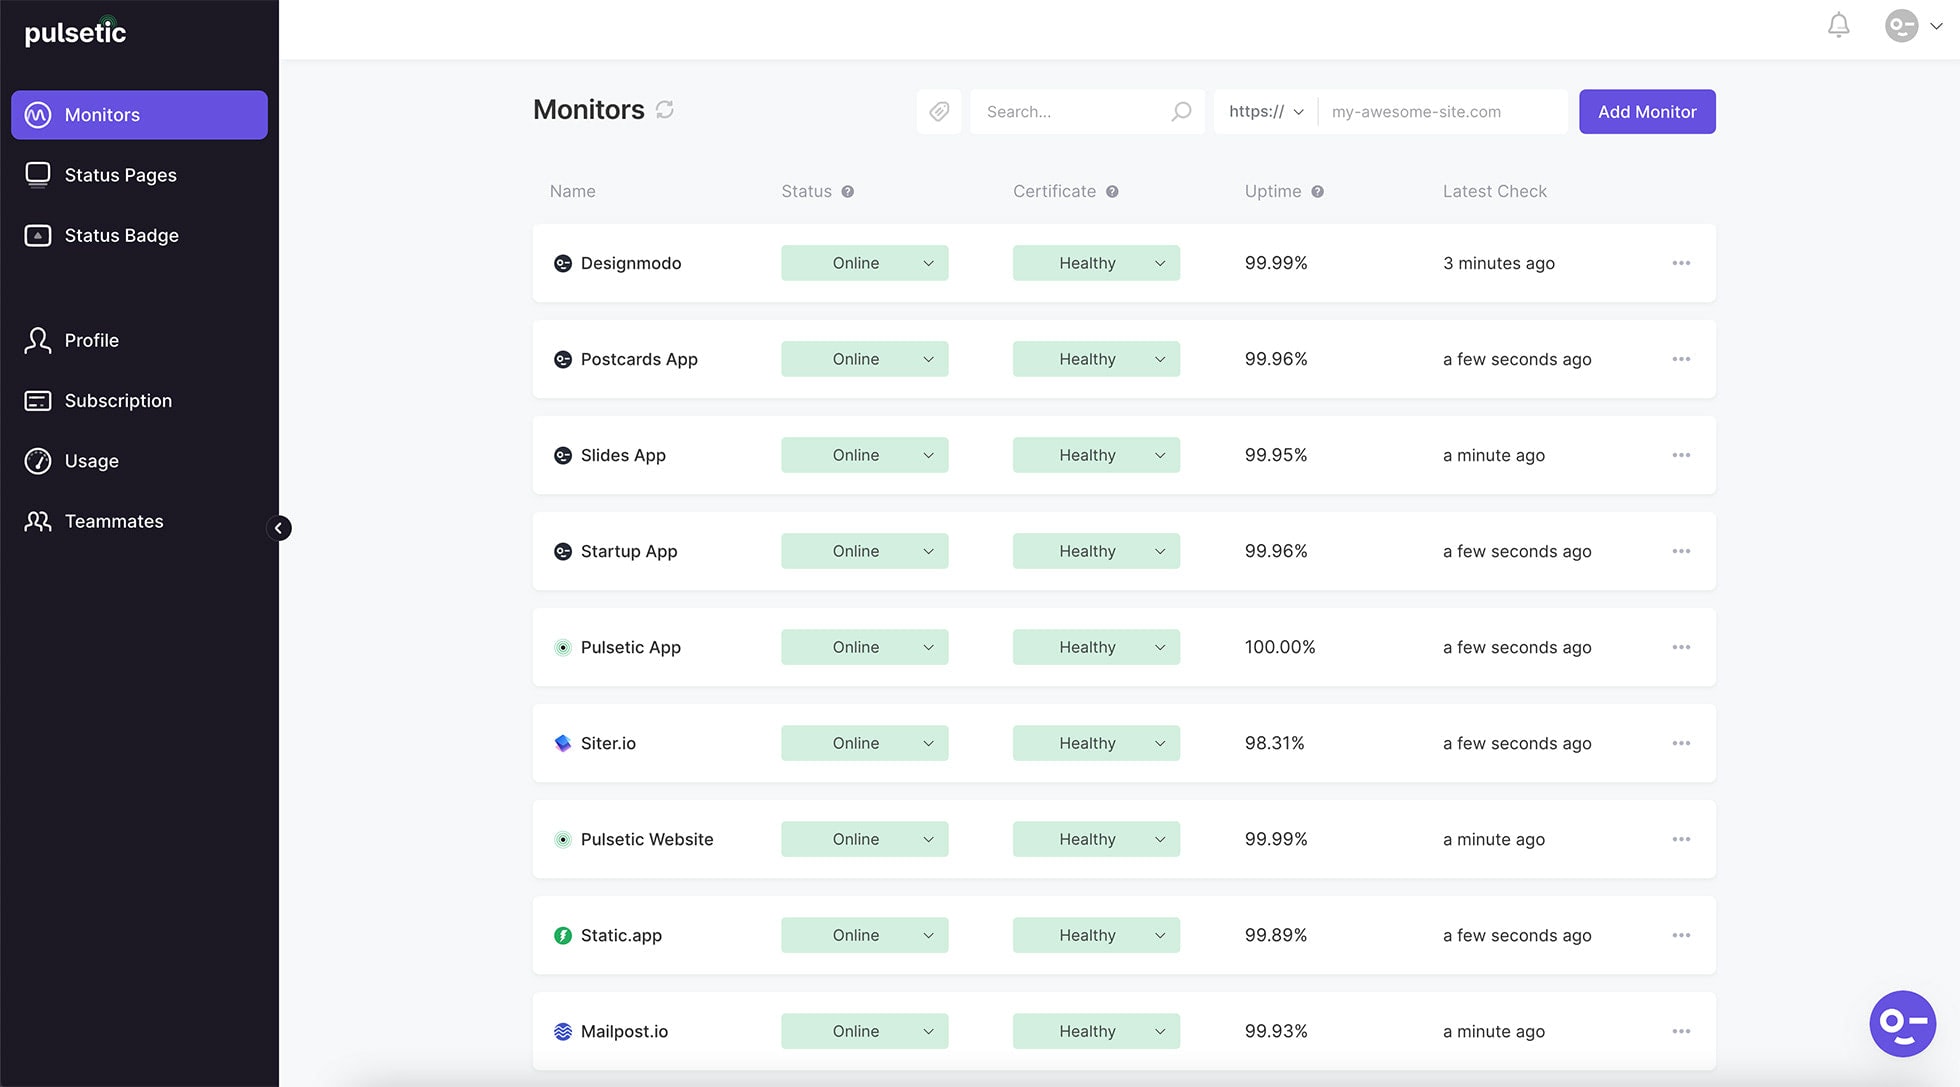
After your email gets verified and add some website for monitoring, you will see a dashboard similar to the image below.
Creating a Website Status Page
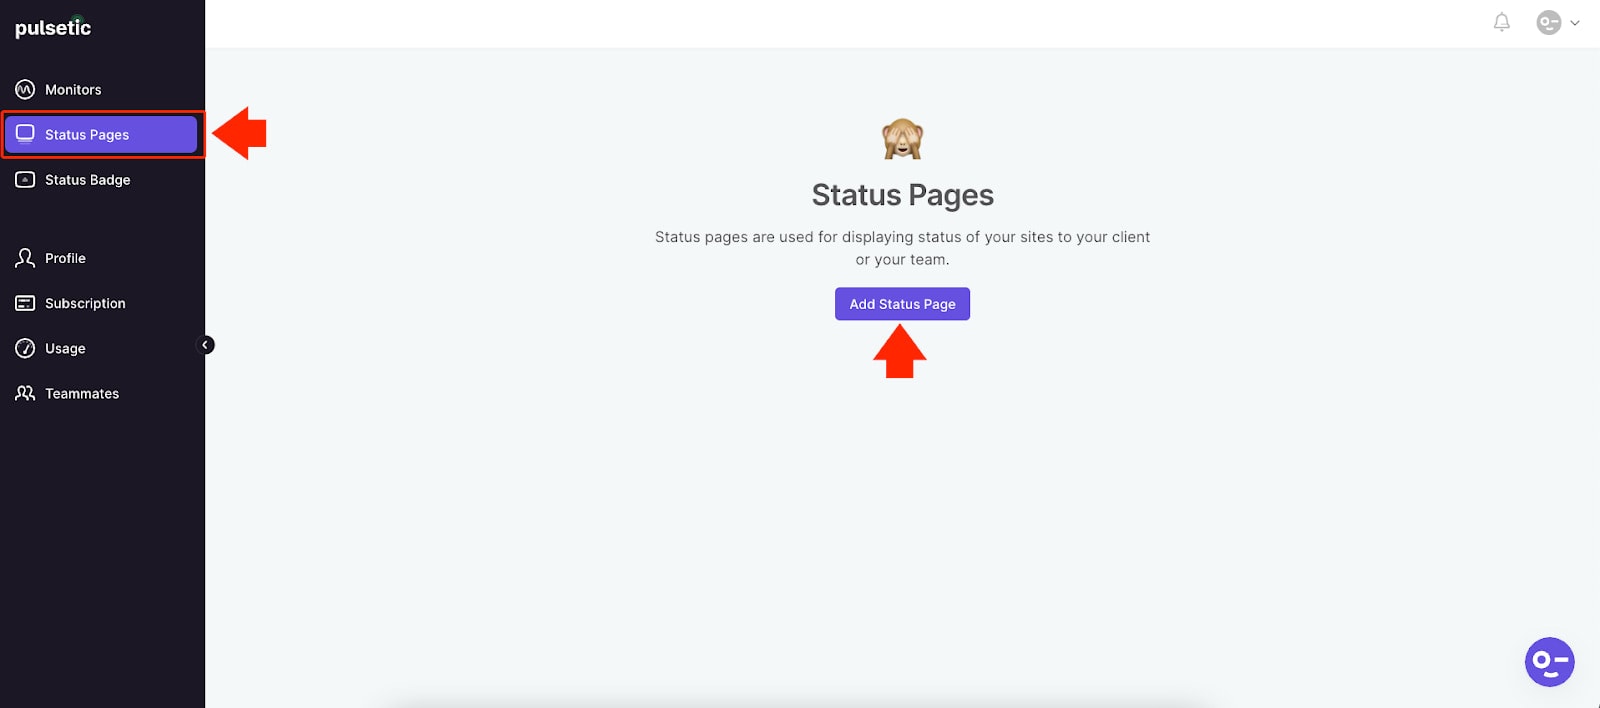
To create a Status Page for your website, click on the Status Page link on the left menu sidebar and then click on the Add Status Page button in the middle of the Status Page screen, as seen below.
Next, you need to fill up the status page form that contains the following information:
- Title – the tile of the status page.
- Custom Domain Name – the domain name of your website.
- Custom Meta Title – the custom meta title for your status page.
- reCAPTCHA Site Key and reCAPTCHA Secret Key – the reCAPTCHA Site Key and reCAPTCHA Secret Key for your status page. If you are unsure how to generate this, you can follow this guide.
- Uptime threshold – If a monitor uptime goes below this value, it is highlighted yellow.
- Monitor to display on Status Page – the website you monitor on your Status Page.
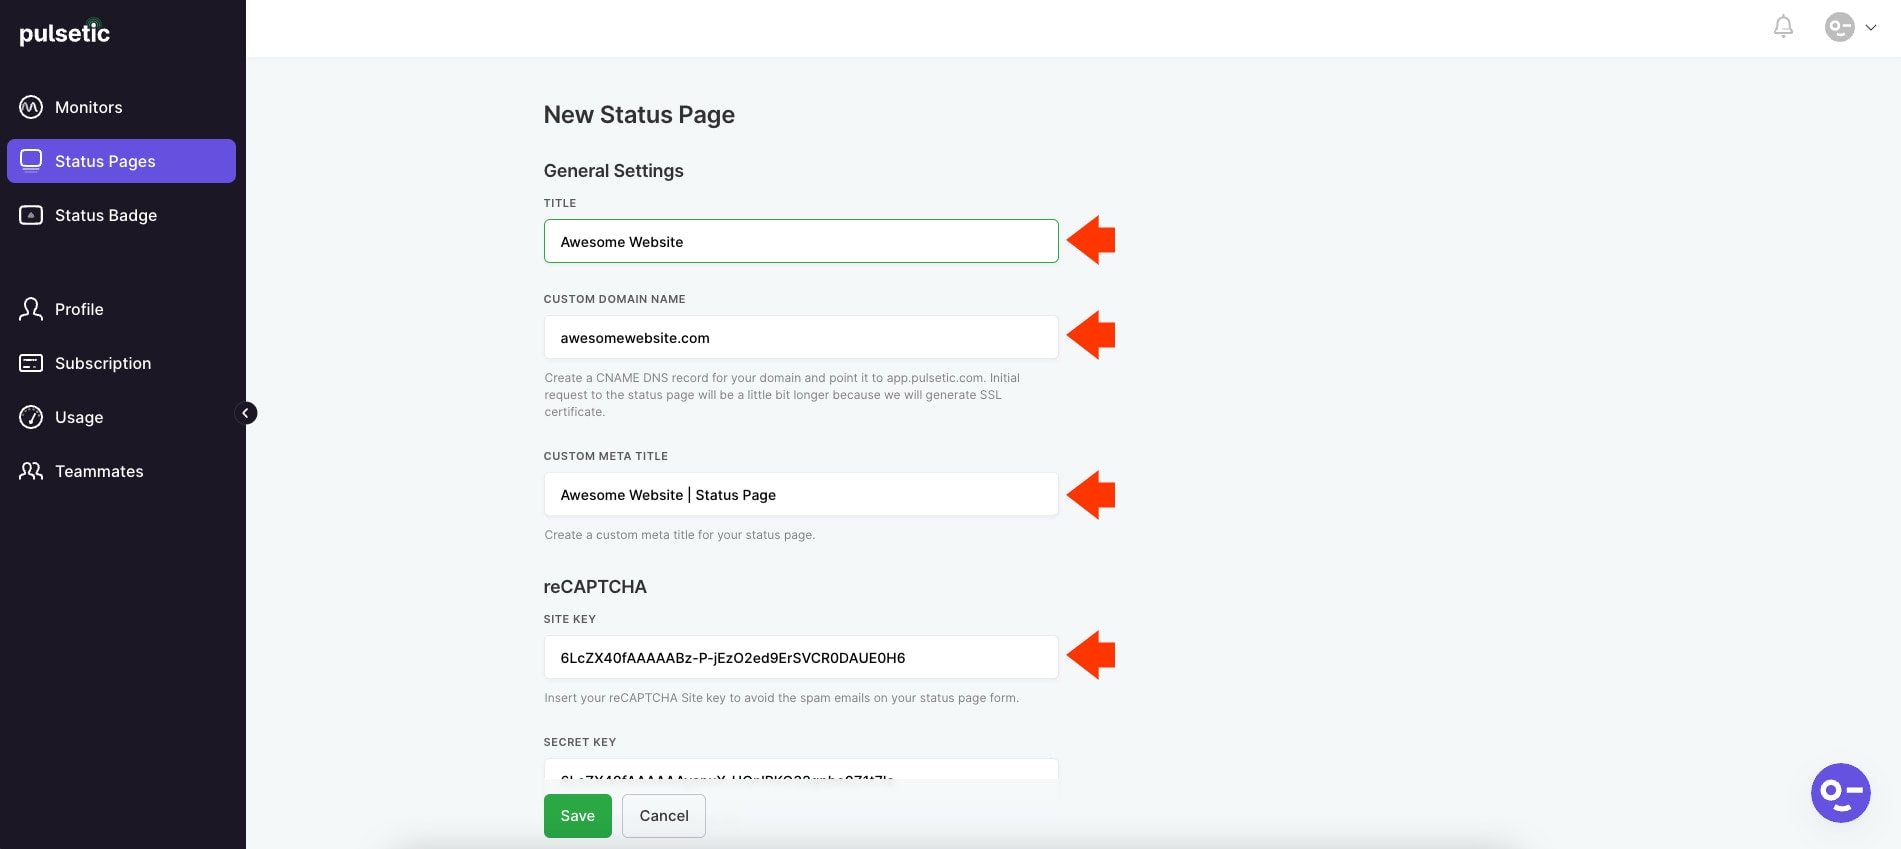
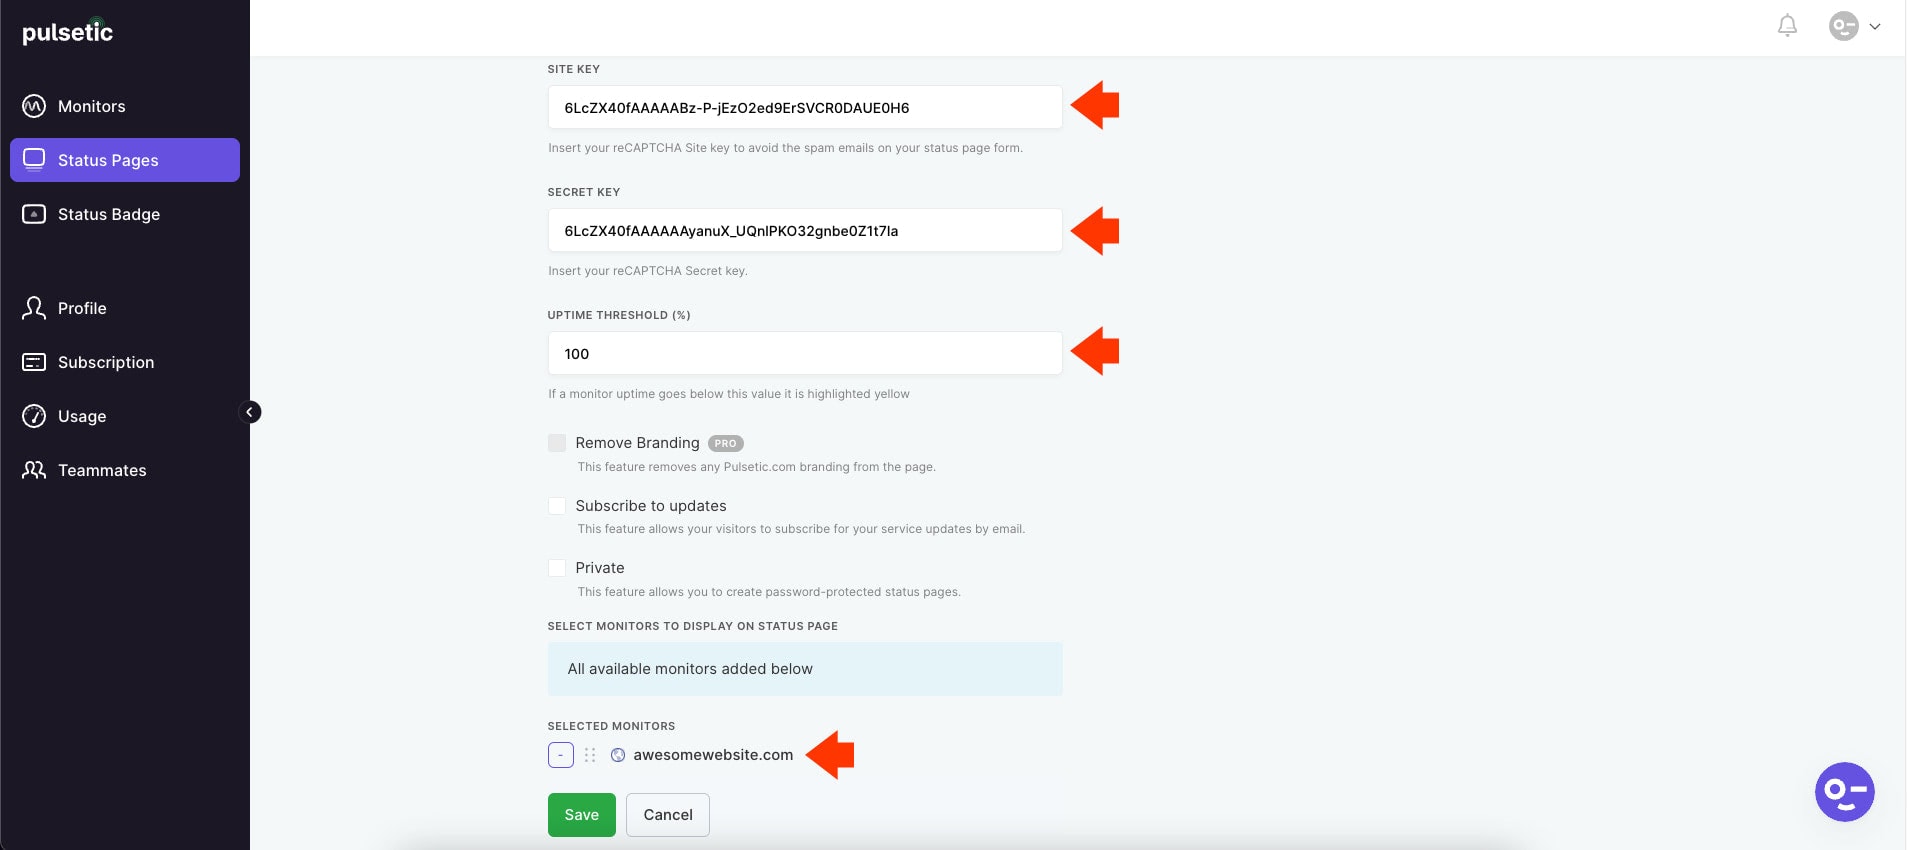
Lastly, click on the “Save” button to create your status page.
Note: If you wish to make your status page private, tick or check on the Private checkbox to enable the remote status page feature.
Creating a CNAME record for Pulsetic Status Page
In order to connect your custom domain to the newly created Status page on your Pulsetic account, you need to add a CNAME record for app.pulsetic.com inside your domain provider. A CNAME or Canonical name record is an alias for another domain. Instead of an A record, it is frequently used to point different hostnames to identical locations.
There are different ways to create a CNAME record for your domain. You can create this on your domain provider’s dashboard or via your hosting provider.
We cannot discuss all of these ways in this tutorial as steps might vary depending on your domain or hosting provider, but keep in mind the following details when adding the CNAME record for your newly created Status page on your Pulsetic account :
- Type field- CNAME Record
- Host Name field – @ or domain name
- Value field – pulsetic.com
- TTL field – Automatic, 30 mins, or 1 hour
Note: DNS configuration can take up to 48 hours to propagate across the internet for changes to resource records. Just make sure that there are no conflicting records configured for the same host and remove them if there are any.
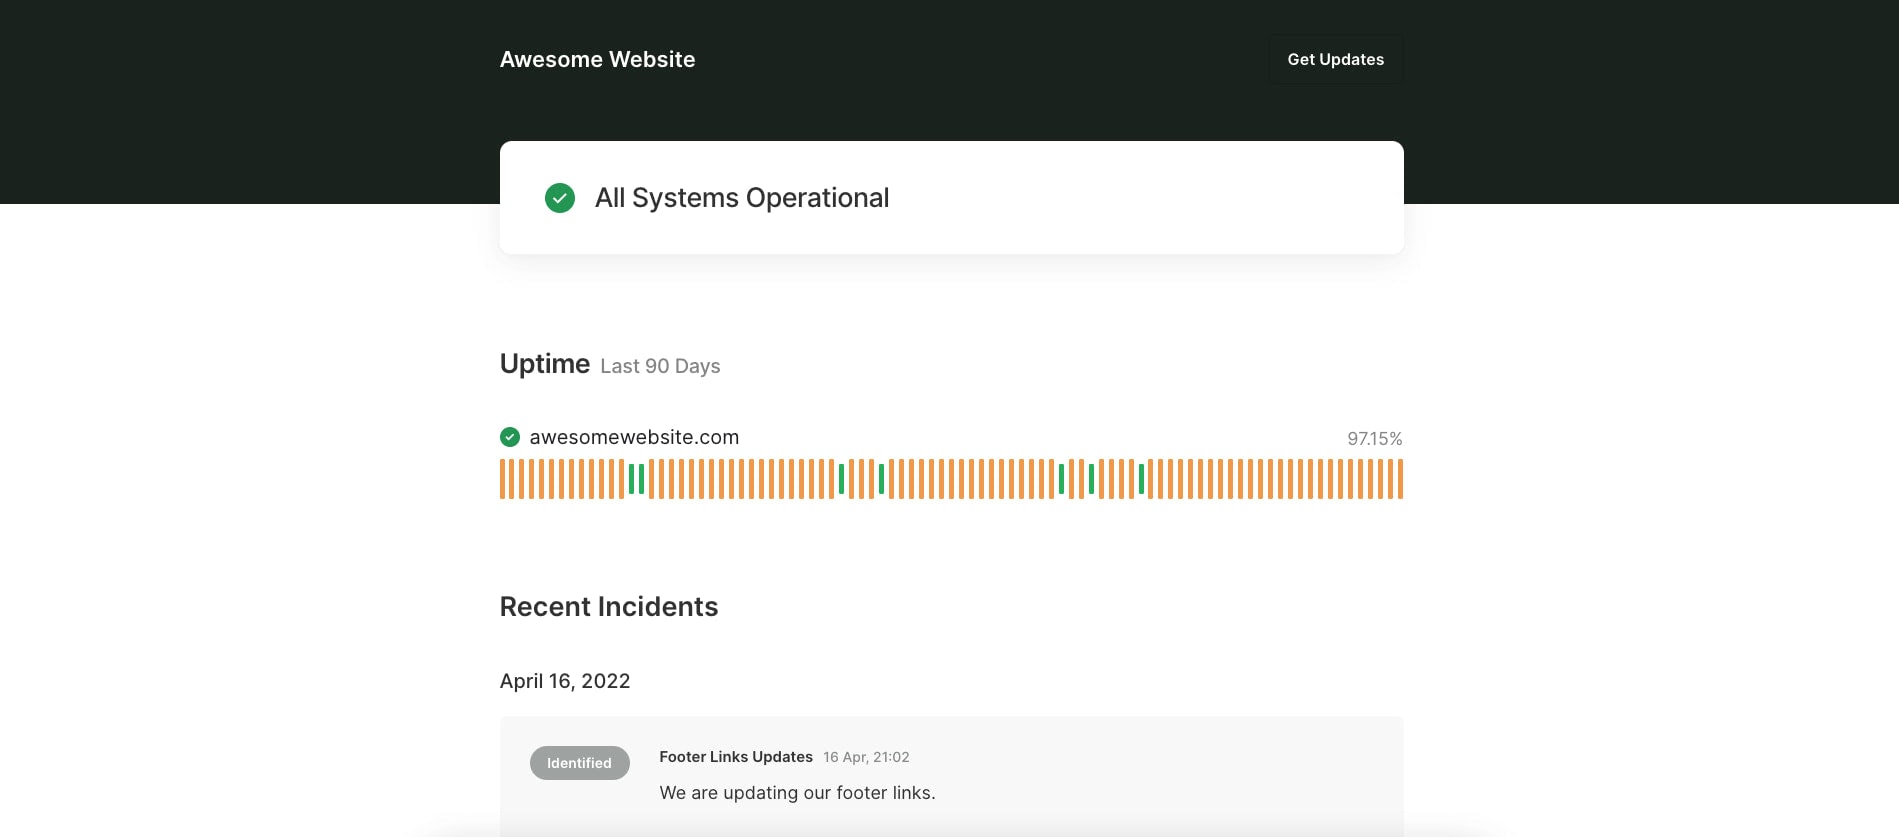
If we click on the Status Page Public link, you will be taken to the status page of your website, which contains information about all system operations, including incident reports.
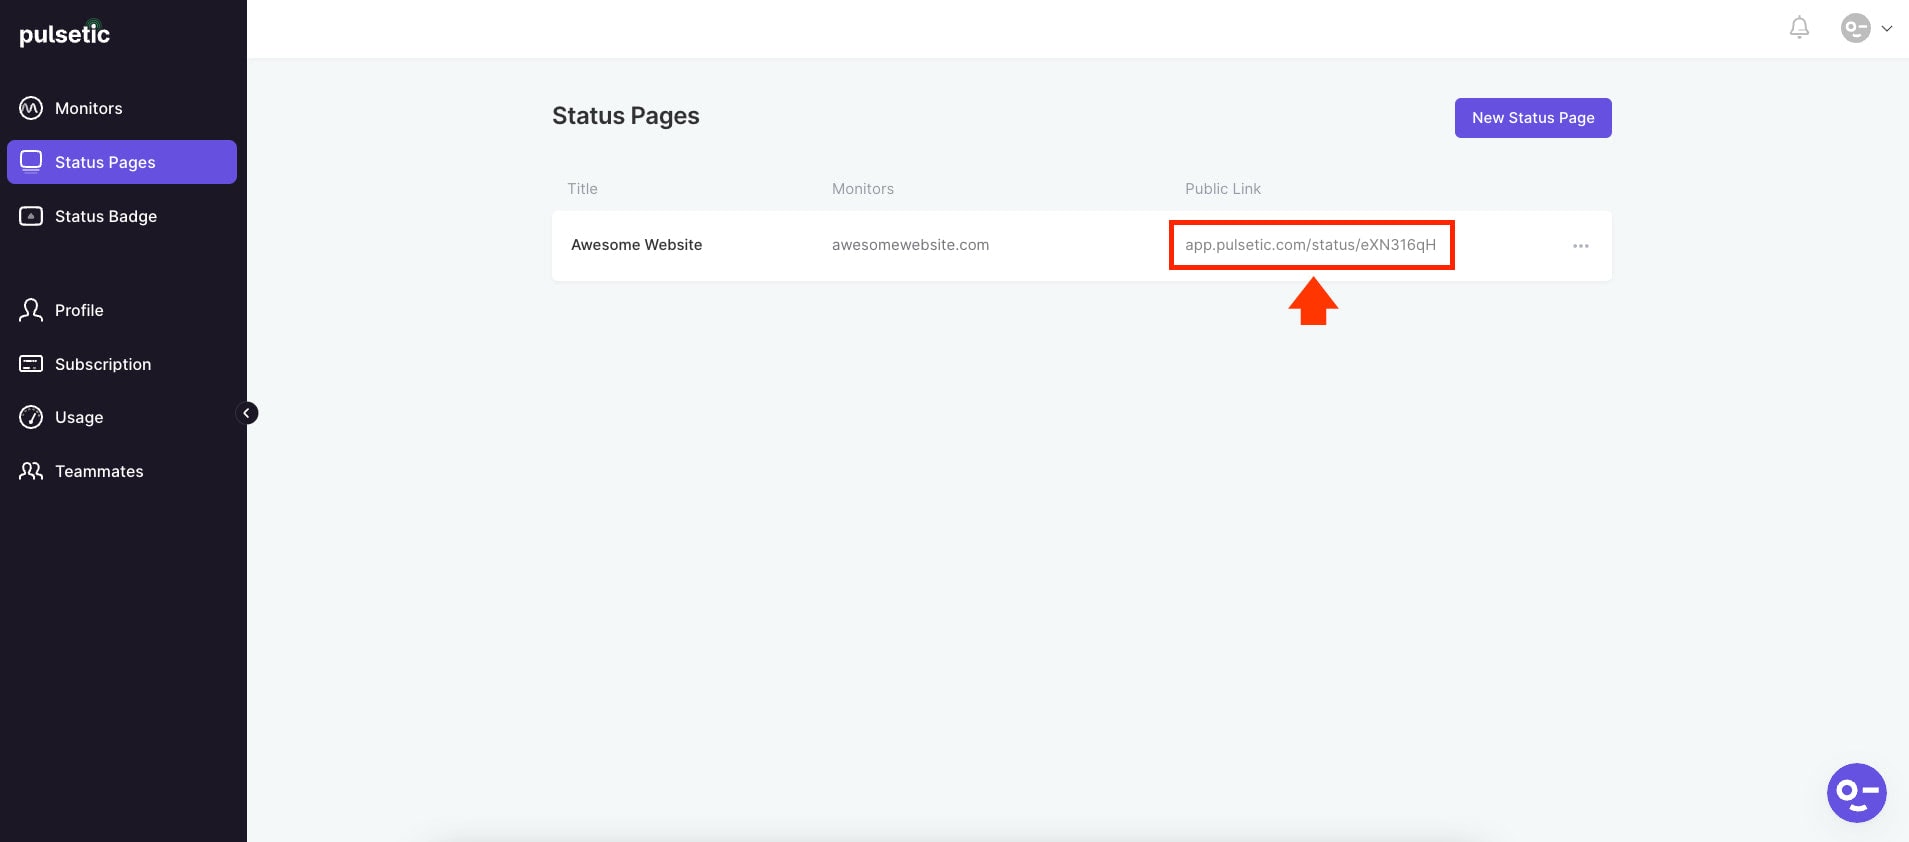
Congratulations! You just created your Status Page!
Managing Status Pages Incident Report
To manage your status page incident reports, click on the Incidents link on the Status Pages Dashboard, as seen below.
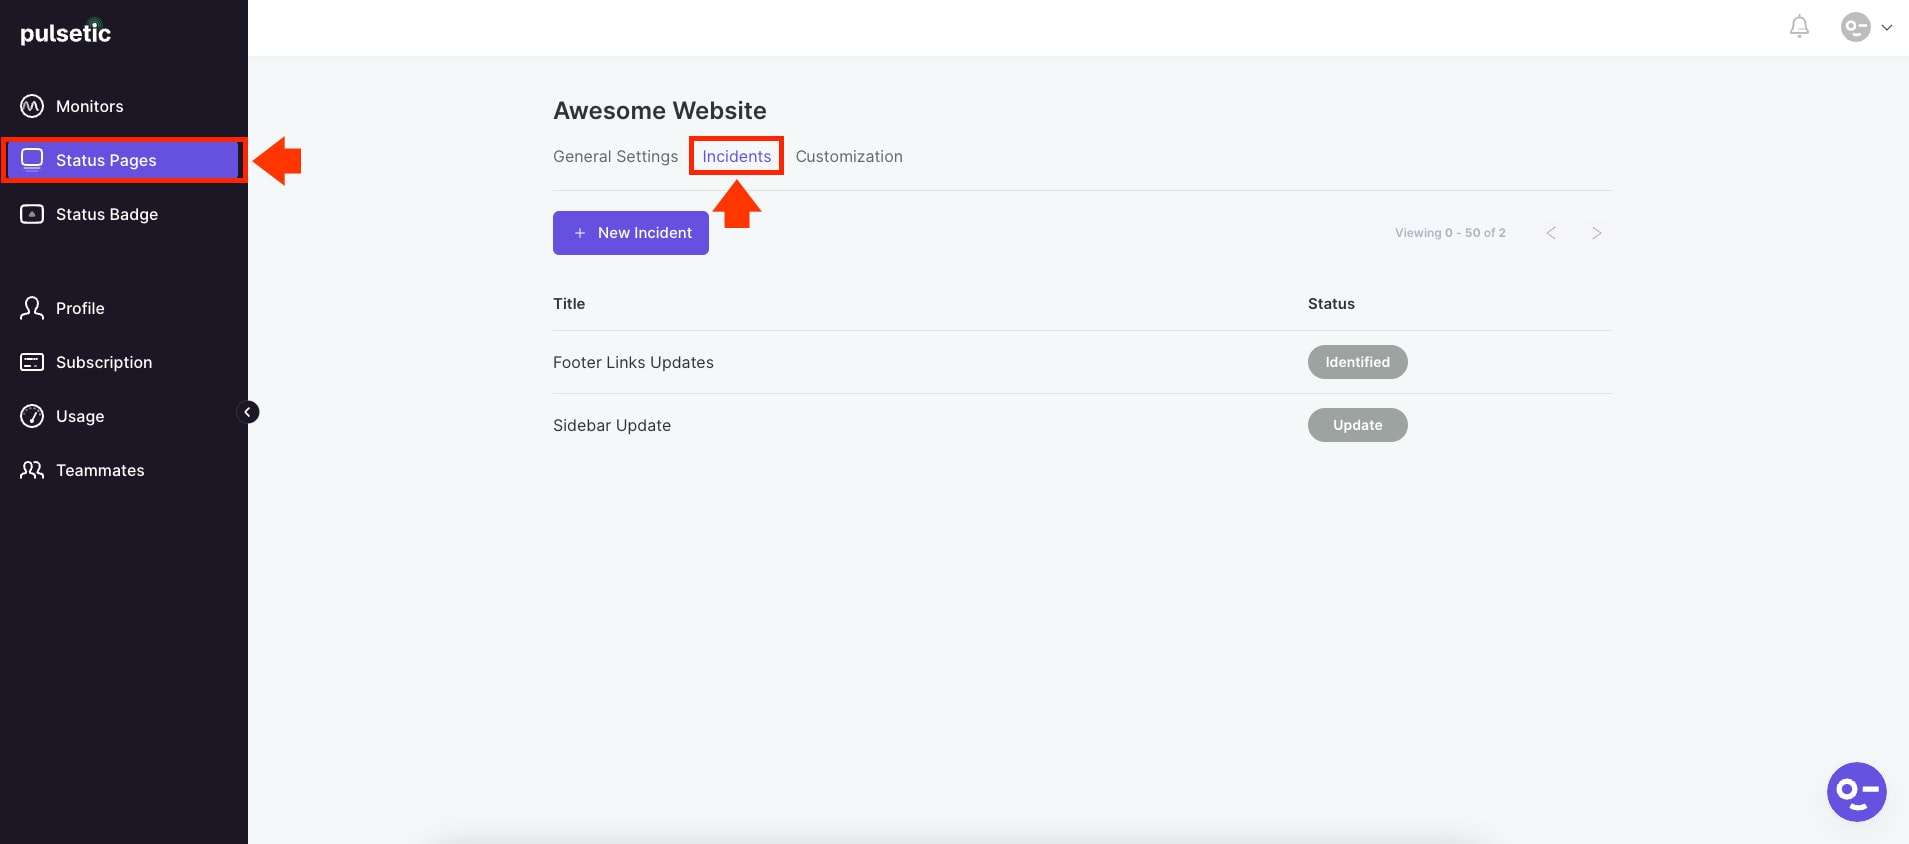
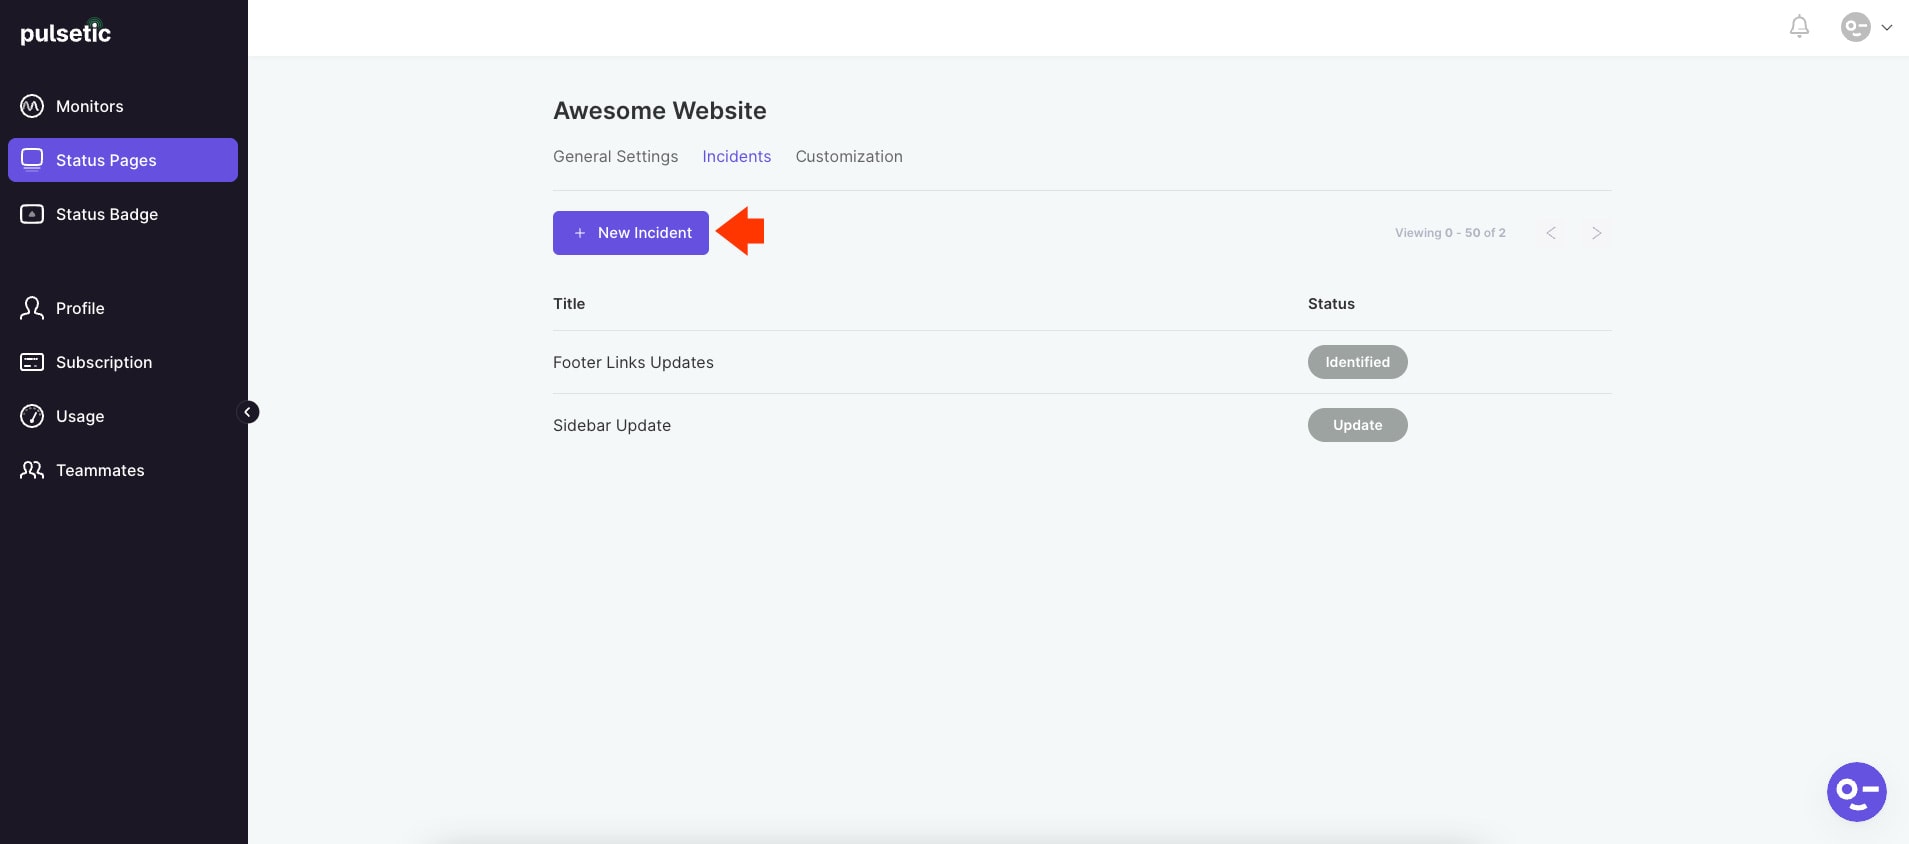
On this page, you create a new incident by clicking on the + New Incident button located near the Status Pages Dashboard menu links.
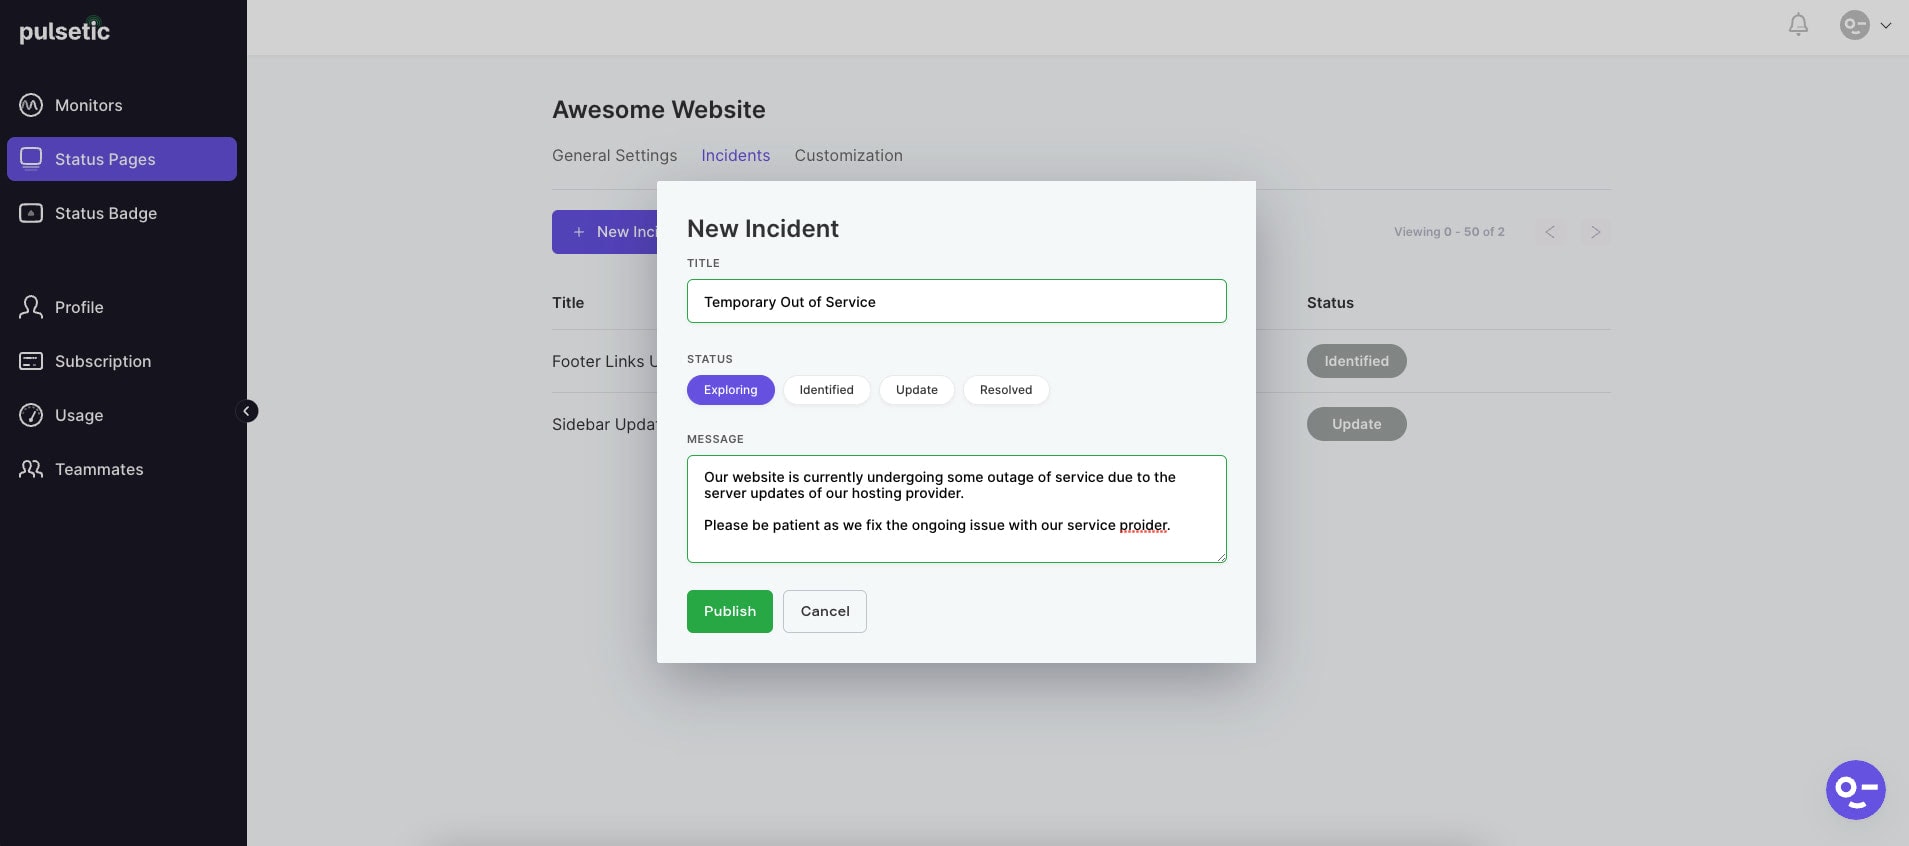
You can tag your incident report as Exploring, Identified, Update, or Resolved, depending on the current status of the incident or website status. Remember that every instance of incidents created on this page is reflected on your website’s status page, as seen in the image below.

Customizing Status Page Properties
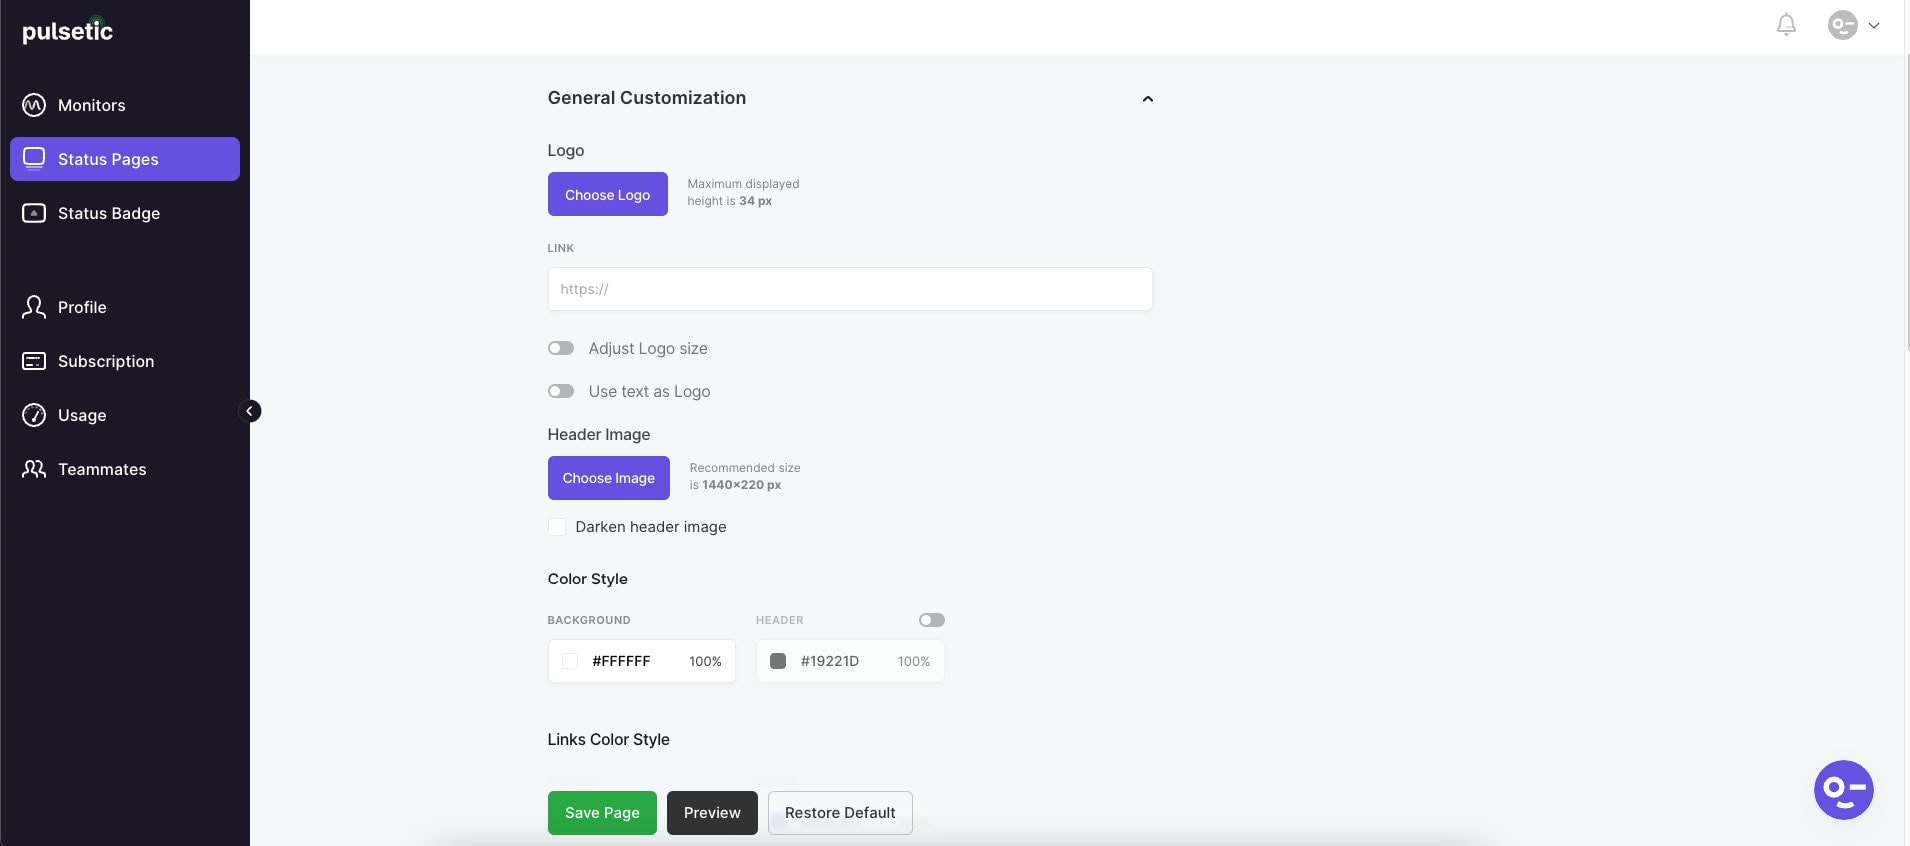
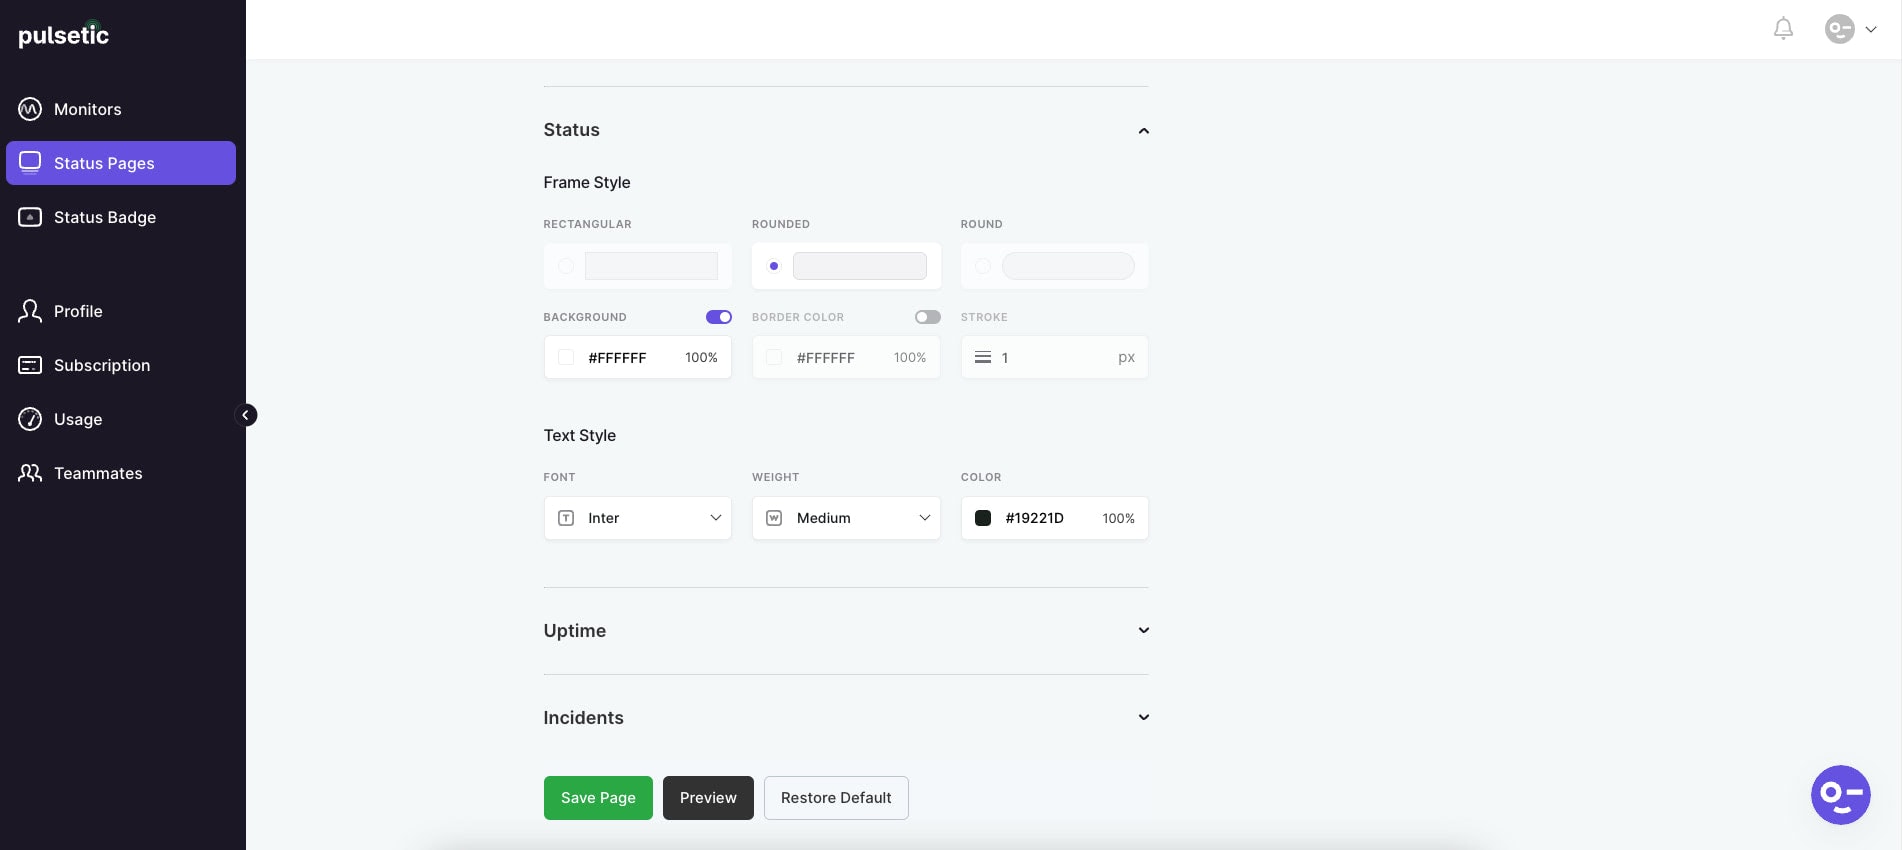
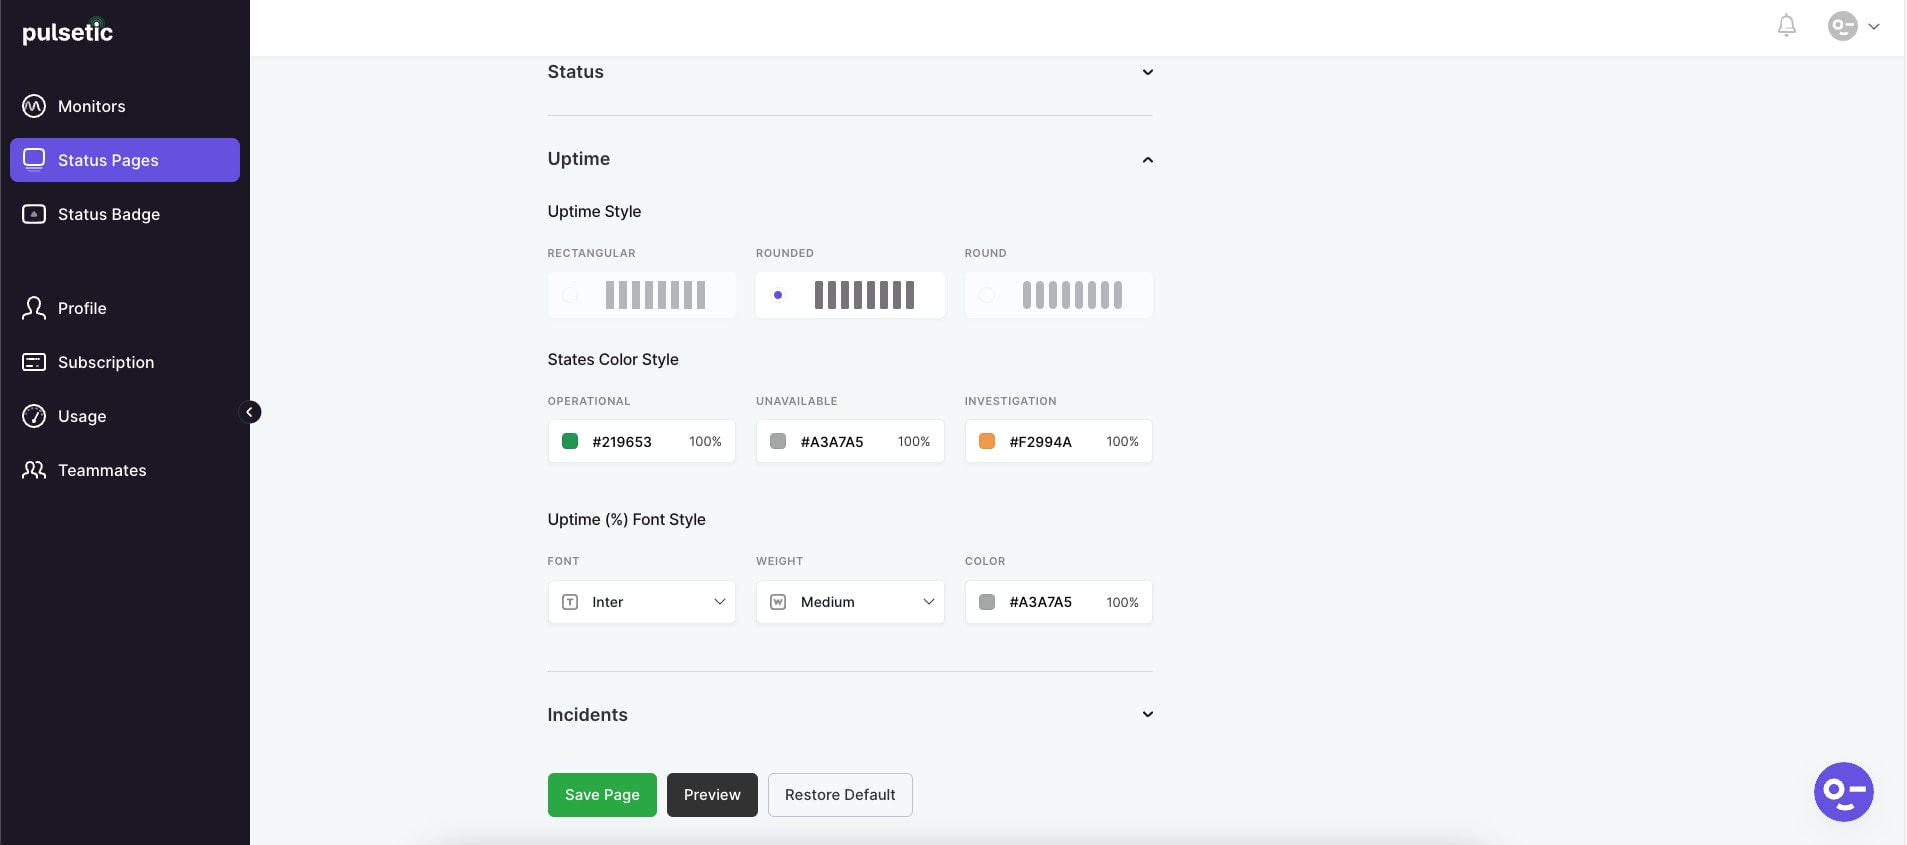
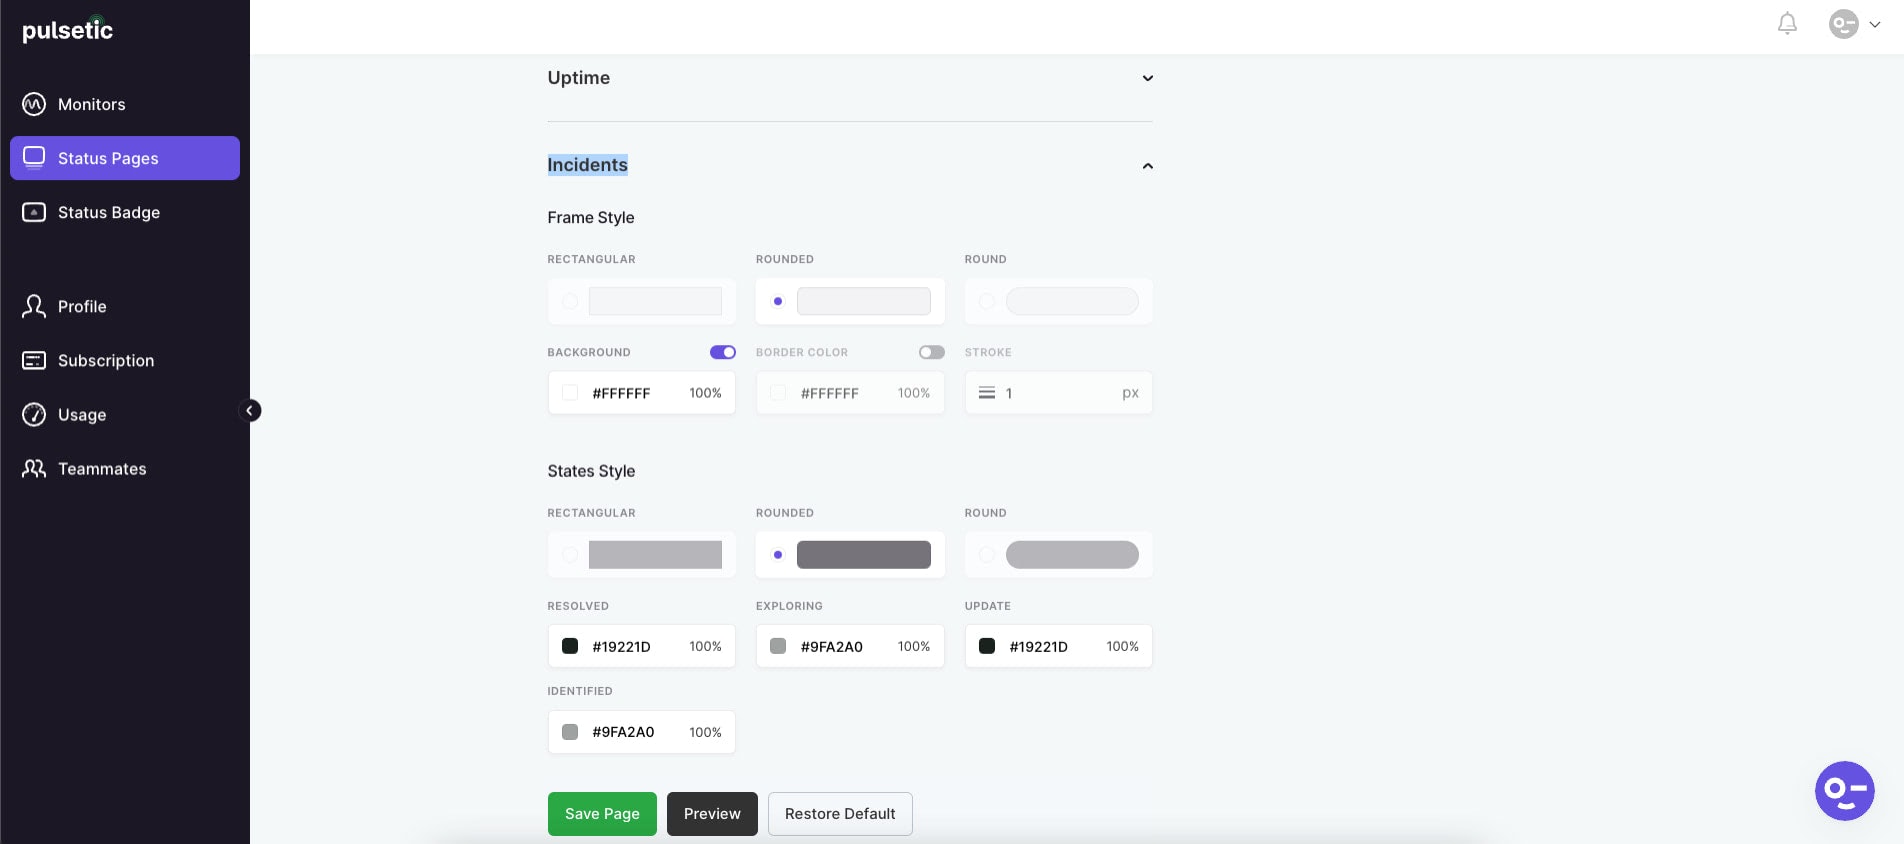
If you wish to customize the look and feel of your status page, you can do so by clicking on the Customization link on the Status Pages Dashboard, as seen in the image below.
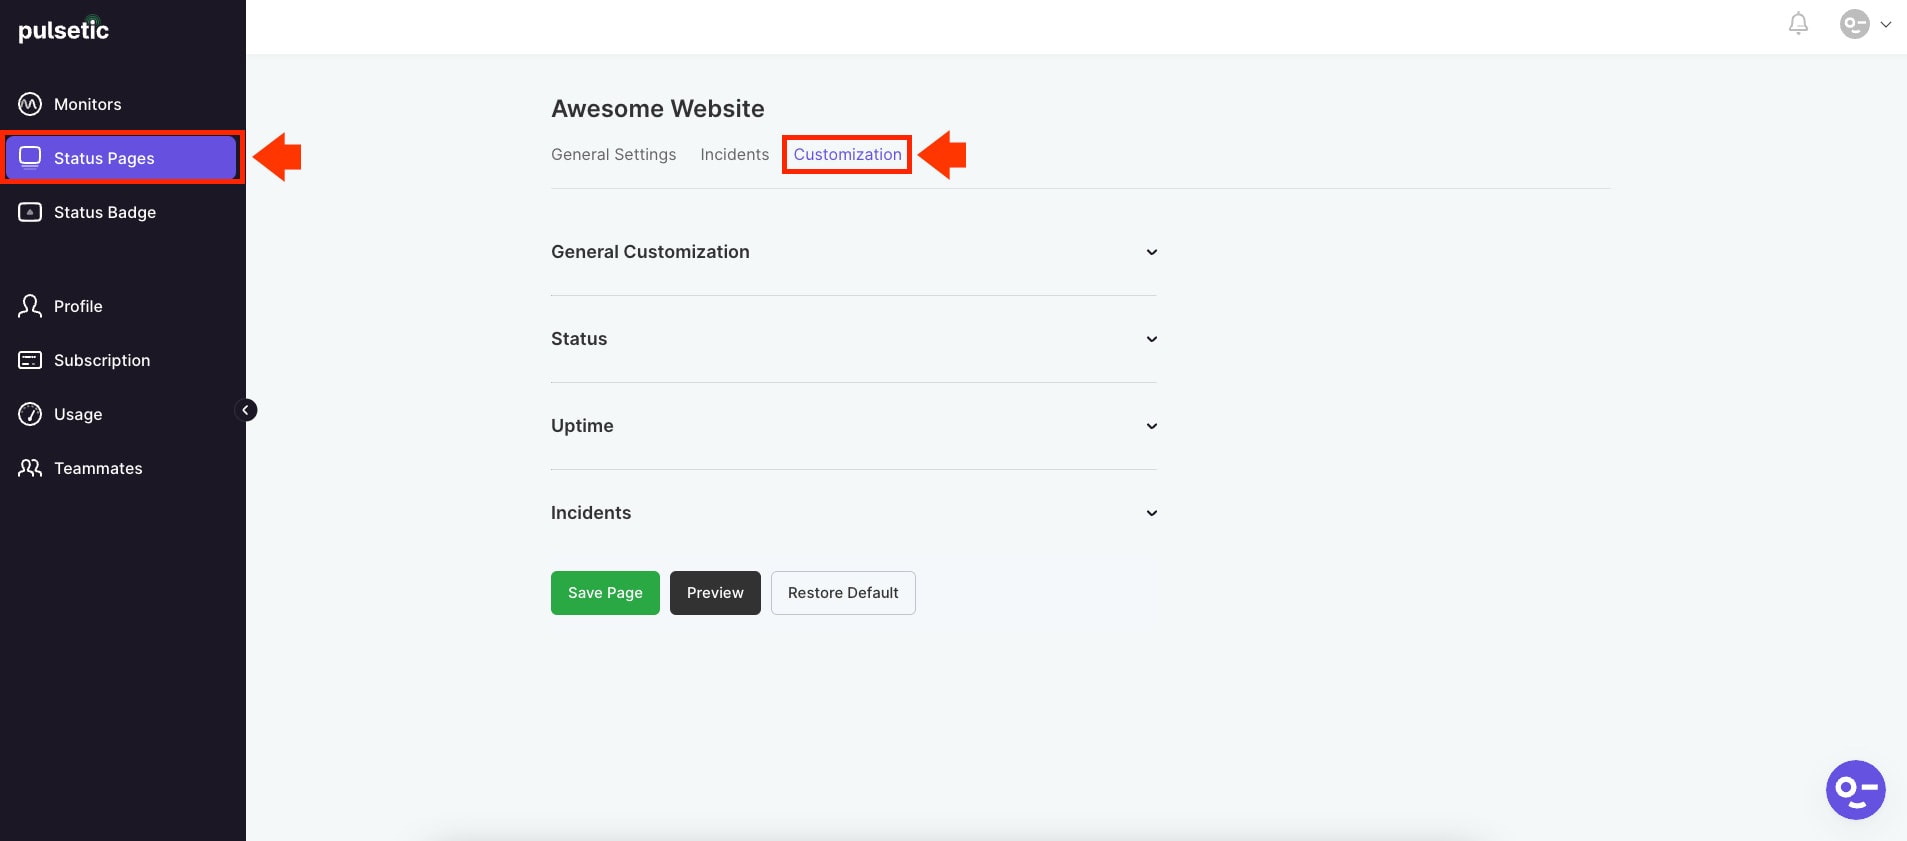
On this page, you can customize the following properties:
- General Customization – in this tab, you can customize the logo, header image, color style, links color style, text style, get update button, and status style icon. You can also add your custom CSS code inside this tab.
- Status – in this tab, you can customize the look and feel of the status bar from frame style to text style.
- Uptime – in this tab, you can customize the style of the uptime/downtime bar from uptime style to uptime percentage style.
- Incidents – in this tab, you can customize how the incident reports will look, such as each incident report’s frame style and state style.
Don’t forget to click on the Save Page button to save your changes. If you wish to preview your changes, click on the Preview button next to the Save Page button. Additionally, if you want to reset the changes you’ve made from the time you created your status page, click on the Restore Default button next to the Preview button.
Wrapping Up
Status pages are the modern way to keep your users or website visitors up-to-date on your website status and services. It effortlessly helps business owners communicate service issues, planned maintenance, and real-time website status through its vast website information display.
Pulsetic is one of the modern status page platforms that provide uptime/downtime overview, performance metrics, and incident management reports. Whether you want to let your website visitors or users know that your team is actively engaged in solving your website or platform problems or you simply want to communicate with them about your scheduled maintenance proactively, all of these can be addressed through the power of status pages.