Effective Web Typography: Rules, Techniques and Responsive Design
Responsive Web Design isn’t just about columns, grids, images and icons. All of this will not make sense without text for content. As Bill Gates once said “Content is King.”
When it comes to content, we need to talk about web typography. Looking at modern web design trends, having responsive typography is a big factor every web designer and web developer shouldn’t miss.
Here, we will discuss creating responsive web typography and factors you need to know about it.
Typography Basics
Good typography is all about selecting the right type for web or printed media. From font type, color of the text to the length and font-size on different viewports, good typography ensures that the final letter forms generate the highest quality end result.
Before we dive in to the process of creating successful responsive web typography, here are a few terms that you need to understand.
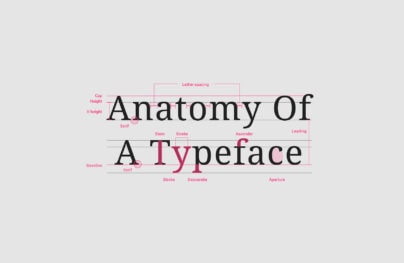
Typeface
With Postcards Email Builder you can create and edit email templates online without any coding skills! Includes more than 100 components to help you create custom emails templates faster than ever before.
Free Email BuilderFree Email TemplatesAlso known as font family. This is a collection of design of characters with a complete set of letters, numbers, symbols, special characters and weight.
Font

This is the actual computer file that contains information about the lettering used, such as typeface, weight, width, style and so on.
Baseline
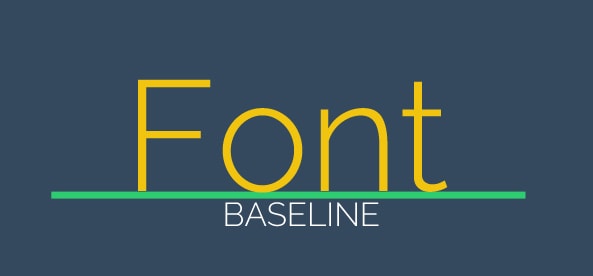
This is the line where the letters rest and where descenders extend.
Cap Height

This is the height of the capital letters above the baseline.
X-height

With Startup App and Slides App you can build unlimited websites using the online website editor which includes ready-made designed and coded elements, templates and themes.
Try Startup App Try Slides AppOther ProductsAlso known as corpus size. This to the distance between the baseline and midline (half the distance from the baseline to cap height)
Descenders
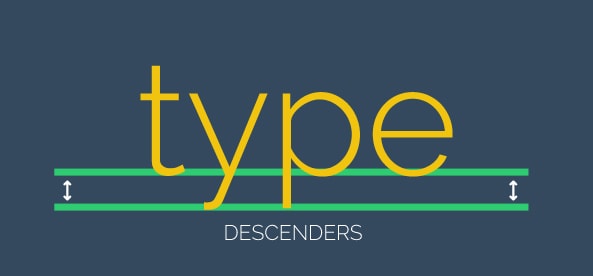
This is the part of a letter that extends below the baseline.
Tracking
Also known as letter spacing. This is the consistent increase or decrease of space between letters uniformly.
Kerning
The process of adjusting the space between individual characters in glyphs of varying widths.
Leading
Also known as line height in CSS. The distance between the baselines of successive lines or types.
Points to Consider on Web Typography
Words, phrases and sentences have meaning but each character can have emotion. Aside from being responsive, you must also consider presenting better web typography to your audience.
The complete design will not make sense if your audience will not understand or is not attracted to your content. In web typography there are four basic elements:
- Type
- Color
- Texture
- Image
All of these will have a big effect to your typography end-result but the type will magnify the expressiveness of your message.
There are five factors that can help you create presentable web typography.
1. Choose the best typeface that corresponds to your topic
Most sites nowadays are using the same typefaces. Yeah, you guessed it right; I am talking about Arial and Helvetica. However, it would make a lot of sense if you could align typefaces with your message.
For instance, your web pages talks about a children’s book would it be good if you’ll use something like DK Crayon Crumble or Little Miss Priss in your header text?
I am not suggesting you need to do this all of the time but the point is make sure that typography aligns with your target audience and the text is clear and readable.
2. Use web fonts
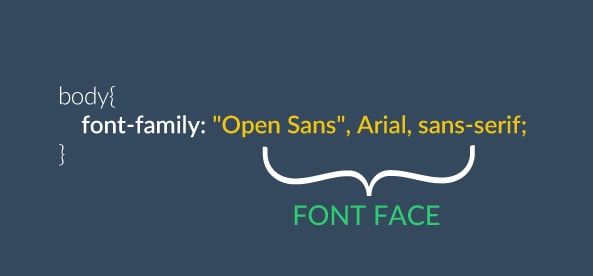
One of the greatest improvements of web design nowadays is the support for Web fonts on all modern browsers via @import command and standard link tag. Check out the demo below.
Using @import tag:
@import url(https://fonts.googleapis.com/css?family=Open+Sans);
Using the standard link tag:
<link href='https://fonts.googleapis.com/css?family=Open+Sans'
rel='stylesheet' type='text/css'>
This means that you can use any font that is available on the hosted web font site such as Google Font and Typekit. Here are the following the advantages of using web fonts:
- It saves money. You don’t need to purchase fonts online.
- It saves time. While you can integrate fonts manually in your folders file, using web fonts can be done with a line of code.
- They are compatible on all new versions of web browsers and are SEO-friendly.
3. Use proper color combinations
One of the major issues web designers commit nowadays is throwing unnecessary color combinations to their sites. Remember good web design can be identified by how well the site functions and how good the design is.
Speaking of design, you don’t just design your web pages randomly and throw a lot of colors that doesn’t mix especially with your text and background of your site. This will make your text unreadable and will bring pain to your visitor’s eyes.
But how do you use proper color combinations? While there is no general rule, there are some guidelines.
- Use proper contrast or distinction colors between text and the background as suggested by W3C. Colors that have the same value but different hue may be easily read with a person with a good vision but not on color blind person. It is important to check the contrast before applying it to your design. You can use this great tool to simulate contrast.
- Use flat UI colors if possible. These colors are light and have great combinations that are not painful to the eyes. Check out flatuicolors.com for more information, based on Flat UI.
4. Use text instead of images
As we all know images make web pages slower. Most often images are the only way to force the web browser to display a preferred font and the exact layout you want. However this might not work. Using real text is the best way to go especially with responsive web design. Remember, search engines can’t read images but they can read text.
5. Use fallback text style when clipping text
There might be a time wherein you need to clip text on images to create a textured or image text. The problem here is that not all browsers support this technique.
The best way to do this is using Paul Irish’s CSS Browser Selector plugin. This is a lightweight plugin that detect the browser and manipulates the styles you want to appear on specific browsers. Here’s how to use this cool plugin.
- Download the plugin here and then link it to your head section:
<script src="css_browser_selector.js" type="text/javascript">
</script>
- Set CSS attributes (either id or class) with the code of each browser you want to change specifically on your stylesheet.
.opera #header { margin: 20px; }
.webkit #header { margin: 30px;  }
.ie #header{ margin: 10px; }
.ff3 #header {margin: 15px; }
For more information about this cool plugin check out this site.
Responsive Typography Ground Rules
Most of the fundamental typographic elements can be manipulated with CSS. However, it actually more than just adapting or optimizing the size of the text on each viewport. Now that we’ve discussed how you can achieve presentable web typography, it’s now time to talk about the basic ground rules that we can apply to achieve better responsive typography.
1. Use rem instead of pixels and ems
The use of both pixels and ems is popular. While pixels are fixed, ems are relative units to the parent element. This means when you resize the browser it’s hard to figure it out the size you need to set to achieve the output you want to attain.
A better option is using rems. Rems or also known as “root em” are always equal to the font size of the root HTML element and what’s more exciting with this is that it was being supported by modern browsers.
html{
  font-size: 16px;   // 1rem = 16px
}
h1{
  font-size: 1.9rem // 19px
}
h2{
   font-size: 1.8rem // 18px
}
In this example I’m defining a base font-size of 16px which is the reference of the font-size of the other element. The size of the h1 and h2 will change as the viewport changes.
For older versions of Internet Explorer, we can specify the font-size in px units first and define the rem units along with it and we can have a resizable text on all browsers.
html{
  font-size: 16px;   // 1rem = 16px
}

h1{
  font-size: 19px; font-size: 1.9rem;
}

h2{
   font-size: 18px; font-size: 1.8rem;
}
2. Experiment rem units on different viewports
Now that you know how to use rem, you need experiment on different sizes of screens via @media queries. The output will depend on the typeface. You need also to use actual font sizes and see if you’ll get the result you want.
@media (max-width: 640px) {
h1 {
    font-size:1.7rem
}
h2{
	font-size: 1.6rem
}
}

@media (min-width: 480) {
h1 {
    font-size:1.9rem
}
h2{
	font-size: 1.8rem
}
}
Notice that on smaller screens the font size is a bit bigger compared to the wider screens. This will make text more readable as users read via phone or tablet.
3. Use CSS3 pseudo-classes to specify specific styles
One of the great features of CSS3 is that it can target a specific letter, line or paragraph and give it a different style. This gives designers the freedom to resize or adjust the text on different sizes.
<iframe width="100%" height="300" src="https://jsfiddle.net/9g298eo1/24/embedded/" allowfullscreen="allowfullscreen" frameborder="0"></iframe>
As you can see on the example below, we use the following the CSS3 pseudo-classes:
- first-of-type – selects the first child of the paragraph tag
- first-line – selects the first line of the the paragraph tag
- first-letter – selects the first letter of the paragraph tag
4. Control your measure
As suggested by Robert Bringhurst, the most ideal measure or line-length is around 45 to 75 characters per line. For responsive web design, the measure is not that easy to control especially on smaller viewports. If you can’t control measure, you can’t control legibility of your text.
There is a good article by Elliot Jay Stocks that talks about this topic on how to use media queries to achieve a desirable line height and measure.
Using Plugins
While there are a lot of jQuery plugins that we can use for responsive web typography online, the most popular one is the FlowType.js. This jQuery plugin counts character per line and set font sizes at definite line length at any viewports.
Let’s take a closer look on how this works.
Step 1: Set Typography Values
Start adding CSS basic set up for FlowType.js.
body {
   font-size: 16px;
   line-height: 20px;
}

h1,h2,h3,h4,p {
   font-family: inherit;
   font-size: inherit;
}

h1 {
   font-size: 3em;
   line-height: 1em;
}

h2 {
   font-size: 2em;
   line-height: 1em;
}

p{
   font-size: 1em;
   line-height: 1em;
}
These values will be used by FlowType.js and change each values as the viewport resizes. Setting up font size and line height will enable you to access and set up your web pages when JavaScript was disabled.
Step 2: Link FlowType.js to your head section
Download FlowType.js and include it the head section of your html document.
<script src="flowtype.jQuery.js"></script>
Step 3: Call FlowType.js
Activate FlowType.js, we just need to add the following codes just before the closing </body> tag.
&lt;script&gt;
$(function () {
$('body').flowtype();
});
&lt;/script&gt;
Step 4: Customize FlowType.js Settings
There are some values that FlowType.js has by default, however you tweak them to the settings you want it to be set up. To do this, you just need to include some other options on your jQuery code.
$('body').flowtype({
   minimum   : 500,
   maximum   : 1920,
   minFont   : 16,
   maxFont   : 40,
   fontRatio : 34,
   lineRatio : 1.50
});
Aside from flowtype.js there are some other jQuery plugins that might help to create responsive web typography. Check out the following jQuery plugins:
- FitText – A jQuery plugin that makes font-sizes flexible making text and headlines fluid or responsive.
- js – A great plugin for radical web typography. It helps control the kerning of text in a just a line of jQuery code.
- Responsive Measures – A simple script that enables you to create ideal measures for a container’s text.
What’s Next?
Responsive design is becoming more and more advanced. We may think that images, layout and grids are what matters. However, we must not forget that the content or the text is what’s read by people and search engines.
Just like putting effort on layouts and images, you must also put some effort on how your text will appear. After all what matters most is that your text is readable, understandable and is easy for eyes on all viewports.
