How to Create an App Icon in Adobe Illustrator

In this tutorial, I’m creating an icon for a message/chat application, I’m using a “postman” bird as a starting point. This tutorial gives you an insight into the steps to take from an initial sketch to a vectorized icon that is ready to be used. Resources and articles that are useful are listed at the end in References.
How to Create a Vintage Photo Camera icon for App Store in Adobe Illustrator
Start sketching
While sketching an idea for an app, you need to have a little concept in your head. Try to analyze this concept to the bare elements so you can start sketching with a minimal set of elements. The fewer elements, the better you can focus on the primary idea. It’s a drawing process I try to focus on.
Another important thing is trying in being original in your first concept. This is not easy as they are so many ideas and good sketches around us (think of the excellent quality platforms like Dribbble are offering us). While there are many good sketches and icons around, you’re not seeing them in the applications stores. It’s becoming a rare symptom to find good, illustrative application icons. The main reason is that it takes time to go from a simple, good idea and sketch to a ready-to-use application icon and the process of that is quickly overlooked.
To be original in your ideas and sketches, one advice I keep following is not looking at other sketches before or while I’m drawing myself. It’s not helping me in accomplishing the idea in my head so I don’t do this anymore.
With Postcards Email Builder you can create and edit email templates online without any coding skills! Includes more than 100 components to help you create custom emails templates faster than ever before.
Free Email BuilderFree Email TemplatesFor this tutorial, I want to sketch a beak of a bird because the focus of a message application is what I want to accomplish when people give it a quick look. Not the full bird, but just the part that is important to convey the message.
I want to keep the sketch as simple as I can, so I’m not going to sketch much detail. Once you have enough sketches and you have one sketch that’s best representing the idea, I stop the sketch phase and go on with doing research.
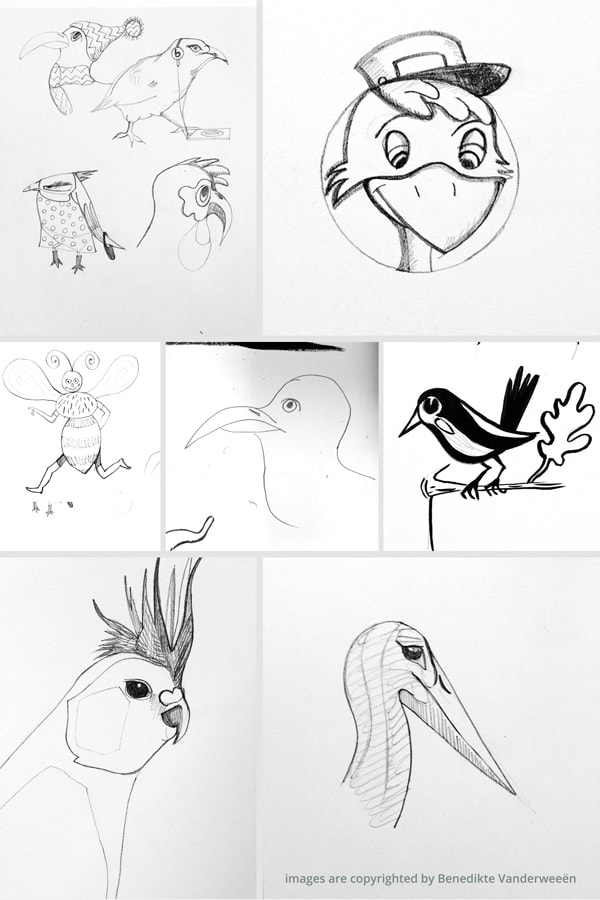
Collect your sketches and pick one sketch to start from.
Doing research
Doing research means collecting ideas and documents to start from (with templates, sometimes PS or AI actions can come in handy, read the device guidelines (iOS, Android, Windows, …), define your target devices: this is usually defined in the project briefing, next create a mood-board to collect all the images and references that inspire you, read books and articles about the subject) – I’m creating my moodboards with Ember (desktop + mobile), it’s a great app to collect screenshots in your mood-board.
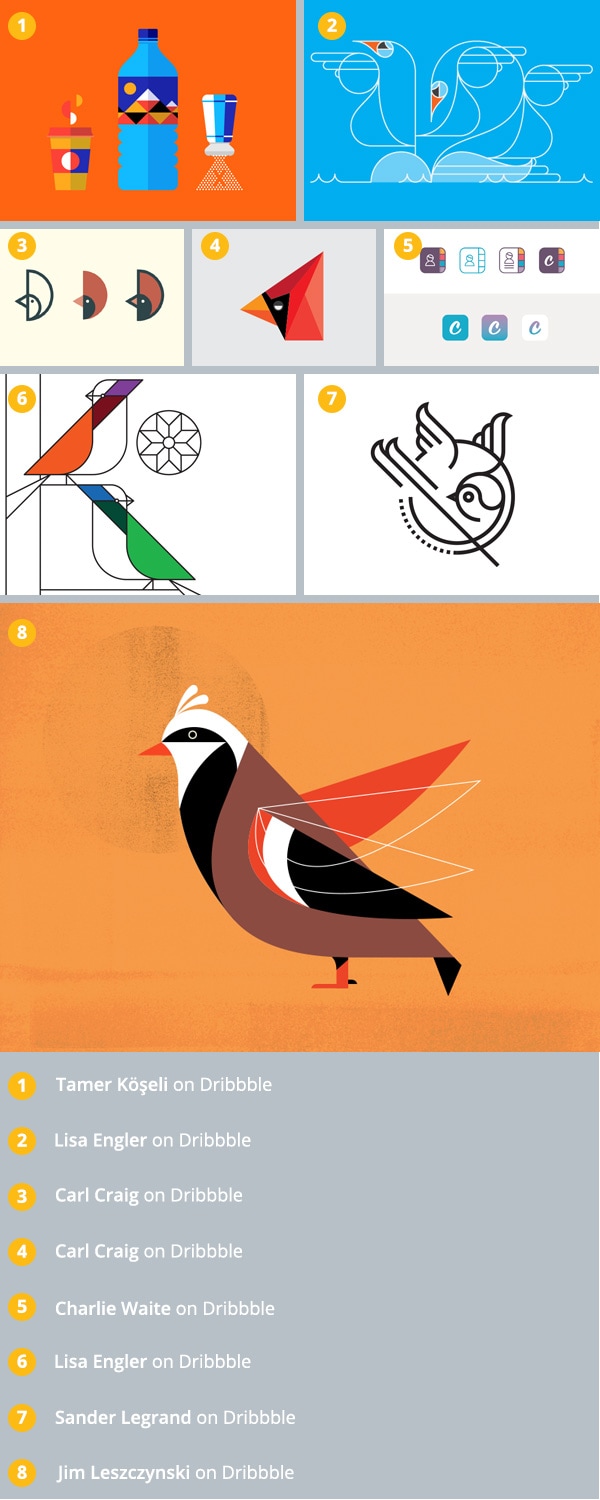
Creating a mood board for inspiration on color use, line use, shape and illustrative direction.
Starting to vectorize in Illustrator
Step by step instructions on how to vectorize your imported sketch.
With Startup App and Slides App you can build unlimited websites using the online website editor which includes ready-made designed and coded elements, templates and themes.
Try Startup App Try Slides AppOther ProductsStep 1: setting up your workspace
Create your workspace in Adobe Illustrator
Start Illustrator and choose New Document cmd + N. For this tutorial, I’m setting the dimensions to 1024 x 1024 pixels, the highest number for the icon dimensions. For this tutorial, I’m targeting the iOS apps, so I’ll stick to the Apple guidelines for iOS apps.
Start by selecting 1 artboard (What is an Art Board?), later on in this tutorial, we can add artboards for different dimensions of the icon.
We will now set the grid to pixels. Go to Preferences > Guides and Grids and set the Gridline to be 10px with 10 subdivisions then go to View > Show Grid then View > Snap to Grid.
Arrange your workspace by selecting Window > Workspace > Essentials to make sure all panels are closed and you can use the maximal screen view to draw the shapes.
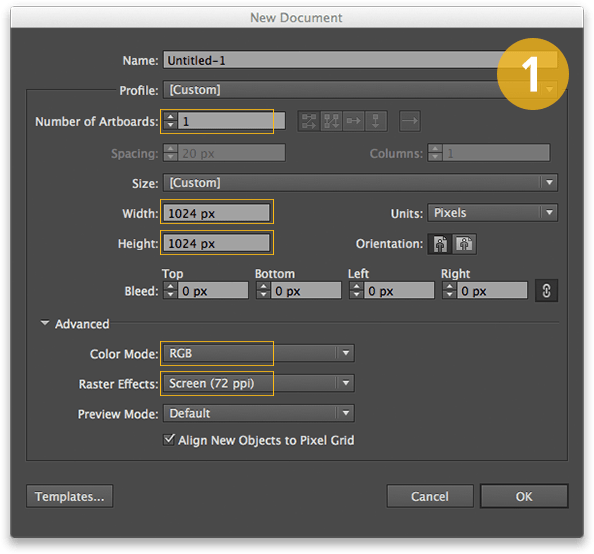
Create a new document, set the dimensions and colorspace.
Step 2: importing your sketch
Analyze your sketch
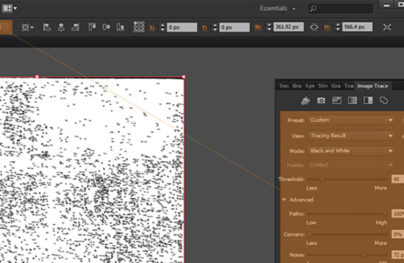
Go to File > Place and select your sketch to import it. Choose Embed in the Linked File panel on top to embed the artwork in your Illustrator file. You can eventually reduce the opacity of the layer to 50%. Rename the layer to “sketch” and lock it by clicking the lock icon next to the eye icon. Create a new layer on top of the “sketch” layer that you will use to draw the shapes.
Select a red color swatch that stands out so you can see clearly what you are drawing. It’s a good idea to analyze your sketch for a couple of minutes and think of the basic geometrical shapes you can use to outline the artwork and then decide whither using the pen tool or combining shapes (circles, rectangles, triangles, curves, etc..). Look at the following scheme:

Analyze your sketch for a couple of minutes and split it into geometrical shapes.
Step 3: place each element on its own layer
Organize your file
Once you are ready to start drawing, organize your file and place every element on a separate layer and name each layer to the element. You should have the following layers in stacking order:
- The Cap layer;
- The Hair layer;
- The Eyes layer;
- The Beak layer;
- The Neck layer;
- The Head layer;
- The background layer;
- The Sketch layer.
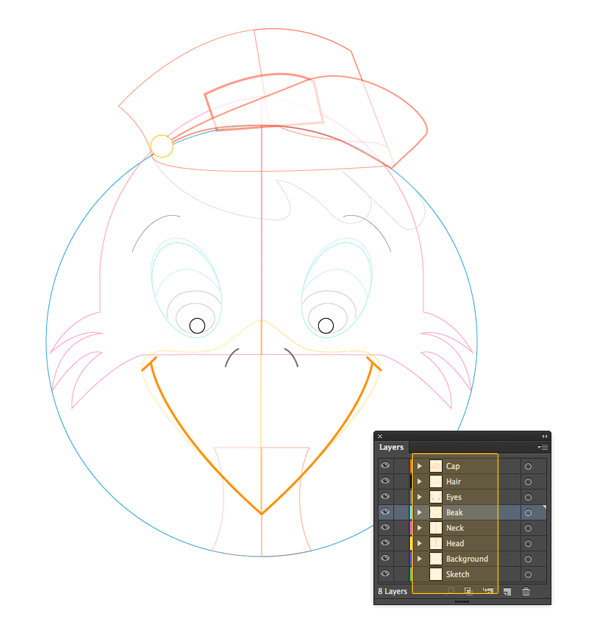
Every element on its layer in stacking order.
Step 4: combining shapes
Using the Shape Builder Tool
To combine certain shapes, there’s a handy tool in Illustrator to replace the Pathfinder tool, it’s called the “Shape Builder Tool” Shift + M, it lets you combine, subtract and divide shapes but more intuitive.
In case you want to combine the left and the right shape, select the shape and the Shape Builder tool from the tool palette and click and drag to the other part, you see a plus sign indicating that the shape will be added to the current shape, pressing the Alt key will show a minus sign, indicating the shape will be subtracted from the current selected one.
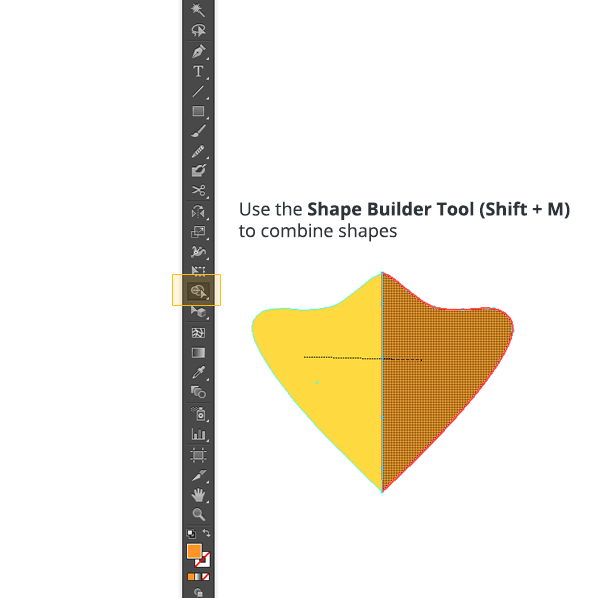
Combining shapes with the Shape Builder Tool.
Step 5: coloring your artwork
Limit the number of colors
Once the basic shapes are ready, choose a color palette to color the figure. I was inspired by the iOS 7 color palette and distilled a few colors from it and combined them with a few other colors I liked. Try to limit your palette as much as possible for clarity.
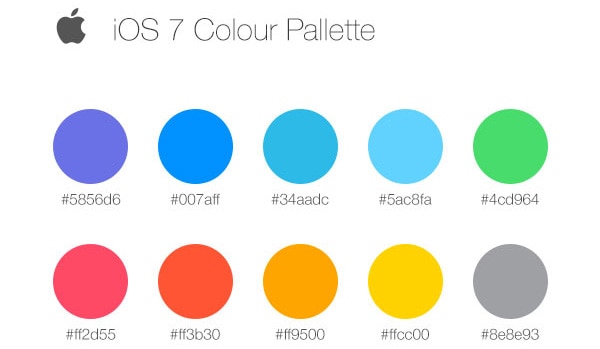
Inspired by the iOS 7 color palette.
This is what the basic colored figure looks like once you color the shapes. In this case, I kept the left and right part and gave the left part a tint of 75% of the color I used 100% in the right part. This way you can give your artwork some depth without having to use drop shadows. Use the Color Guide Window > Color Guide Shift + F3 to experiment with different tints of a color. In the Color Guide palette, click the upper right icon to “Show Options” to expand and see the different tints.
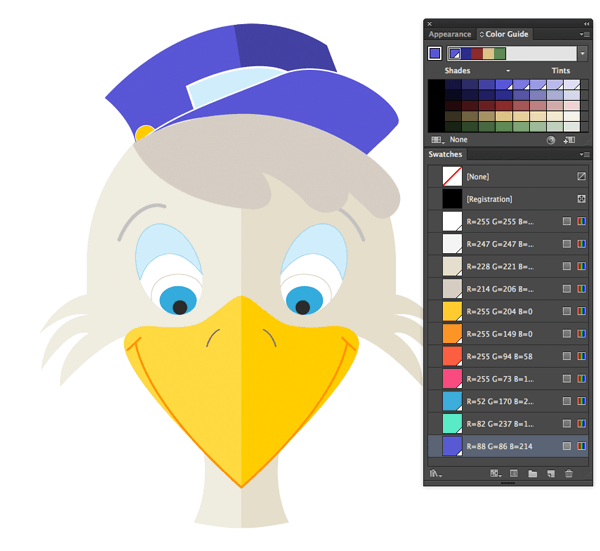
Coloring your artwork with the limited color set.
Step 6: Adding details
Giving character to the bird
Take the illustration to the next level by adding more detail to the bird: think of the eyebrows, subtle shadows in the eyes to give some depth, play with different colors to see what gives the best results. Adding detail is always a bit dangerous because you can add so much that you lose track of the “whole picture” and because it takes a lot of time to do (at least for me). In this example, I will limit the amount of detail, I’m going to stick to the more flat style of the icon which I think is perfect for the application style.
To let the character pop out a bit more, use the Appearance palette Windows > Appearance. Make a shape of the whole figure by combining the shapes and put this shape in the background on top of the circle. Give this a white fill via the Appearance Palette and a dark red Stroke of 6pt. Eventually, give the shape a slightly light drop shadow by selecting the shape and going to the Effect menu under in the Palette and choose to Stylize > Drop Shadow. Fill in the values as shown in the figure.
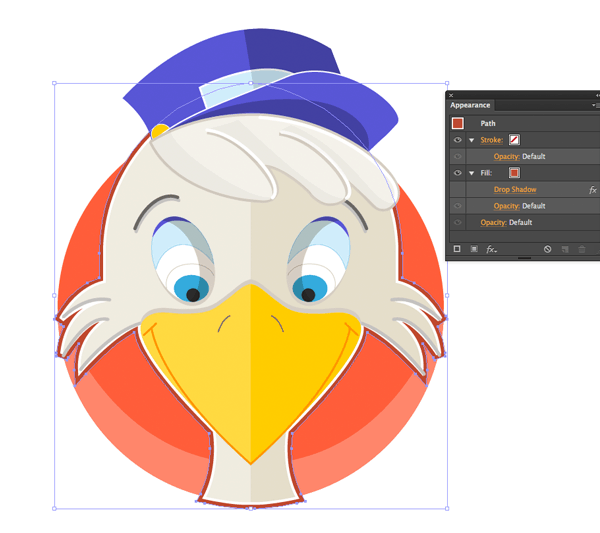
Adding details with color tints.
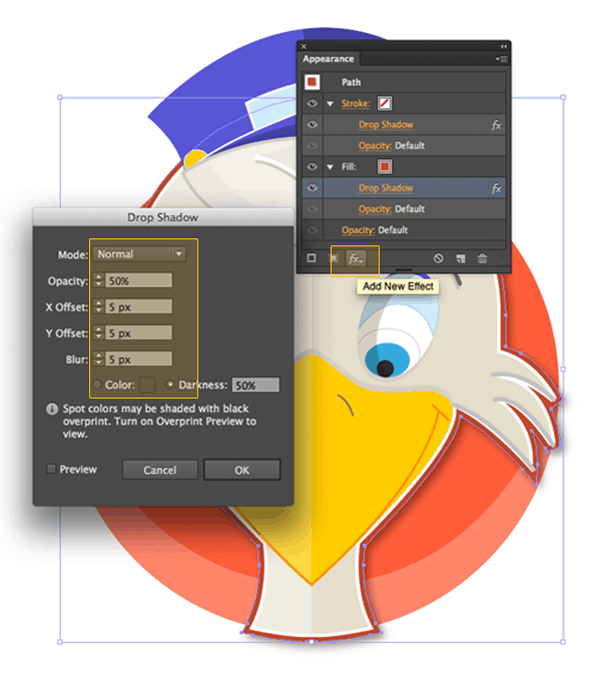
Adding a drop shadow to the figure with effects.
Assembling all elements
Step 7: Open a template or make one
The iOS icon template
I’m using the iOS 7 App Icon Template by Michael Flarup, a great template btw, you can find the link in “References” at the end of this tutorial.
Watch a good tutorial on how to use this template on Vimeo or on the website. Simply put: all icon formats are automatically generated for you by Photoshop actions. Isn’t that great!?
The only thing we have to do is make sure the illustration is well placed on the correct layer in Photoshop and off we go!

Open the icon iOS template and place your artwork.
Delivering the icon
Step 8: automating the icon generating process
Using the iOS icon template
Use the Photoshop actions coming with the template to generate all the different icon formats. Click the “Export Icons (Squared)”, you’ll see the preview pane and hit “Save”. This will save all the icons in a folder. These are now ready to use.

Use the Photoshop action to generate the icons from the iOS template.
It’s always a good idea to read the device/OS guidelines before starting to submit your app to the store.
References
-
- iOS 7 App Icon Template
- iOS icon gallery
- iOS 7 UI Kit Photoshop Action Set by Jérémy Paul
- Android App icon guidelines
- The Icon Handbook by Jon Hicks