Building a Custom WordPress Login Form with Flat UI
WordPress is the most populous and one of the best content management systems in the world. It powers over 60 percent of websites in the world.
By default, the Login form in WordPress is only visible when trying to access the administration dashboard. But you may prefer a custom login page that integrates visually with your website design instead of using the WordPress default login.
In this tutorial, I will teach you how to build a custom login form that can be embedded in a post or page using a shortcode and in a specific theme location using template tag.

The Flat UI form component — with a great aesthetic — will be used for the login form in this tutorial.
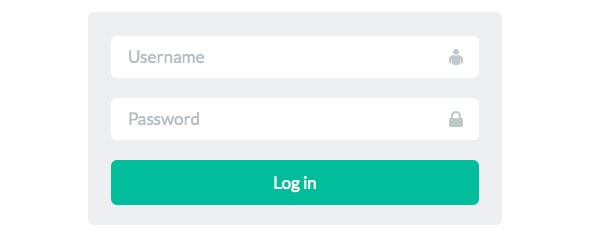
Below is a screenshot of the custom login form.
With Postcards Email Builder you can create and edit email templates online without any coding skills! Includes more than 100 components to help you create custom emails templates faster than ever before.
Free Email BuilderFree Email Templates
Custom WordPress Login Form Development
Without further fussing, let’s get started.
First, create a folder called “plugin directory” where all of the plugin files will be stored.
Include the plugin file header as follows:
<?php

/*
  Plugin Name: Designmodo Login Form
  Plugin URI: https://designmodo.com
  Description: Simple Login form plugin that just work
  Version: 1.0
  Author: Agbonghama Collins
  Author URI:
 */
Remember we are using the form component in Flat UI and need to include it to our plugin folder. Download the Flat UI, extract the files and copy the bootstrap, css and font folder to our plugin folder.
The PHP function dlf_form() below contains the Login HTML form code.
 function dlf_form() {

?>

<form method="post" action="<?php echo $_SERVER['REQUEST_URI']; ?>">
	<div class="login-form">
		<div class="form-group">
			<input name="login_name" type="text" class="form-control login-field" value="" placeholder="Username" id="login-name" />
			<label class="login-field-icon fui-user" for="login-name"></label>
		</div>

		<div class="form-group">
			<input  name="login_password" type="password" class="form-control login-field" value="" placeholder="Password" id="login-pass" />
			<label class="login-field-icon fui-lock" for="login-pass"></label>
		</div>
		<input class="btn btn-primary btn-lg btn-block" type="submit"  name="dlf_submit" value="Log in" />
</form><closeform></closeform>
</div>
<?php
}
We need to authenticate the username and password that will be entered to the login form. The dlf_auth() below handles that.
function dlf_auth( $username, $password ) {
global $user;
$creds = array();
$creds['user_login'] = $username;
$creds['user_password'] =  $password;
$creds['remember'] = true;
$user = wp_signon( $creds, false );
if ( is_wp_error($user) ) {
echo $user->get_error_message();
}
if ( !is_wp_error($user) ) {
wp_redirect(home_url('wp-admin'));
}
}
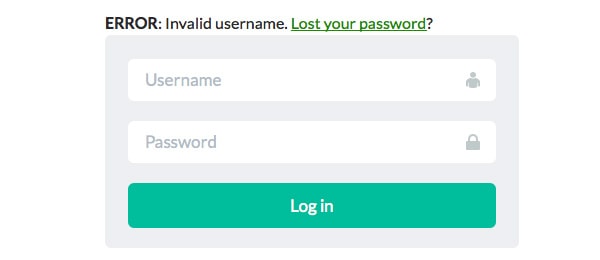
When an invalid username or password is entered, an error message informing the user that data supplied is invalid will be displayed with a link to the Lost your password page, assuming the user forgot his or her password.
With Startup App and Slides App you can build unlimited websites using the online website editor which includes ready-made designed and coded elements, templates and themes.
Try Startup App Try Slides AppOther Products
The dlf_process() function below display the login form to WordPress front-end, check if the login form has been submitted and then call the dlf_auth() function to authenticate the username and password. If the login credentials are deemed valid, the user will be redirected to WordPress admin dashboard.
Below is the code for the dlf_process() function:
function dlf_process() {
if (isset($_POST['dlf_submit'])) {
	dlf_auth($_POST['login_name'], $_POST['login_password']);
}

dlf_form();
}
To give our plugin the awesome look powered by Flat UI, we need to append the Bootstrap and Flat UI css stylesheet to WordPress header using WP enqueue function as shown below.
function flat_ui_kit() {
wp_enqueue_style('bootstrap-css', plugins_url('bootstrap/css/bootstrap.css', __FILE__));
wp_enqueue_style('flat-ui-kit', plugins_url('css/flat-ui.css', __FILE__));

}

add_action('wp_enqueue_scripts', 'flat_ui_kit');
To be able to easily embed this custom login form to a WordPress page, it has to be done via shortcode. The codes below provide a [dm_login_form] shortcode which when inserted to a post or page, the login form will be embedded.
function dlf_shortcode() {
ob_start();
dlf_process();
return ob_get_clean();
}

add_shortcode('dm_login_form', 'dlf_shortcode');
Voila! we have completed the coding of our custom WordPress login form plugin.
Using the Login Form Plugin
First, get the plugin installed and activated in your WordPress blog.
To embed the custom login form in a post or page, use the shortcode [dm_login_form]. To include it a specific location in your theme, use the template tag below.
<?php echo do_shortcode('[dm_login_form]'); ?>
Summary
I know a lot of us would love to have a customized login form on a WordPress-powered website. This tutorial should help you achieve it.
If you have any questions, let me know in the comments below.


