How to Create a UI Sliders Set in Photoshop
Hi there. In the following tutorial your will learn how to create a UI sliders set in Photoshop.
Tutorial Details
Difficulty: Intermediate
Estimated Completion Time: 1 hour
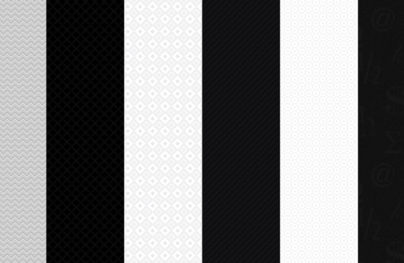
Final Image
As always, this is the final image that we’ll be creating:
![How to Create a UI Sliders Set [Tutorial]](https://designmodo.com/wp-content/uploads/2012/04/preview.jpg "How to Create a UI Sliders Set [Tutorial]")
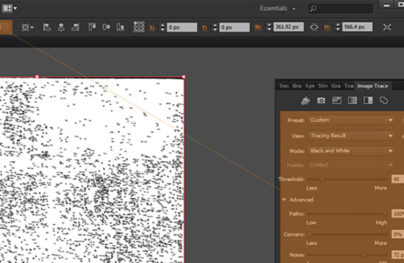
Step 1
Open Photoshop and hit Control + N to create a new document. Enter all the data shown in the following image and click OK. Enable the Grid (View > Show > Grid) and the Snap to Grid (View > Snap To > Grid). You need a grid every 1px. Go to Edit > Preferences > Guides, Grid & Slices and focus on the Grid section. Enter 1 in the Gridline Every box and 1 in the Subdivision box. Also, set the color of the grid at #696969. Once you set all these properties click OK. Don’t get discouraged by all that grid. It will ease your work later. You should also open the Info panel (Window > Info) for a live preview with the size and position of your shapes.

Step 2
Go to the Layers panel. By default, Photoshop created a locked layer named “Background”. Hold Alt and double click on it. This will immediately unlock your layer. Select it, set the foreground color at #aaaaaa, pick the Paint Bucket Tool and simply click inside your document.
With Postcards Email Builder you can create and edit email templates online without any coding skills! Includes more than 100 components to help you create custom emails templates faster than ever before.
Free Email BuilderFree Email Templates
Step 3
Pick a dark grey for the foreground color, grab the Rounded Rectangle Tool, set the radius at 5px and create a 410 by 12px shape. Move to the Layers panel (Window > Layers) and double click on this new vector shape to open the Layer Style window. Activate the Drop Shadow, the Inner Shadow, the Gradient Overlay and the Stroke then enter the properties shown in the following images.


Step 4
Set the foreground color at white, pick the Rounded Rectangle Tool and make sure that the radius is still set at 5px. Create a 70 by 12px shape and place it as shown in the first image. The Snap to Grid should ease your work. Open the Layer Style window for this new vector shape and enter the properties shown in the following images.
With Pulsetic you’ll be instantly notified the moment your website, API, or server becomes unavailable. Monitor uptime from multiple global locations and respond to incidents before your users are affected.
Create beautiful status pages in minutes to keep customers informed during outages and build trust with transparent communication.
Start Monitoring for Free


Step 5
Set the foreground color at #3c3c3c and pick the Rectangle Tool. Create three, 1 by 4px shapes and place them as shown in the first image. Open the Layer Style window for the left rectangle, activate the Drop Shadow and enter the properties shown in the following image. Open the Layer Style window for the right rectangle, enter the properties shown in the following image but inverse the angle (180 degrees).


Step 6
Pick the Rounded Rectangle Tool and make sure that the radius is set at 5px. Create two, 30 by 12px shapes and place them as shown in the following image. Again, the Snap to Grid will ease your work.

Step 7
Open the Layer Style window for the left rounded rectangle created in the previous step, enter the properties shown in the following images and click OK. Focus to the Layers panel, right click on the left rounded rectangle and click on Copy Layer Style. Move to the right rounded rectangle created in the previous, right click on it and click on Paste Layers Style. Keep focusing on the Layers panel, select the two rounded rectangles created in the previous step and drag them below the large rounded rectangle created and edited in the third step.


Step 8
Set the foreground color at #4b4b4b, pick the Rectangle Tool and create a 4 by 6px shape. Select this new vector shape and switch to the Direct Selection Tool. Select the top, left anchor point and drag it 3px down then select the bottom, left anchor point and drag it 3px up. In the end your vector shape should look like a triangle. Open the Layer Style window for this triangle and enter the properties shown in the following image.


Step 9
Reselect the triangle created in the previous step, place it as shown in the first image and duplicate it (Control + J). Flip this copy horizontally (Edit > Transform > Flip Horizontal) and drag it to the right as shown in the second image.

Step 10
Select all the vector shapes created so far and group them (Control + G). Move to the Layers panel, double click on the group and name it “Grey Slider”. Right click on it and go to Duplicate Group. Obviously, this created a group copy. Select it, rename it “Green Slider” and drag it a few pixels down as shown in the following image. Next, you need to edit some of the shapes inside this new group. Start with the longest rounded rectangle. Open the Layer Style window and edit the Gradient Overlay and the Stroke properties as shown in the following images.


Step 11
Keep focusing on the group copy created in the previous step and continue editing the rest of the shapes. First, change the colors used for the arrows and the button. Next, open the Layer Style window for the left and right rounded rectangle and edit the Stroke properties as shown in the second image. Finally, open the Layer Style window for the arrow shapes and enter the properties shown in the third image.


Step 12
Duplicate the “Green Slider” group. Select it, rename it “Blue Slider”and drag it a few pixels down as shown in the following image. Again, open the Layer Style window for the largest rounded rectangle and edit the Gradient Overlay and the Stroke properties as shown in the following images.


Step 13
Keep focusing on the “Blue Slider” group and continue editing the rest of the shapes. Just follow the properties shown in the following images.


Step 14
Return to the “Grey Slider” group and duplicate it. Select this new group, rename it “Red Slider” and drag it down as shown in the following image. Open this group and remove the button shape along with the three, little rectangles. Now, focus on the left and right rounded rectangles. Open the Layer Style window for these two shapes and edit the angle used in the Gradient Overlay section as shown below.

Step 15
Pick the Rounded Rectangle Tool and make sure that the radius is set at 5px. Create a 200 by 10px shape and place it as shown in the first image. Open the Layer Style window for this new shape and enter the properties shown in the following images. Move to the Layers panel and make sure that this new shape is part of the “Red Slider” group.


Step 16
Next, you need to create your own pattern. First, hit Control + N to create a new document. Enter 100 in the width and height boxes and click OK. Next, make sure that the Grid (View > Show > Grid) and the Snap to Grid (View > Snap To > Grid) are enabled. You’ll need a grid every 10px. So, go to Edit > Preferences > Guides, Grid & Slices and focus on the Grid section. Enter 10 in the Gridline Every box and 1 in the Subdivision box. Once you set all these properties move to the Layers panel and delete the “Background” layer. Set the foreground color at #323232, pick the Pen Tool and create the two shapes shown below. Once again, the Snap to Grid should ease your work. Make sure that your shapes are placed like in the following image and go to Edit > Define Patter. Pick a name for your pattern, click OK and you got your pattern. You can close this document.

Step 17
Return to “gridline every 1px”. So, go to Edit > Preferences > Guides, Grid & Slices and enter 1 in the Gridline Every box. Duplicate the “Red Slider” group and drag this new group a few pixels down. Open it, select the red rounded rectangle and duplicate it (Control + J). Move to the Layers panel, right click on this new red shape click on Clear Layer Style. Obviously, this removed the Layer Style properties. Make sure that this shape is still selected, lower its Fill to 0% and open the Layer Style window. Enter the properties shown in the following imge and click OK.


Step 18
Duplicate the “Red Slider” group and drag the new group down. Pick the Ellipse Tool, create a 22px circle and place it as shown in the second image. Open the Layer Style window for this new shape and enter the properties shown in the following images. Simply click on the New button to save the gradient used in the Gradient Overlay section. Move to the Layers panel and make sure that this small circle is part of the group copy created in the beginning of the step.


Step 19
Duplicate the group created in the previous step. Drag this new group a few pixels down and open it. Select the 22px circle and pick the Ellipse Tool. Check the Subtract button from the top bar then draw an 8px circle as shown in the second image. This should add a simple hole inside your circle.

Step 20
Again, duplicate the group created in the previous step and drag the copy a few pixels down. Set the foreground color at #191919, pick the Ellipse Tool, create a 6px circle and place it as shown below. Open the Layer Style window for this new shape and enter the properties shown in the following images. Move to the Layers panel and make sure that this small circle is part of the group copy created in the beginning of the step.


Step 21
Duplicate the “Red Slider” group and drag the new group down. Pick the Rounded Rectangle Tool and set the radius at 3px. Create a 26 by 12px shape and place it as shown below. Open the Layer Style window for this new shape and enter the properties shown in the following images. For the Gradient Overlay section you will need the gradient saved in step #18. Move to the Layers panel and make sure that this new shape is part of the group copy created in the beginning of the step.


Step 22
Duplicate the two arrow shapes and place the copies as shown in the following image. Replace the existing fill color with #858585 then open the Layer Style window and enter the properties shown in the following images.


Step 23
Make a new copy of the “Red Slider” group and drag it down. Pick the Rectangle Tool, create a 12 by 20px shape and place it as shown in the following image. Move to the Layers panel and make sure that this new shape is part of the group copy created in the beginning of the step.

Step 24
Reselect the vector shape created in the previous step, pick the Add Anchor Point Tool and add two new anchor points as shown in the first image (the circled points). Switch to the Direct Selection Tool, select the bottom, left anchor point and move it 6px to the right then select the bottom, right anchor point and move it 6px to the left. Make sure that this vector shape is still selected, switch to the Convert Point Tool and click on the two anchor points highlighted in the second image. In the end your shape should look like in the third image.

Step 25
Focus on the vector shape edited in the previous step, open the Layer Style window and enter the properties shown in the following images.


Step 26
Set the foreground color at #3c3c3c and pick the Rectangle Tool. Create two, 4 by 1px shapes and place them as shown in the first image. Open the Layer Style window for these two shapes, activate the Drop Shadow and enter the properties shown in the following image. Move to the Layers panel and make sure that these shapes are part of the group created in step #23.

Step 27
Make a copy of the group created in step #23, move it a few pixels down and open it. First, select the sharp button shape and delete it. Next, pick the Rounded Rectangle Tool, set the radius at 3px, create a 16px by 16px shape and place it as shown in the following image. Move to the Layers panel and drag this new shape inside the group, below the two, thin rectangles. Open the Layer Style window for this rounded rectangle, enter the properties shown below, click OK and you’re done.

And We’re Done!
Here is how your final result should look.
Download UI Sliders Set PSD