How to Create a Credit Card UI using HTML and CSS3
Difficulty: Intermediate
Estimated Completion Time: 30 minutes
In this tutorial, we are going to create a simple Credit Card Form using HTML and CSS3. We’ll work with Google Fonts to use the custom font (Roboto) for this form. You are free to integrate this form into your website.
Slides: HTML Static Website Builder
Credit Card UI Design
Designing an effective and user-friendly credit card UI is essential for ensuring a seamless experience for users during online transactions. Here are some recommendations and tips to consider when creating a credit card UI:
- Intuitive Layout: Organize the credit card input fields in a logical and easily understandable manner. Align them in the order of card number, expiration date, and CVV code, as they typically appear on a physical credit card. This intuitive layout helps users quickly fill in the required information.
- Card Preview: Display a visual representation of a credit card that updates as users input their information. This card preview helps users verify their entered details and reduces the likelihood of errors.
- Responsive Input Fields: Implement input fields that automatically format and validate the user’s input as they type. For example, add spaces between every four digits of the card number and automatically move to the next input field when the previous one is completed.
- Input Field Icons: Use icons to represent different input fields, such as a calendar icon for the expiration date and a lock icon for the CVV code. These visual cues help users easily identify the required information.
- Clear Error Messages: Provide specific and actionable error messages when users enter incorrect information. For example, if a user inputs an invalid card number, display a message like “Invalid card number. Please re-enter.” This guidance helps users quickly identify and correct mistakes.
- Card Type Detection: Automatically detect the type of credit card being used (e.g., Visa, Mastercard, American Express) based on the card number, and display the corresponding card logo. This feature not only enhances the user experience but also helps users ensure they’re using the correct card.
- Autofill Support: Integrate support for browser autofill features, which allows users to quickly fill in their credit card information if they’ve saved it in their browser.
- Accessibility: Ensure your credit card UI is accessible to users with disabilities by following accessibility guidelines such as WCAG (Web Content Accessibility Guidelines). Use proper labels, alternative text, and appropriate color contrast to make the UI accessible for users with varying needs.
- Security Assurance: Display security badges or messages to assure users that their credit card information is being handled securely. This helps build trust and confidence in the transaction process.
- Mobile Optimization: Optimize the credit card UI for mobile devices by making input fields large enough for easy tapping, using mobile-friendly keyboards, and ensuring responsive design.
By incorporating these recommendations and tips into your credit card UI design, you can create an intuitive, user-friendly, and secure experience that encourages successful transactions and reduces the likelihood of user frustration.
Let’s get started.
With Postcards Email Builder you can create and edit email templates online without any coding skills! Includes more than 100 components to help you create custom emails templates faster than ever before.
Free Email BuilderFree Email TemplatesCredit Card HTML
Let’s create our HTML structure.
We will create a form with the class “credit-form.” Then we will divide our form in two sections. The first section is the form header where will have our form title, and the second is the form body where will have all the form elements and buttons.
    <form class="credit-card">
      <div class="form-header">
        <h4 class="title">Credit card detail</h4>
      </div>

      <div class="form-body">
        <!-- Card Number -->
        <input type="text" class="card-number" placeholder="Card Number">

        <!-- Date Field -->
        <div class="date-field">
          <div class="month">
            <select name="Month">
              <option value="january">January</option>
              <option value="february">February</option>
              <option value="march">March</option>
              <option value="april">April</option>
              <option value="may">May</option>
              <option value="june">June</option>
              <option value="july">July</option>
              <option value="august">August</option>
              <option value="september">September</option>
              <option value="october">October</option>
              <option value="november">November</option>
              <option value="december">December</option>
            </select>
          </div>
          <div class="year">
            <select name="Year">
              <option value="2016">2016</option>
              <option value="2017">2017</option>
              <option value="2018">2018</option>
              <option value="2019">2019</option>
              <option value="2020">2020</option>
              <option value="2021">2021</option>
              <option value="2022">2022</option>
              <option value="2023">2023</option>
              <option value="2024">2024</option>
            </select>
          </div>
        </div>

        <!-- Card Verification Field -->
        <div class="card-verification">
          <div class="cvv-input">
            <input type="text" placeholder="CVV">
          </div>
          <div class="cvv-details">
            <p>3 or 4 digits usually found <br> on the signature strip</p>
          </div>
        </div>

        <!-- Buttons -->
        <button type="submit" class="proceed-btn"><a href="#">Proceed</a></button>
        <button type="submit" class="paypal-btn"><a href="#">Pay With</a></button>
      </div>
    </form>
CSS
Before we get started with the CSS, make sure to include our .css file and font in the head. We are going to use Roboto for this tutorial. You can download it from Google Fonts.
  <link href='https://fonts.googleapis.com/css?family=Roboto:400,300,100' rel='stylesheet' type='text/css'>
  <link rel="stylesheet" href="style.css">
First, add global/basic styling and make sure that the body has full height by adding the following lines:
/* Global */
* {
    box-sizing: border-box;
}

body,
html {
    height: 100%;
    min-height: 100%;
}

body {
    font-family: 'Roboto',
    sans-serif;
    margin: 0;
    background-color: #e7e7e7;
}
Great, now let’s style the card to make it 360×400.
We align it to the center of the page, add rounded corners and some shadows:
/* Credit Card */
.credit-card {
    width: 360px;
    height: 400px;
    margin: 60px auto 0;
    border: 1px solid #ddd;
    border-radius: 6px;
    background-color: #fff;
    box-shadow: 1px 2px 3px 0 rgba(0,0,0,.10);
}
We’ve set the left and right margins to auto, to horizontally center the element within its container.
Let’s add height and padding to our form-header and form-body:
With Startup App and Slides App you can build unlimited websites using the online website editor which includes ready-made designed and coded elements, templates and themes.
Try Startup App Try Slides AppOther Products
.form-header {
    height: 60px;
    padding: 20px 30px 0;
    border-bottom: 1px solid #e1e8ee;
}

.form-body {
    height: 340px;
    padding: 30px 30px 20px;
}
This is how our card looks so far:
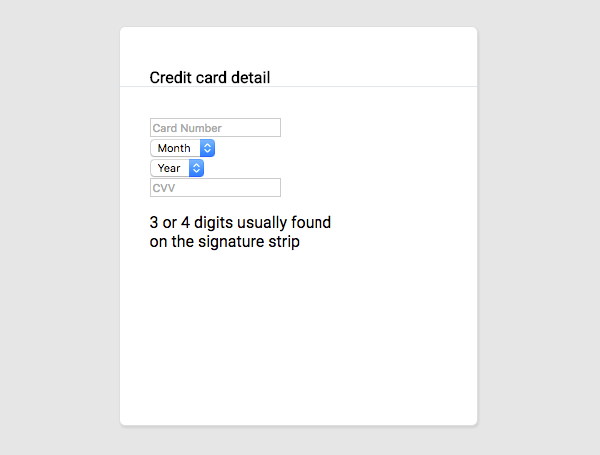
Our card has no structure, no color and no personality. We can change that with a little bit of code.
Add style to the title by giving it a color and setting the margins to 0.
/* Title */
.title {
    font-size: 18px;
    margin: 0;
    color: #5e6977;
}
We’re giving it a height of 42px, and adding basic styling to every element in our card, including buttons.
/* Common */
.card-number,
.cvv-input input,
.month select,
.year select {
    font-size: 14px;
    font-weight: 100;
    line-height: 14px;
}

.card-number,
.month select,
.year select {
    font-size: 14px;
    font-weight: 100;
    line-height: 14px;
}

.card-number,
.cvv-details,
.cvv-input input,
.month select,
.year select {
    opacity: .7;
    color: #86939e;
}
Style the form-body and the form elements within it. Start with the first input, which is the card number.
/* Card Number */
.card-number {
    width: 100%;
    margin-bottom: 20px;
    padding-left: 20px;
    border: 2px solid #e1e8ee;
    border-radius: 6px;
}
Then, let’s style our select elements, month and year. Float month to the left and year to the right and give them some basic styles.
/* Date Field */
.month select,
.year select {
    width: 145px;
    margin-bottom: 20px;
    padding-left: 20px;
    border: 2px solid #e1e8ee;
    border-radius: 6px;
    background: url('caret.png') no-repeat;
    background-position: 85% 50%;
    -moz-appearance: none;
    -webkit-appearance: none;
}

.month select {
    float: left;
}

.year select {
    float: right;
}
Now, we have to style our card verification field where we have the cvv-input and the cvv-details, which gives us details about the card verification code.
/* Card Verification Field */
.cvv-input input {
    float: left;
    width: 145px;
    padding-left: 20px;
    border: 2px solid #e1e8ee;
    border-radius: 6px;
    background: #fff;
}

.cvv-details {
    font-size: 12px;
    font-weight: 300;
    line-height: 16px;
    float: right;
    margin-bottom: 20px;
}

.cvv-details p {
    margin-top: 6px;
}
We’re done with the inputs.
This is how it looks:
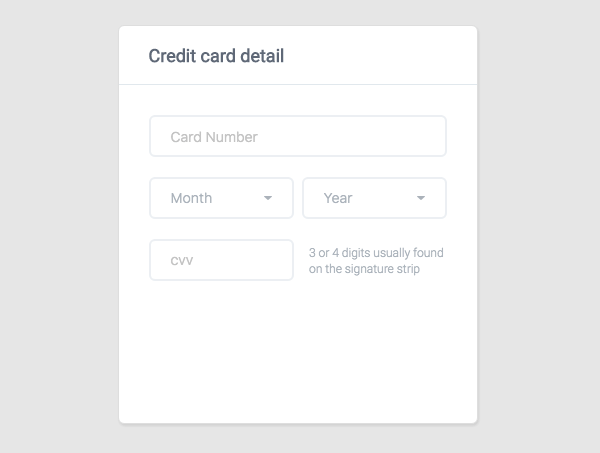
Pretty nice, right? But we’re not done yet.
We have one last thing to do — buttons. Let’s style them.
/* Buttons Section */
.paypal-btn,
.proceed-btn {
    cursor: pointer;
    font-size: 16px;
    width: 100%;
    border-color: transparent;
    border-radius: 6px;
}

.proceed-btn {
    margin-bottom: 10px;
    background: #7dc855;
}

.paypal-btn a,
.proceed-btn a {
    text-decoration: none;
}

.proceed-btn a {
    color: #fff;
}

.paypal-btn a {
    color: rgba(242, 242, 242, .7);
}

.paypal-btn {
    padding-right: 95px;
    background: url('paypal-logo.svg') no-repeat 65% 56% #009cde;
}
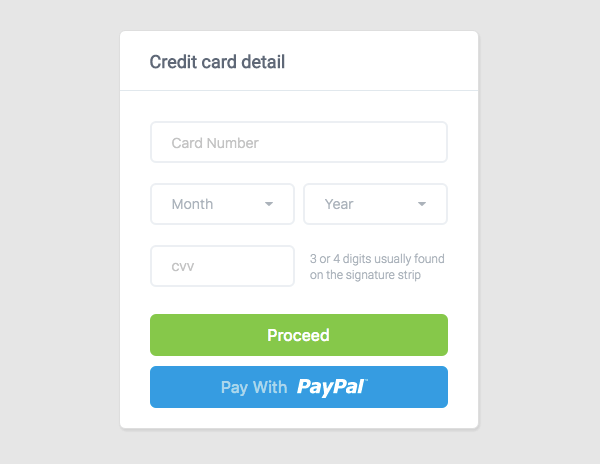
And this is our final version:

Isn’t this cool?
Conclusion
We’re done here. I hope you find this tutorial useful and you have learned something new from it. You can use this form for your next project or personal website.
Download the Credit Card HTML
If you have any questions or suggestions, please post in the comments.