A Beginner’s Guide To Grunt: Build Tool for JavaScript
Modern Web development is rapidly moving toward more complicated client-side applications. The ability to build more advanced applications requires more sophisticated tools that allow developers to manage complexity and prevent the program they write from collapsing under the weight of a technical dept. A developer needs to carry out a set of steps in order to prepare a web app for use.
In this article, we’ll take a brief look at Grunt. To illustrate how a task runner can simplify the development process, we’ll build a small TypeScript application that uses RequireJS and Knockout and we’ll use Grunt to prepare, debug and release versions of that app.
Demo Application
Overview
Let’s first take a look at the demo application we’re going to use for illustrative purposes. This is a simple app that has a single input field for an email address. The app validates user input and outputs either a “SUCCESS” label or a list of validation errors below the input box.
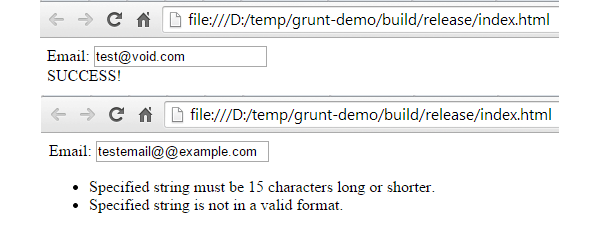
The app uses a somewhat contrived set of validation rules stating that the email address entered must be: not empty, no longer than 15 characters and in a valid format.
As stated above, the application is written in TypeScript. It uses the RequireJS loader to enable modular development and easier development tracking. It also uses Knockout as a data-binding library, although with a UI that is that simple, it doesn’t really matter all that much.
With Postcards Email Builder you can create and edit email templates online without any coding skills! Includes more than 100 components to help you create custom emails templates faster than ever before.
Free Email BuilderFree Email TemplatesTools and Libraries
A majority of the tools used in front-end development run in Node.js. Be sure to install it if you want to follow along. You’ll also need NPM — a node packet manager, which makes it easy to install those tools and their dependencies.
We’ll start by creating a folder for the app, let’s call it “grunt_demo”. We need to initialize it for using with npm. To do so, open a command line, set the project folder as a working directory and run the initialization command:
> cd grunt_demo
> npm init
It will ask you a couple of simple questions and create a package.json file, which will store a list of packages you’ve installed for this project.
By now your folder should look something like this:
+ grunt-demo
|-- package.json
Now, to get RequireJS and Knockout, we’ll install another package manager called Bower. Compared to NPM, which is used for Node.js development and development tools, Bower is a front-end package manager. We’ll use it to get libraries that are supposed to run in a browser.
To install Bower from NPM, you’ll need to run the following command: > npm install bower -g
Option “-g” instructs the packet manager to install Bower globally in the system. Normally, packages are installed locally inside the project folder so each project can use specific versions of packages without affecting other projects. But since Bower is not a direct dependency of an application or it’s supporting tools, there is no need to install it locally.
To use Bower, we also need to initialize the folder: > bower init
With Pulsetic you’ll be instantly notified the moment your website, API, or server becomes unavailable. Monitor uptime from multiple global locations and respond to incidents before your users are affected.
Create beautiful status pages in minutes to keep customers informed during outages and build trust with transparent communication.
Start Monitoring for FreeYou’ll go through the same process of answering questions as you did when we initialized NPM. In fact, as you’ll soon see, both packet managers use a pretty similar set of commands.
After initialization, Bower will create it’s own analog of package.json, called bower.json:
Now we are all set to install RequireJS and Knockout:
> bower install requirejs --save
> bower install knockout --save
Those commands will download and install both libraries to your project folder, inside the “bower_components” subfolder.
“–save” key instructs Bower keep a record of installed packages in bower.json. That way, as long as you commit bower.json to your repository, you don’t have to include the “bower_components” folder, but you’ll still be able to re-install the exact versions of the libraries your app depends on.
Next, we’ll install the TypeScript compiler. Since TypeScript is being actively worked on, with the new versions being released often, we’ll install it locally in our project folder:
> npm install typescript --save-dev
“–save-dev” key works the same way as “–save” (both Bower and NPM support these keys), but registers the installed package as a development dependency, i.e. the dependency that is needed during development time, but not required to actually run the app. NPM packages are installed in the “node_modules” subfolder.
It you read our article about TypeScript, you know that in order to get autocomplete suggestions and type checking for external libraries, the TypeScript compiler needs to type definition modules. A collection of high quality type definitions for a variety of popular JavaScript libraries is maintained in a repository called DefinetelyTyped.
Instead of downloading the entire repository, with type definitions for hundreds of libraries that we don’t need, we’ll install yet another package manager, but now one specifically designed for TypeScript definition. It is called TypeScript Definition manager (TSD for short) and uses DefinitelyTyped as a source for type definitions.
We’ll follow the same procedure as we did for Bower, by installing it globally from NPM and initializing the project folder:
> npm install tsd@next -g
> tsd init
Initialization will create a tsd.json for tracking installed definition modules.
Issuing the following commands will download definitions for Knockout and RequireJS and put it inside the typings subfolder at your project location:
> tsd install require --save
> tsd install knockout --save
TSD will also create and maintain a “tsd.d.ts” file, which will reference all installed type definition modules using the TypeScript /// <reference /> comment structure. It’s handy because now you can only reference a single “tsd.d.ts” file in our *.ts files to get type definitions for all installed libraries (instead of referencing them one by one).
Implementation
Now we are ready to write the demo application. Let’s create a source folder called “src”. We’ll need an “index.html” file to represent a single screen of our application. We’ll also need configuration and bootstrap scripts for RequireJS. The main application logic will go into the “app” subfolder and will consist of the main application view model and an email validator. To make the app a bit more interesting, the email validator will use a generic validation library that will reside in the “validation” subfolder:
…
|– + src
|– + app
|– emailValidator.ts
|– mainViewModel.ts
|– + validation
|– validator.ts
|– … other validation files …
|– index.html
|– require.config.ts
|– require.startup.ts
…
The HTML markup for the app is fairly simple:
<!DOCTYPE HTML>
<html>
<head>
  <meta http-equiv="Content-Type" content="text/html; charset=UTF-8">
  <title>Grunt Demo</title>
  <script src="require.config.js"></script>
  <script src="../bower_components/requirejs/require.js"
          data-main="require.startup"></script>
</head>
<body>
  <form action="#">
    <label for="email-input">Email:</label>
    <input id="email-input" type="text" data-bind="value: email" />
  </form>

  <!-- ko if: errors().length -->
  <ul data-bind="foreach: errors">
    <li data-bind="text: $data"></li>
  </ul>
  <!-- /ko -->

  <!-- ko if: !errors().length -->
  <span>SUCCESS!</span>
  <!-- /ko -->
</body>
A couple of things to note here. We first load a require configuration file, which we refer to with the extension “.js”, although at the moment we only have a “.ts” version of it. We’ll deal with the compilation later. Next, RequireJS is loaded and configured to execute the “require.startup” module (using data-main=”…” attribute) after initialization is complete. This will be the entry point of our application. Finally, there is a simple HTML markup that is used to display an email entry form and validation results. data-bind=”…” attributes and <!– /ko –> comments represent a Knockout-specific way to define data bind the UI to the model.
In require.config.ts we simply configure base URL and some paths for RequireJS:
var require: Require = &amp;amp;lt;any&amp;amp;gt;{
baseUrl: '.',
paths: {
'knockout': '../bower_components/knockout/dist/knockout'
}
};
An entry point is also fairly simple:
require(['knockout', 'app/mainViewModel'], (ko, MainViewModel) =&amp;amp;gt; {
ko.applyBindings(new MainViewModel());
});
All it does is create an application view model and pass it to Knockout to bind to our UI represented as an HTML markup.
The main view model uses an email validator to validate an email stored in an “email“ property. Validation errors are assigned to the “errors” property. The validation process is run each time the email is changed, which is done using Knockout computed properties.
/// <reference path="../../typings/tsd.d.ts" />

import ko = require('knockout');
import EmailValidator = require('app/emailValidator');
import validationUtil = require('validation/validationUtil');

class MainViewModel {
  public email: KnockoutObservable<string>;
  public errors: KnockoutComputed<Array<string>>;

  private validator: EmailValidator;

  constructor() {
    this.validator = new EmailValidator(15 /* maxLength */);

    this.email = ko.observable('')
    this.errors = ko.computed(() => this.getValidationErrors());
  }

  private getValidationErrors(): Array<string> {
    var failure = this.validator.validate(this.email());
    return validationUtil.getFailureMessages(failure);
  }
}

export = MainViewModel;
Notice how it references the “tsd.d.ts” file to get type definitions for Knockout.
EmailValidator.ts and the rest of the validation-related code can be found in the source code download attached to this article.
Now, when the application is ready, it’s time to build and run it.
Grunt Task Runner
Installation
We’ll handle all build-related tasks using Grunt, which is a task runner designed to automate routine tasks.
We’ll start by installing the Grunt command line interface (CLI).
> npm install grunt-cli -g
It does not install the task runner itself. This is only a simple portion that provides command line access to the Grunt task runner, which will be installed locally alongside your project. That way, multiple projects can use their own version of Grunt.
To install the Grunt task runner, let’s run the following command:
> npm install grunt --save-dev
The last bit of installation is to create “gruntfile.js” in the project root folder. This is the node.js script that will contain definitions and configuration of all tasks that we want to run for this project.
Grunt Basics
Command Line
Tasks are what Grunt executes and runs. A task can represent a particular thing to do, like a step of your build process or a sequence of steps. Whenever you run Grunt, you specify one or more tasks to run.
To run a particular task, you can use following command: > grunt [task_name],
where [task_name] is the name of a task to run. Grunt will attempt to run a task named “default” if the task name is not specified.
So, > grunt default and > grunt will do the same thing.
Gruntfile
Tasks are specified and configured in the gruntfile. It has a simple structure:
module.exports = function(grunt) {
  grunt.initConfig({
     // task configuration goes here
  });
  // load tasks from plugins
  grunt.loadNpmTasks('grunt-contrib-uglify’);
  // register tasks
  grunt.registerTask('default', ['uglify']);
};
Tasks
There are three types of tasks in Grunt: Alias tasks, multi tasks and basic tasks.
Alias Tasks
Alias tasks are registered using the grunt.registerTask() method. You pass a task name, an optional description and an array of other task names:
grunt.registerTask('conquer_the_world', ['veni', 'vidi', 'vici']);
The statement above creates a new alias task called “conquer_the_world”. Calling
> grunt conquer_the_world
will run tasks “veni”, “vidi” and “vici” in the order they are specified in the array.
Alias tasks are handy for defining sequences of steps.
Multi tasks
Multitasks are the ones that require configuration. Task configuration is specified as part of the object that is passed to the grunt.initConfig() method at the beginning of the grunt file. A particular set of configuration parameters for a task is called a target. A multi task can have multiple targets (that’s where the “multi”- part of the “multi task” moniker comes in.)
The example below shows how to pass some configuration parameters to a task called “copy” with two targets called “html” and “css”:
grunt.initConfig({
  copy: {
    html: /* configuration parameters here */,
    css:  /* configuration parameters here */
  }
});
Target configuration can be any valid JSON-object, for example:
grunt.initConfig({
  copy: {
    html: { ext: '.html' },
    css:  { ext: '.css' }
  }
});
To run a task with a particular target, you reference it using the following schema:
[task_name]:[target_name]
Multitasks are registered using the grunt.registerMultiTask() method. You pass a task name, an optional description and a function that will be executed when Grunt runs a task. Inside that function, this.target will have a target name and this.data will contain target configuration.
grunt.registerMultiTask('copy', function() {
  grunt.log.writeln(this.target + ': *' + this.data.ext);
});
Running “grunt copy” (with the configuration provided in the example above) will output:
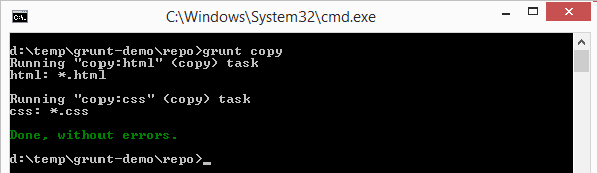
Basic tasks
Basic tasks simply allow you to execute the specified function. Grunt does not look for a configuration like it does for multi task. You register basic tasks using the same grunt.registerTask() method, but instead of passing an array of other tasks, you pass a function:
grunt.registerTask('foo', function() {
  grunt.log.writeln('Hello, world!');
});
You can pass arguments to basic tasks by appending them to a task name using the following pattern:
[task_name][:arg_1][:arg_2]…[:arg_N]
Plugins
The list of plugins is available at gruntjs.com. Plugins are installed using NPM. Once a plugin is installed, you can call grunt.loadNpmTasks() method, passing a plugin name as a first parameter, to load tasks from the plugin:
grunt.loadNpmTasks('grunt-contrib-watch');
Build Tasks
Now it’s time to use Grunt to build our small demo application.
First, we need to think what we want to achieve. At the very least we need TypeScript files compiled to JavaScript, otherwise we wouldn’t be able to run the app at all.
To encourage ourselves to write better code, we also would like to run some sort of linter on our TypeScript code to ensure that we follow best practices and avoid common TypeScript / JavaScript pitfalls.
During our build process, we will compile code located in the “src” folder and produce, debug and release versions of the app, which we’ll put in a folder named “build”.
…
|– + build
|– debug
|– release
…
TypeScript Compilation
Let’s start with the TypeScript compilation. A quick search shows that someone has already written a Grunt task to do exactly that. Let’s install the grunt-ts plugin and start writing a grunt file using the framework shown in the corresponding section above.
> npm install grunt-ts --save-dev
Configure the plugin, and point it to where the TypeScript files are located. We also need to register plugin tasks. Finally, we’ll define an alias task called “default,” which will perform a build process.
We can lookup configuration details for a plugin on its NPM page.
module.exports = function(grunt) {
  grunt.initConfig({
    ts: {
     default: {
        src: './src/**/*.ts'
        outDir: './build/debug/'
      }
    },
  });
  grunt.loadNpmTasks('grunt-ts');
  grunt.registerTask('default', ['ts']);
};
In the code snippet above we configure a single target called “default,” and specify the location of TypeScript files and an output folder where to place all the compiled JavaScript files.
The ./src/**/*.ts pattern means that we need to compile all files that have the extension .ts and are located inside the “src” folder or any of its subfolders. Note also that a directory pattern ends with “/“. A dot at the beginning of the path means project root, which is the location of the grunt file.
Since manipulations with files are quite often required during build tasks, Grunt supports a lot of ways of specifying which files to access. You can find them described here.
While reading through grunt-ts documentation, you may notice that it is installed with it’s own version of the TypeScript compiler, which unfortunately is a bit out date. Hopefully, we can specify a path to our own version (which, if you remember, we’ve installed to “node_modules/typescript”).
module.exports = function(grunt) {
  grunt.initConfig({
    ts: {
options: {
	  compiler: './node_modules/typescript/bin/tsc'
},
     default: {
        src: './src/**/*.ts'
        outDir: './build/debug/'
      }
    },
  });
...
};
Although it looks like we’ve defined another target, it’s not exactly true. The “options” key is a special key that defines some settings shared by all targets. Each target can in turn contain the “options” property to override some of the global options.
Now, if we run a default task in Grunt, it should compile our TypeScript code and place the compiled versions into the “build/debug” folder.
> grunt
(Remember, you don’t need to specify a task name if you want to run a task called “default.”)
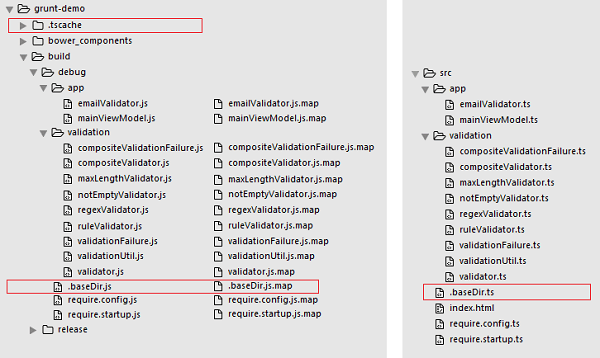
Indeed, the debug folder contents now mirror our src folder structure, but contains twice as many files. That is because the TypeScript compiler by default creates a .map file for each of the compiled JavaScript files. These files contain a source map files that allows you to see TypeScript code in the browser debugger instead of JavaScript, which actually is running. You can read more about source maps here.
There are some unexpected additions. These include the “.tscache” folder in the project root folder and “.baseDir.ts” in the “src” folder (along with the compiled versions of that file in “build/debug”).
These are files that grunt-ts creates to be able to incrementally compile only changed TypeScript files instead of recompiling an entire project even when a single file was changed. It stores a hash of each TypeScript file it compiled in the “.tscache” folder and uses the “.baseDir.ts” file as a marker of the code root folder (this is necessary to be able to maintain the same folder structure in the destination folder as in the source folder).
With that mystery out of our way, the only issue that keeps us from running a debug version of our application is the missing index.html file, which we haven’t yet copied to the “build/debug” folder.
File Copy
A quick search through the Grunt plugin page reveals a plugin called “grunt-contrib-copy” that is designed specifically for copying files between folders.
> npm install grunt-contrib-copy --save-dev
Now, we can update the grunt file to include another build step:
module.exports = function(grunt) {
  grunt.initConfig({
    copy: {
      html: {
        flatten: true,
        expand: true,
        src: './src/index.html',
        dest: './build/debug/'
      }
    },

    ts: {
options: {
	  compiler: './node_modules/typescript/bin/tsc'
},
     default: {
        src: './src/**/*.ts'
        outDir: './build/debug/'
      }
    },
  });

  grunt.loadNpmTasks('grunt-ts');
  grunt.loadNpmTasks('grunt-contrib-copy');

  grunt.registerTask('default', ['copy:html', 'ts']);
};
Note the “expand” and “flatten” configuration options under the “copy:html” target. Normally the copy task preserves the folder structure, and if these two options weren’t set, “index.html” would’ve been copied to “./build/debug/src/index.html” instead of “./build/debug/index.html”, which we want. The “Expand” option is required in order to be able to specify the “flatten” option, which helps us achieve what we want. “Flatten” removes all path parts from the generated “dist” paths, meaning that in our case “./src/index.html” will first be reduced to “index.html” before appending it to “./build/debug/” destination.
Templates
Before we attempt to build and run out the demo application, we have to address one important thing. Notice how adding a configuration for another topic forced us to repeat ourselves:
grunt.initConfig({
  copy: {
    html: {
      flatten: true,
      expand: true,
      src: './src/index.html',
      dest: './build/debug/'
    }
  },
  ts: {
    options: {
      compiler: './node_modules/typescript/bin/tsc'
    },
    default: {
      src: './src/**/*.ts',
      outDir: './build/debug/'
    }
  },
});
Imagine if we wanted to change our project folder structure or simply rename one of the folders. That would force us to go through all the configurations in the grunt file and update multiple places to reflect the changes in folder names or structure. Although it might seem easy to do with our simple configuration, it’s fairly easy to imagine a more complicated grunt file where that would be a real issue.
Hopefully, there is a trick up in the Grunt’s sleeve to help us keep the grunt file DRY. In the configuration object you can define properties to store arbitrary data. The only limitation is to keep those property names different from task names.
You can then reference these properties in task configuration objects using <%= %> syntax.
grunt.initConfig({
  vars: {
    sourcePath: './src/',
    buildPath: './build/',
    debugPath: '<%= vars.buildPath %>debug/',
    typescriptFiles: '<%= vars.sourcePath %>**/*.ts',
    indexHtmlFile: 'index.html'
  },
  copy: {
    html: {
      flatten: true,
      expand: true,
      src: '<%= vars.sourcePath %><%= vars.indexHtmlFile %>',
      dest: '<%= vars.debugPath %>'
    }
  },

  ts: {
    options: {
      compiler: './node_modules/typescript/bin/tsc'
    },
    default: {
      src: '<%= vars.typescriptFiles %>',
      outDir: '<%= vars.debugPath %>'
    }
  },
});
“Vars” here does not correspond to any task name used and does not define any task configuration. It’s used to store some constant values that we want to share between task configurations. That way, if the folder structure changes, we can update the grunt file in a single place.
Text Replacement
Now grunt seemingly does what we want. It puts the compiled *.js files and index.html into the build/debug folder. However, an attempt to run an app won’t be successful. The reason for that is the paths to libraries used.
Remember the folder structure we’ve established.
+ grunt-demo
|– + bower_components
|– + knockout
|– … knockout.js files …
|– + requirejs
|– … require.js files …
|– + node_modules
|– + typings
|– + src
|– + app
|– + validation
|– index.html
|– require.config.ts
|– require.startup.ts
|– package.json
|– bower.json
|– tsd.json
Both RequireJS and Knockout reside outside of the source folder. When they are referenced in index.html and require.config.ts, we used paths relative to these files to refer to those libraries:
index.html
<script src="require.config.js"></script>
<script src="../bower_components/requirejs/require.js"
        data-main="require.startup"></script>
require.config.ts
var require: Require = &amp;amp;lt;any&amp;amp;gt;{
baseUrl: '.',
paths: {
'knockout': '../bower_components/knockout/dist/knockout'
}
};
However, the debug version of the application is located in a folder that is nester 1 level deeper relative to “bower_components”, compared to the “src” folder.
+ grunt-demo
|– + bower_components
|– + knockout
|– … knockout.js files …
|– + requirejs
|– … require.js files …
|– + build
|– + debug
|– + app
|– + validation
|– index.html
|– require.config.js
|– require.startup.js
|– …
That means that index.html and require.config.js in the build/debug folder have to reference libraries using the “../../bower_components/” path instead of “../bower_components/”.
We could, of course, add an extra “../” prefix to files located in the “src” folder. However, imagine if we wanted to change the location where the application is built to. We’d have to change the gruntfile first, since it’s currently defines the target location. We’d also need to remember to update “src/index.html” and “src/require.config.ts” to reflect the new build target folder. And having to remember things is a sure way to make mistakes, because human memory is not perfect.
Aside from violating the DRY principle, this approach also ignores the Single Responsibility Principle (SRP) as well. Ideally, the grunt file alone should be responsible for project builds, keeping the source code unaware of details of where it’s going to be deployed.
One solution for that problem is to let grunt file set the relative path to the “bower_components” folder. Let’s update both “src/index.html” and “src/require.config.ts” and replace “../bower_components” with some token value:
index.html
<script src="require.config.js"></script>
<script src="{{bower}}/requirejs/require.js"
        data-main="require.startup"></script>
require.config.ts
var require: Require = &amp;amp;lt;any&amp;amp;gt;{
baseUrl: '.',
paths: {
'knockout': '{{bower}}/knockout/dist/knockout'
}
};
Now, all we need to do is to replace this {{bower}} string with an actual relative path during the build procedure. Luckily, there is a plugin that does exactly that.
> npm install grunt-text-replace --save-dev
In the grunt file we make the necessary adjustments:
module.exports = function(grunt) {
  grunt.initConfig({
    vars: {
      sourcePath: './src/',
      buildPath: './build/',
      debugPath: '<%= vars.buildPath %>debug/',
      typescriptFiles: '<%= vars.sourcePath %>**/*.ts',
      indexHtmlFile: 'index.html',
      requireConfigFile: 'require.config.js',
      bowerPathRelativeToBuildTarget: '../../bower_components'
    },
    copy: { ... shortened for brevity ... },
    ts: { ... shortened for brevity ... },
    replace: {
      bower: {
        src: [
          '<%= vars.debugPath %><%= vars.indexHtmlFile %>',
          '<%= vars.debugPath %><%= vars.requireConfigFile %>'
        ],
        overwrite: true,
        replacements: [{
          from: '{{bower}}',
          to: '<%= vars.bowerPathRelativeToBuildTarget %>'
        }]
      }
    }
  });
  grunt.loadNpmTasks('grunt-ts');
  grunt.loadNpmTasks('grunt-contrib-copy');
  grunt.loadNpmTasks('grunt-text-replace');
  grunt.registerTask('default', ['copy:html', 'ts', 'replace:bower']);
};
Finally, we can run the app and make sure that the build is successful.
Linting
One final bit of building a debug version of the app is to run all TypeScript code through linter to enforce a consistent coding style that encourages following best practices and avoiding common pitfalls.
> npm install grunt-tslint --save-dev
This grunt plugin uses TSLint to check the specified TypeScript files. It comes with a robust set of built-in rules it can verify (for example, enforcing that class names are PascalCased, or that curly braces are not omitted in if/for/do/while statements). It also supports custom rules, but we are not going to use those.
module.exports = function(grunt) {
grunt.initConfig({
vars: { ... shortened for brevity ... },
copy: { ... shortened for brevity ... },
ts: { ... shortened for brevity ... },
replace: { ... shortened for brevity ... },
tslint: {
default: {
files: {
src: '&amp;amp;lt;%= vars.typescriptFiles %&amp;amp;gt;'
}
}
}
});
grunt.loadNpmTasks('grunt-ts');
grunt.loadNpmTasks('grunt-contrib-copy');
grunt.loadNpmTasks('grunt-text-replace');
grunt.loadNpmTasks('grunt-tslint');
grunt.registerTask('default', [
'copy:html', // - copy index.html to build/debug folder
'tslint', // - lint *.ts files
'ts', // - compile *.ts files to build/debug folder
'replace:bower' // - replace placeholders with an actual
// bower_components path
]);
};
The exact set of rules that TSLint verifies is configured in the tslint.json file. Let’s copy it from “./node_modules/grunt-tslint/” to the root of the project and make some adjustments. (To indicate that we are going to use this copy of the configuration file, we need to specify that in the task configuration:
tslint: {
  options: {
    configuration: grunt.file.readJSON('tslint.json')
  },
  default: {
    files: {
      src: '<%= vars.typescriptFiles %>'
    }
  }
}
Now you can, for example, disable a rule that requires all *.ts files to have an empty line at the end. You’ll need to open tslint.json in an editor and change “eofline”: true to “eofline”: false.
We’ve also adjusted a rule that enforces consistent string quotation marks. By default, it requires that all strings are enclosed in double quotes, but, as you can see from the code snippets in this document, we prefer using single quotes. So we’ve changed the rule configuration like this:
“quotemark”: [true, “single”]
The list of built-in rules and their settings is available here.
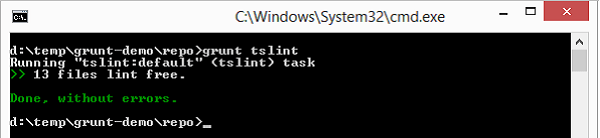
Now, let’s see if our code is in a good shape. By the way, you can run a linting task alone (instead of triggering an entire build process) using the following command:
> grunt tslint
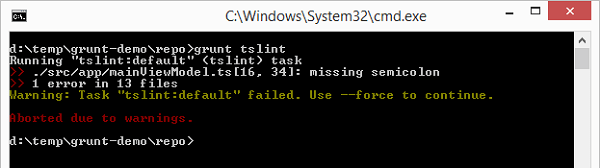
And it appears that we’ve missed a semicolon in one place (mainViewModel.ts):
constructor() {
this.validator = new EmailValidator(15 /* maxLength */);
this.email = ko.observable('') // <- missing semicolon
this.errors = ko.computed(() => this.getValidationErrors());
}
Indeed, there is one needed at the end of line 16. In JavaScript there is an automatic semicolon insertion (ASI) feature that makes it possible to omit semicolons. There will be no error or warning issued. But JavaScript is not a semicolon-less feature and reliance on ASI might lead to some subtle and hard to find issues. This is so much the case that the TypeScript compiler actually detects missing semicolons and silently inserts them into the code generated. Strictly speaking, this is no better than what ASI does, so we’d better pay attention to the linter warning and fix the issue:
this.email = ko.observable(''); // <- that's better
Bundling and Optimization
With the build process is in place for a debug version of the application, we are now ready to takethe next logical step and update the build process to be able to produce a release version.
It doesn’t make much sense to prepare a release version every time we need to build and run our app. Thus, we’ll separate the build steps that are required for a release version into a separate task.
module.exports = function(grunt) {
  ...
  grunt.loadNpmTasks('grunt-tslint');
  grunt.registerTask('debug', [
    'copy:html',      // - copy index.html to build/debug folder
    'tslint',         // - lint *.ts files
    'ts',             // - compile *.ts files to build/debug folder
    'replace:bower'   // - replace placeholders with an actual
                      //   bower_components path
  ]);
  grunt.registerTask('release', [ 'debug', ... other release steps ... ]);
  grunt.registerTask('default', [ 'debug' ]);
};
As you can see from the code snippet above, we’ve renamed the “default” task to “debug”, and registered another alias task called “release”. That way, we’ll be able to call:
> grunt debug
to build a debug version of the app, and
> grunt release
to prepare a release build.
We’ve also created a new “default” task that simply delegates all the work to the “debug” task. That way we can create a debug version with a simple command:
> grunt
just like we did in the previous section of this document. This provides a nice shortcut and saves us a few keystrokes.
To build a release version, we still need to perform all the steps we did for the debug version. That is why the first thing the “release” task does is execute the “debug” task.
grunt.registerTask('release', [ 'debug', ... other release steps ... ]);
Currently, in the debug version, we have a lot of individual script files that are loaded asynchronously using RequireJS when our application needs it. In the production version though, we might not want to take a performance overhead of making dozens of requests to load each individual script. We also want to minimize the amount of data that is downloaded when a page is opened in order to make it load faster and save some bandwidth.
To achieve both goals we’ll use r.js — a RequireJS optimization tool that bundles all scripts into a single file and minimizes the file using UglifyJS.
And yet again, someone has done all the heavy lifting of integrating these tools with grunt for us.
> npm install grunt-contrib-requirejs --save-dev
module.exports = function(grunt) {
  grunt.initConfig({
    vars: {
      ... shortened for brevity ...
      releasePath: '<%= vars.buildPath %>release/',
      requireEntryPointName: 'require.startup',
      releaseScriptsBundleFile: 'scripts.js'
    },
    copy: { ... shortened for brevity ... },
    ts: { ... shortened for brevity ... },
    replace: { ... shortened for brevity ... },
    tslint: { ... shortened for brevity ... },
    requirejs: {
      compile: {
        options: {
          baseUrl: '<%= vars.debugPath %>',
          mainConfigFile: '<%= vars.debugPath %>'
                          + '<%= vars.requireConfigFile %>',
          name: '<%= vars.requireEntryPointName %>',
          out: '<%= vars.releasePath %>'
               + '<%= vars.releaseScriptsBundleFile %>',
          include: [
            '<%= vars.bowerPathRelativeToBuildTarget %>/requirejs/require'
          ]
        }
      }
    }
  });
  ...

  grunt.loadNpmTasks('grunt-contrib-requirejs');
   ...
  grunt.registerTask('release', [ 'debug', 'requirejs' ]);
  grunt.registerTask('default', [ 'debug' ]);
};
We’ve configured the “requirejs” task to look through all the JavaScript files in the “build/debug” folder and bundle them together along with their dependencies (Knockout and RequireJS). The configuration also specifies that the bundle should be called “scripts.js” and be placed in the “build/release” folder.
Script References Replacement
Now our release build process bundles scripts and puts them into the “build/release” folder. But that’s not enough. We are, yet again, missing the index.html file.
+ grunt-demo
|– + bower_components
|– + build
|– + release
|– styles.js
|– …
And we can not simply copy it from the debug to the release folder. This is because index.html in the debug folder does not know anything about the styles.js bundle we’ve built and still references individual scripts (using RequireJS):
build/debug/index.html
<head>
    <meta http-equiv="Content-Type" content="text/html; charset=UTF-8">
    <title>Grunt Demo</title>

    <script src="require.config.js"></script>
    <script src="../../bower_components/requirejs/require.js"
                data-main="require.startup"></script>
</head>
What we want is a copy of that file with


