Create an SVG Animation using CSS and JavaScript
SVG, or Scalable Vector Graphics, is an application of XML to provide vector graphical information in a lightweight form. Unlike the other rasterized image format such as PNG and JPEG, SVG can be scaled without loss of image quality.
Creating an SVG graphic can be designed using Adobe Illustrator and other graphics editing software or manually using XML/SVG DOM tags and settings to create elements, shapes or paths.
Although these are XML graphics it is possible to put some animation on them which can be implemented in many different ways such as CSS, JavaScript and SMIL (Synchronized Multimedia Integration Language).
In today’s tutorial, I am going to show you how you can animation SVG using CSS and JavaScript using icons, text and vector graphics.
Resource you need to complete this tutorial:
- SVG Icons
- SVG Text
- SVG Vector Plant and Vase
- Knowledge about HTML and CSS
- Time and Patience
Exporting Adobe Illustrator Files to SVG
One of the best ways to export an image to SVG format is by using Adobe Illustrator. I already created the final SVG icons, text and illustrator that we will be using on this tutorial.
With Postcards Email Builder you can create and edit email templates online without any coding skills! Includes more than 100 components to help you create custom emails templates faster than ever before.
Free Email BuilderFree Email Templates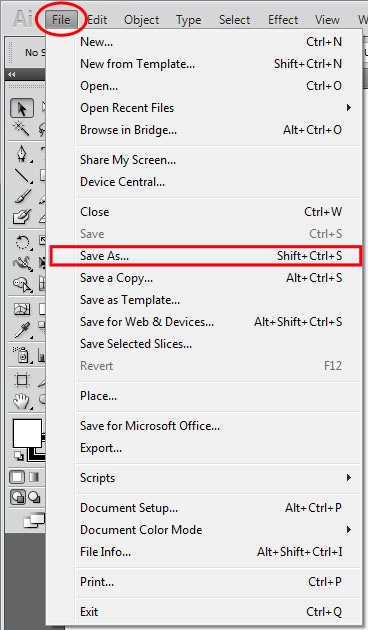
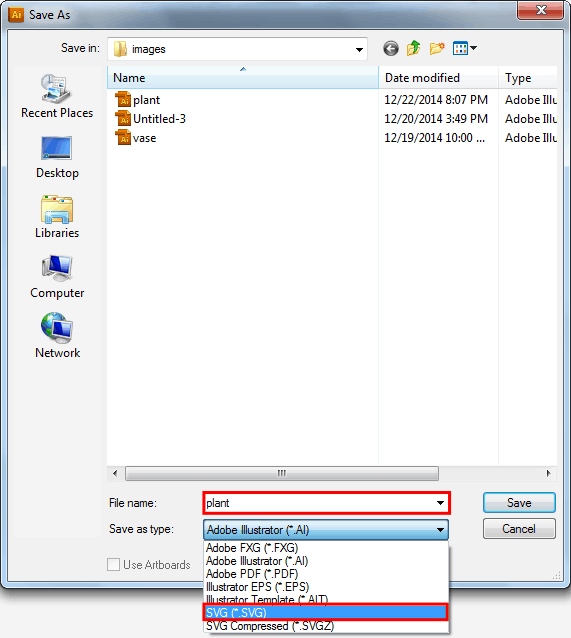
To export your Adobe Illustrator files to SVG, simply go to File->Save As and then put your desired name of the SVG format you want to export. On this example I’ll use “plant” and for the type format select SVG.
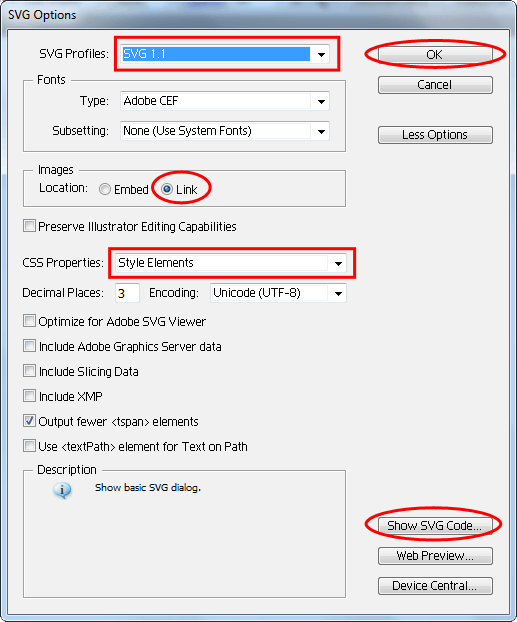
Next, the SVG option window will appear; make sure version SVG 1.1 is selected under profiles and then the link radio button was set selected on images location. For the CSS properties, select Style Elements. If you want to check the SVG codes you can simply click the “Show SVG Code” button on the bottom part. To finish the export process simply click on the “OK” button.
Using SVG in HTML
SVG as stated above is an XML based file and some browsers allow you to insert an SVG image on HTML. There are different ways to include SVG on HTML documents.
1. By inserting whole SVG XML codes on your HTML document
This is the quickest way to insert SVG images on HTML documents. Copy and paste SVG XML codes within the <svg> tag. If you have more than one SVG image that you want to insert this might be a little confusing especially if you are just getting started. See the example below:
<svg version="1.1" xmlns="https://www.w3.org/2000/svg" xmlns:xlink="https://www.w3.org/1999/xlink" x="0px" y="0px" width="200px" height="200px" viewBox="0 0 200 200" style="enable-background:new 0 0 200 200;" xml:space="preserve" class="icon">
<style type="text/css">
.st0 {
    fill:none;
    stroke:#F2F2F2;
    stroke-width:4;
    stroke-miterlimit:10;
}
.icon .st0 {
    -webkit-transition: .5s;
    -moz-transition: .5s;
    transition: .5s;
}
.icon .fill {
    -webkit-transition: .5s;
    -moz-transition: .5s;
    transition: .5s;
    fill: #ffffff;
}
.icon:hover {
    cursor: pointer;
}
.icon:hover .st0 {
    stroke: #1f8a4c;
}
.icon:hover .fill {
    -webkit-transform: scale(893, 893);
    -moz-transform: scale(893, 893);
    transform: scale(893, 893);
}
</style>
    <g id="fill" transform="translate(101,99)">
        <circle class="fill" r="0.1" />
    </g>
    <g id="container">
        <circle class="st0" cx="101" cy="99" r="89.333" />
    </g>
    <g id="icon-details">
        <path class="st0" d="M146.899,134.202c3.856,4.702,2.772,11.963-2.418,16.218l0,0c-5.192,4.258-12.523,3.896-16.38-0.806
        l-30.004-36.594c-3.855-4.701-2.772-11.964,2.418-16.22l0,0c5.19-4.256,12.523-3.895,16.377,0.808L146.899,134.202z" />
        <circle class="st0" cx="77.843" cy="72.434" r="33.331" />
        <circle class="st0" cx="77.844" cy="72.434" r="22.343" />
    </g>
</svg>
2. By using an image tag
Another way to include SVG in your HTML documents is by using the <img> tag via src attribute. This is the same process of importing ordinary image format on your HTML tag. However, it doesn’t work sometimes and it’s hard to manipulate via CSS. Check out the example below:
With Startup App and Slides App you can build unlimited websites using the online website editor which includes ready-made designed and coded elements, templates and themes.
Try Startup App Try Slides AppOther Products&amp;lt;img src=&amp;quot;images/text-svg.svg&amp;quot; alt=&amp;quot;text svg&amp;quot;&amp;gt;
3. By using the object tag
This is the preferred way to import SVG images. Using the <object> tag along with the <embed>, it renders the image in a vector format on different browsers. For the rest of this tutorial, were going to use this method to include our SVGs on HTML documents. See the example below.
<object>
	<embed src="images/text-svg.svg">
</object>
Note: Although CSS and JavaScript can be used for SVG animation via inline and internal styling properties, it doesn’t guarantee that it is supported on all browsers especially on IE9 or below.
SVG Icon Hover Animation
For this part of the tutorial, I created three SVG flat icons that we’re going to work with. The first thing we need to do is insert them on our HTML document <embed> tag and then wrap them in an <object> tag.
<ul>
<li>
		<object>
			<embed src="images/icon-magnifying-glass.svg">
		</object>
</li>
<li>
		<object>
			<embed src="images/icon-list.svg">
		</object>
</li>
<li>
		<object>
			<embed src="images/icon-envelope.svg">
		</object>
</li>
</ul>
Now it’s time for the CSS, where we we will manipulate the hover effects of the SVG. To do this, we’re going to apply CSS on each SVG images classes via internal CSS.
.st0 {
    fill:none;
    stroke:#F2F2F2;
    stroke-width:4;
    stroke-miterlimit:10;
}
.icon .st0 {
    -webkit-transition: .5s;
    -moz-transition: .5s;
    transition: .5s;
}
.icon .fill {
    -webkit-transition: .5s;
    -moz-transition: .5s;
    transition: .5s;
    fill: #ffffff;
}
.icon:hover {
    cursor: pointer;
}
.icon:hover .st0 {
    stroke: #1f8a4c;
}
.icon:hover .fill {
    -webkit-transform: scale(893, 893);
    -moz-transform: scale(893, 893);
    transform: scale(893, 893);
}
Using the default SVG class provided by Adobe Illustrator when these SVG icons were exported, we’re going to add CSS3 transition property to create a smooth fill effect. The fill property is the same with background-color in CSS while the stroke property is the same as the border-color. To create a pop-out hover effect we’re going to use CSS3 transform scale and manipulate the behavior of the fill.
SVG Text Animation
The next SVG animation that we will look on is about drawing text SVG. The text.svg file contains the words “SVG TEXT” within a box. So basically what we’re trying to achieve here is that we will make the border rotate in a dash form and then add an animation delay before drawing the text.
We’re still using the <object> and <embed> tag here to insert our SVG file into our HTML document.
<object>
  <embed src="images/text-svg.svg">
</object>
For our CSS we’re going to use stroke-dasharray and stroke-dashoffset to create a smooth line drawing effect. Stroke-dasharray attribute basically set up the flow of dashes and used to stroke paths while stroke-dashoffset determines the distance between dashes.
We will use CSS3 @keyframes to attain this effect and then set up the animation delay for the st1 class which is the actual class of the text svg itself.
.st0 {
    font-family:'Lato-Light'
}

.st1 {
    font-size:181.2018px
}

.st2 {
    display:none
}

.st3 {
    fill:none;
    stroke:#FFF;
    stroke-width:3;
    stroke-miterlimit:10
}

.st0 {
    stroke-dasharray:800;
    stroke-dashoffset:0;
    -webkit-animation:dash 2s linear forwards;
    -moz-animation:dash 2s linear forwards;
    animation:dash 2s linear forwards;
    opacity:0
}

@-webkit-keyframes dash {
from {
    stroke-dashoffset:800;
}

to {
    stroke-dashoffset:1;
    opacity:1;
}
}

@-moz-keyframes dash {
from {
    stroke-dashoffset:800;
}

to {
    stroke-dashoffset:1;
    opacity:1;
}
}

@keyframes dash {
from {
    stroke-dashoffset:800;
}

to {
    stroke-dashoffset:1;
    opacity:1;
}
}

.st1 {
    stroke-dasharray:800;
    stroke-dashoffset:0;
    -webkit-animation:dash 2s linear forwards;
    -moz-animation:dash 2s linear forwards;
    animation:dash 2s linear forwards;

    -webkit-animation-delay:1.6s;
    -moz-animation-delay:1.6s;
     animation-delay:1.6s;
}

#container {
    stroke-dasharray:50;
    stroke-dashoffset:0;
    -webkit-animation:dash 1.5s linear forwards;
    -moz-animation:dash 1.5s linear forwards;
    animation:dash 1.5s linear forwards;
}
SVG Vector Animation with CSS and JavaScript
For the last part of this tutorial, I created two vector elements. The first is a vase and the second is a plant image. The goal is to achieve an animation so that when we hover the mouse on the vase the plant will grow on the top of the base element.
Using the <object> tag, we’ll have two elements here: vase.svg and plant.svg. You’ll notice below that instead of src, I use data attribute to specify the path of our SVG. This data attribute will be use by our JavaScript codes later on to attain the effect that we want. We’ll also wrap everything in an id container and then give the plant.svg an id of plantobj and vaseobj id for the vase.svg.
<div id="container" style="margin: 0px auto; display: block; width: 300px; height: 350px">
<object data="images/plant.svg" id="plantobj" type="image/svg+xml">
</object>
<object data="images/vase.svg" id="vaseobj" type="image/svg+xml">
</object>
</div>
Now for our CSS, we need to set up the id container to position and relative and give it a specific height and width.
#container {
      position: relative;
      margin: 0px auto;
      display: block;
      width: 300px;
      height: 350px
    }
Next, let’s add styles on both vaseobj and plantobj. Basically, the styles that we’ll be adding here is the position set up of our elements. Then on our plant element, we’ll set up a CSS3 transform property of scale and then add some transition to create a smooth effect.
#vaseobj {
      position: absolute;
      bottom: 20px;
      left: 70px;
    }
    #plantobj {
      position: absolute;
      bottom: 127px;
      left: 130px;

      -moz-transform: scale(0, 0);
      -webkit-transform: scale(0, 0);
      transform: scale(0, 0);

      -moz-transform-origin: 20%, 100%;
      -webkit-transform-origin: 20% 100%;
      transform-origin: 20% 100%;

      -moz-transition: all 1.5s ease;
      -webkit-transition: all 1.5s ease;
      transition: all 1.5s ease;
    }
Then, we’ll add the CSS for our grow class which is to scale the element in a ratio of 200 percent on both x-axis and y-axis. This will make sense later on our JavaScript codes.
#plantobj.grow {
      -moz-transform: scale(2, 2);
      -webkit-transform: scale(2, 2);
      transform: scale(2, 2);
    }
Finally, let’s add some magic to our vector elements using JavaScript to create the growing effect. First, we’ll create a function to catch the SVG document. This will also test if it returns the document object produced by a frame document otherwise the value will be null. This will also make sure that we can make our cursor pointer when we hover on the vase element.
function getSubDocument(embedding_element) {
  if (embedding_element.contentDocument) {
    return embedding_element.contentDocument;
  }
  else {
    var subdoc = null;
    try {
      subdoc = embedding_element.getSVGDocument();
    } catch(e) {}
    return subdoc;
  }
}
Now let’s add the juicy part. Using the window.onload event we will assign our ids on different variable. Then using the onmouseover and onmouseout we will add the class grow to the plant element to create a smooth growing effect.
window.onload = function () {
var vaseobj = document.getElementById('vaseobj');
var vasedoc = getSubDocument(vaseobj);
var vs = vasedoc.getElementById('vase');
vs.style.cursor = 'pointer';
var plantobj = document.getElementById('plantobj');
vaseobj.onmouseover = function() {
plantobj.className = &amp;quot;grow&amp;quot;;
};
vaseobj.onmouseout = function() {
plantobj.className = &amp;quot;&amp;quot;;
}
};
More Tips
Though we can use <object> along with an <embed> tag to include an SVG image to our HTML document, developer Alexey Ten introduced some tricks on how we can use vector and provide a fall back for rasterized version of our SVG. This means using the <svg> tag we can use both the href and src attribute at the same time. Check out the example below.
<svg width="300" height="300">
    <image xlink:href="images/icon-magnifying-glass.svg" src="images/icon-magnifying-glass.png" width="300" height="300"/>
</svg>
For more information about this you can read his post regarding this.
Recommended JavaScript Library for SVG
While you can animate SVG using CSS and JavaScript, there are some good libraries online that will help you animate SVG.
Wrapping Up
SVG is one of the best ways to put XML graphics online that will enable your HTML documents to be smaller, faster and interactive.
With these simple ideas on how you can animate SVG images, check out Mozilla’s SVG guide for more ways to animate SVG documents.
And that’s it! Hopefully, you’ve learned something in this tutorial. I hope that all major browsers (as well as IE) will support SVG in the near future. This will make scalable graphics a lot better.