Bootstrap 4 Tutorial: Working with npm, Grunt.js and Sass (Part 1)
Bootstrap 4 offers a variety of options for installation making it easy for developers to install using package managers such as Bower, Composer, Meteor and npm or manually using source files.
Looking for a Bootstrap online builder?
- 👉 Try our Bootstrap Builder and create unlimited projects for unlimited clients.
- 👉 Start to build a website using our Bootstrap Templates.
In previous tutorials, we worked on source files in Bootstrap 4. But on this two part series tutorial we’re going to look on how we can use node package manager (npm) and grunt.js to install and work with bootstrap 4 and Sass.

What is Node Package Manager?
npm stands for Node Package Manager, which is the default package manager for Node.js JavaScript runtime environment.
Node.js makes it easy to write JavaScript codes for applications that enables developers to share and reuse code while the code is being updated upon sharing.
It was created on the V8 JavaScript runtime and written in C++, which was originally intended as a server environment for applications. As time passes by developers started using node.js as a task automation software that opened up a new environment for node-based tools like Grunt to improve front-end development tasks.
With Postcards Email Builder you can create and edit email templates online without any coding skills! Includes more than 100 components to help you create custom emails templates faster than ever before.
Free Email BuilderFree Email TemplatesWhy Do You Need npm to Install Bootstrap?
There are lots of advantages to using npm. Downloading bootstrap through npm enables you to gain latency time. Instead of downloading source files, you get a local one in just a couple of commands.
npm was originally to get Node Module, but with the escort of the JavaScript language (and the advent of browserify), it has grown up. In fact, you can download compass and some other useful plugins via npm.
Installing Node.js
For us to be able to use this tools available in Node.js we need to manage them by installing the package manager.
By installing node.js, we could get the node package manager that comes with it. This installs packages for projects and gives you a bunch of options that you can customize.
Go to the Node.js download page and get the version you need. There are three packages available for Mac, Windows and Linux users. Just click the next button and set it to your preferred location.

Checking npm Installation
To verify that your installation was successful, let’s give Node a try. I am using the Git Bash command prompt for Windows but you can use terminal for Mac or Linux. Otherwise, you can download and install Git if you want to.
Type npm update -g npm to check if it was installed properly or up to date. You can type npm –v if you want to check version you are using. I am using version 2.14.7.
With Startup App and Slides App you can build unlimited websites using the online website editor which includes ready-made designed and coded elements, templates and themes.
Try Startup App Try Slides AppOther Products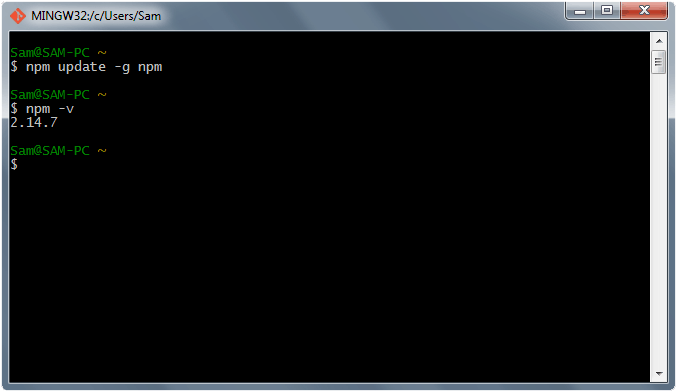
Node Package Modules
npm comes with an installation package for both local or global mode. Local mode installs the package in a node_modules folder in your parent working directory which was being used by the current user of the system.
While Global packages installs the package on {prefix}/lib/node_modules/ which is owned by root (where {prefix} is usually /usr/ or /usr/local). That being said, you might need to use sudo to install packages globally.
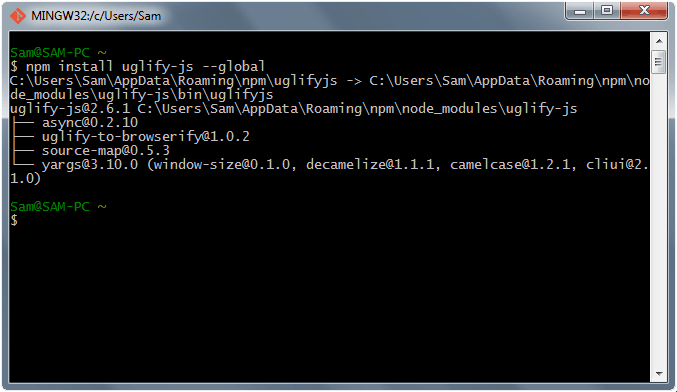
Installing Packages in Global Mode
If you want to install package globally you will need to use –global flag but this can abbreviated to -g. Let’s say we want to install uglify (a JavaScript parser/compressor, beautifier library) we can then type in npm install uglify-js –global.
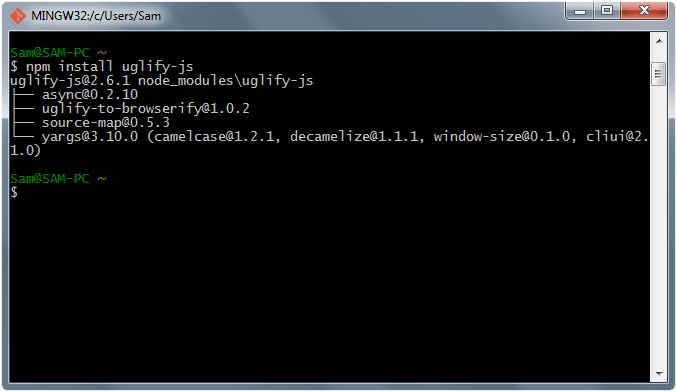
Installing Packages in Local Mode
On the other hand, installing packages in local mode can be done without the –global flag. The package will be installed to your working directory inside a node_modules folder.
Let’s try to install uglify in local mode. Type in npm install uglify-js to you command prompt or terminal.
We have covered the basics of npm. Let’s now see how we can use Grunt.js with npm to speed our development process.
P.S.: If want to learn more about npm you can always visit the documentation here.
Using Grunt.js with npm
If you are a Front-end developer you might have work with the following tasks manually:
- Concatenate all of your JS and CSS files together for production
- Compress/minify CSS, JS and image file sizes
- Use Sass and compile in .css format
- Install necessary tools for website development
All of these tasks are likely familiar and you can make them easier and more organized using Grunt.js.
Grunt is a task-based command-line tool that speeds up workflows by reducing the effort required to prepare files for production. Grunt runs on Node.js via npm but you don’t have to know Node.js to use it. Just like you don’t have to know Ruby to use Sass. While it might be intimidating at first, this part of the tutorial will help you understand easily on how we can use Grunt.js in your Bootstrap development using Sass.
We will start first with the foundation of Grunt.js and try to install the necessary plugins we can use to speed up the development.
Why use Grunt.js?
Grunt runs tasks. You specify the tasks you want Grunt to do and it will do all the work for you. It does do a great deal to streamline development workflows that you are doing manually.
Here are some of the reasons why you will love Grunt:
- It is the most widely supported and popular task runner
- Can compile Sass into CSS
- Can minify the prefixed CSS
- Check JavaScript for errors
- Concatenate other included scripts into one file
- Watch files for changes and rerun tasks as needed
- Has vast automated tasks that are already available to use
Set Up
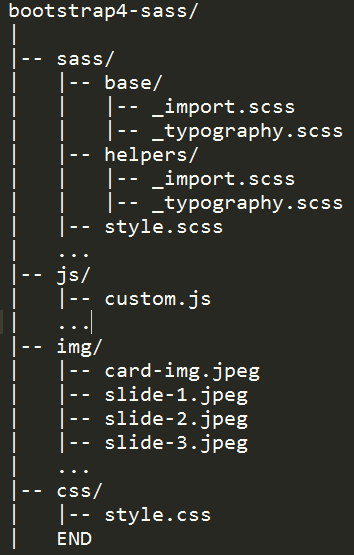
Before we install Grunt.js, let’s create our project directory. Below are the files and file folders.
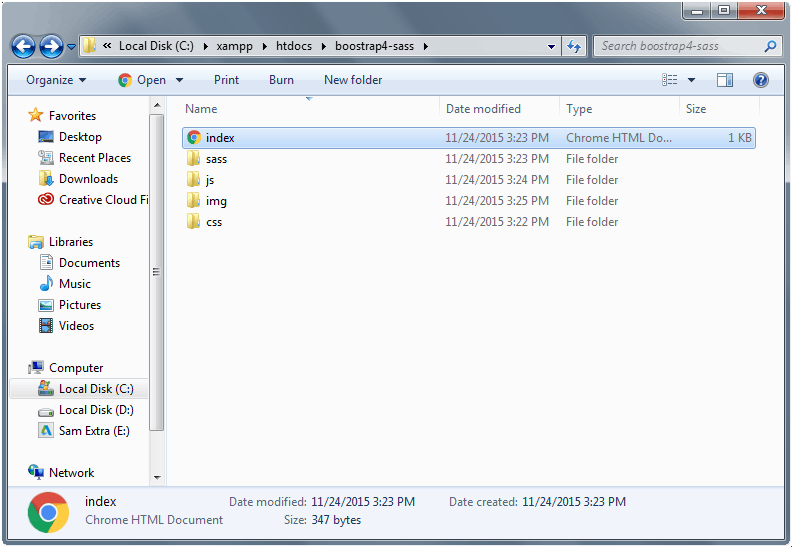
File Structure
Installing Grunt.js
Since we have node.js installed already, we can install grunt.js directly via npm using a couple of commands. Open up your terminal or command prompt (I am using git bash command prompt) and inside your project directory type npm install -g grunt-cli.
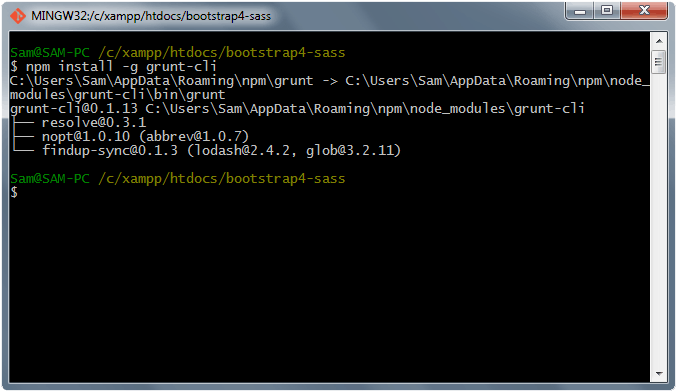
Note: You may need to use sudo (for OSX, *nix, BSD etc) or run your command shell as an administrator (for Windows) to do this. This will put the grunt command in your system path, allowing it to be run from any directory.
Next, create the package.json and Gruntfile.js file inside the project folder.
- json: This file is used by npm to store metadata for projects published as npm modules. We will list grunt and the Grunt plugins our project needs as devDependencies in this file.
- js: tTis file is used to configure or define tasks and load Grunt plugins.
Note: We will manually configure grunt plugins via package.json, but you can use the terminal or command prompts to place them automatically on the devDependencies section using Grunt commands. This gives us an existing file to work on. Please take note that having an existing file doesn’t mean we don’t need to install them via terminal or command prompt.
Now inside the package.json, we will store some metadata specification about the project needs that we will published as npm modules and list of plugins we will use. Copy and paste the code below inside your package.json file.
{
  "name": "bootstrap4-sass",
  "version": "0.1.0",
  "devDependencies": {
    "grunt": "~0.4.5",
    "grunt-contrib-compass": "^1.0.4",
    "grunt-contrib-concat": "^0.5.1",
    "grunt-contrib-cssmin": "^0.14.0",
    "grunt-contrib-imagemin": "^1.0.0",
    "grunt-contrib-jshint": "~0.10.0",
    "grunt-contrib-nodeunit": "~0.4.1",
    "grunt-contrib-sass": "^0.9.2",
    "grunt-contrib-uglify": "^0.11.0",
    "grunt-contrib-watch": "^0.6.1"
  }
}
The Grunt plugins specified above are the following:
- grunt-contrib-compass – use to compile Sass to CSS using Compass.
- grunt-contrib-concat – use to concatenate files.
- grunt-contrib-cssmin – use to minify CSS.
- grunt-contrib-imagemin – use to minify images.
- grunt-contrib-jshint – use to detect errors and potential problems in code.
- grunt-contrib-nodeunit – use to run Nodeunit unit tests.
- grunt-contrib-sass – use to compile Sass to CSS.
- grunt-contrib-uglify – use to minify files.
- grunt-contrib-watch – use to run tasks whenever watched files change.
Installing Grunt and Grunt plugins
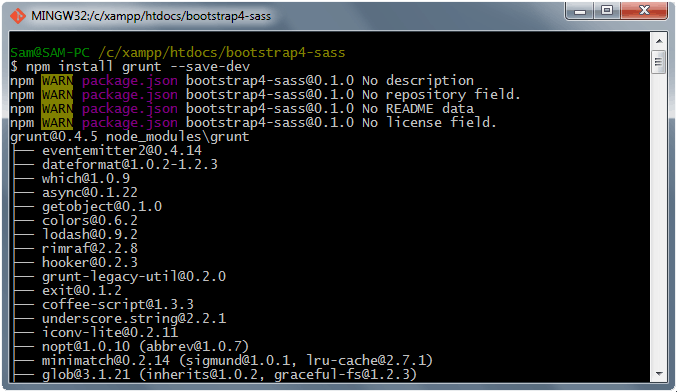
To add Grunt on your project use the command npm install grunt –save-dev. Not only will this install <module> locally, but it will automatically add to the devDependencies section if it was not yet specified inside the package.json file, using a tilde version range. This will also add the grunt folder inside the node_modules folder.
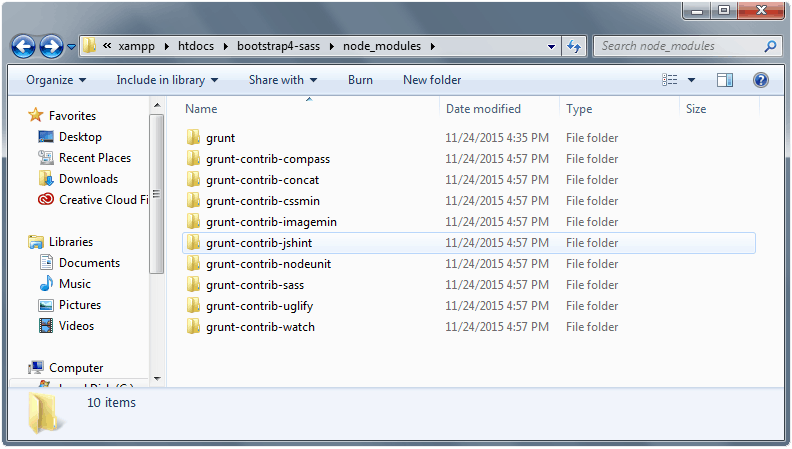
Next, start installing each plugin via Grunt commands. Open up your terminal or command prompt and start typing the following commands:
- npm grunt-contrib-compass –save-dev
- npm grunt-contrib-concat –save-dev
- npm grunt-contrib-cssmin –save-dev
- npm grunt-contrib-imagemin –save-dev
- npm grunt-contrib-jshint –save-dev
- npm grunt-contrib-nodeunit –save-dev
- npm grunt-contrib-sass –save-dev
- npm grunt-contrib-uglify –save-dev
- npm grunt-contrib-watch –save-dev
You will see that all of these plugins were included inside the node_modules folder.
Configuring Gruntfile.js
The Gruntfile.js file is a valid JavaScript file that belongs in the root directory of our project, next to the package.json file, and should be committed with our project source.
Let’s configure this file. Copy and paste the following codes to your Gruntfile.js file.
module.exports = function(grunt) {

  // Project configuration.
  grunt.initConfig({
    pkg: grunt.file.readJSON('package.json'),

    compass: {
    dist: {
      options: {
        sassDir: 'sass',
        cssDir: 'css',
        environment: 'production'
      }
    },
    dev: {
      options: {
        sassDir: 'sass',
        cssDir: 'css'
      }
    }
  },

    watch: {
    	sass:{
    		files: ['sass/*.scss'],
    		tasks: ['sass', 'cssmin']
    	}
    },

    sass: {
    	dist: {
            options: {
                compass: true,
            },
    		files: {
    			'css/style.css' : 'sass/style.scss'
    		}
    	}
    },

    concat: {
    	options: {
    		separator: ';',
    		stripBanners: true,
    		 banner: '/*! <%= pkg.name %> <%= grunt.template.today("yyyy-mm-dd") %> */\n'
    	},

    	dist: {
    		src: ['js/*.js'],
    		dest: 'js/main.min.js'
    	}
    },


    uglify:{
    	options: {
    		manage: false,
    		preserveComments: 'all' //preserve all comments on JS files
    	},
    	my_target:{
    		files: {
    			'js/main.min.js' : ['js/*.js']
    		}
    	}
    },


    cssmin:{
    	my_target:{
    		files: [{
    			expand: true,
    			cwd: 'css/',
    			src: ['*.css', '!*.min.css'],
    			dest: 'css/',
    			ext: '.min.css'

    		}]
    	}
    }

  });

  // Load the plugin that provides the "compass" task.
  grunt.loadNpmTasks('grunt-contrib-compass');

     // Load the plugin that provides the "watch" task.
  grunt.loadNpmTasks('grunt-contrib-watch');

     // Load the plugin that provides the "sass" task.
  grunt.loadNpmTasks('grunt-contrib-sass');

    // Load the plugin that provides the "uglify" task.
  grunt.loadNpmTasks('grunt-contrib-uglify');

      // Load the plugin that provides the "concat" task.
  grunt.loadNpmTasks('grunt-contrib-concat');

   // Load the plugin that provides the "cssmin" task.
  grunt.loadNpmTasks('grunt-contrib-cssmin');

   // Default task(s).
  grunt.registerTask('default', ['uglify','cssmin']);
};
The module.exports = function(grunt) is the wrapper function to call Grunt while the grunt.file.readJSON(‘package.json’) imports the JSON metadata stored in package.json into the grunt config. Because <% %> template strings may reference any config properties, configuration data like filepaths and file lists may be specified this way to reduce repetition.
Let’s discuss how some of these plugins work.
Minifying CSS
This block of code is the configuration of our cssmin plugin. There are three options you need to take a look at here: src, dest, ext. The src includes the *.css file meaning it will select all files and minified them using the extension .min.css inside the dest folder css. You can replace the options to a specific CSS style only if you need to.
   cssmin:{
    	my_target:{
    		files: [{
    			expand: true,
    			cwd: 'css/',
    			src: ['*.css', '!*.min.css'],
    			dest: 'css/',
    			ext: '.min.css'

    		}]
    	}
    }
We then load the task plugin via: grunt.loadNpmTasks(‘grunt-contrib-cssmin’);
To run this task simply type grunt cssmin in your terminal or command prompt.
Compressing JavaScript
The block of code below is the configuration of our uglify-js plugin. Notice the my_target option where the file configuration was set. The first option before the colon (:) is the name of the minified output file along with its directory while the second option which is inside the square brackets means all of the JavaScript’s files will be compress to the main.min.js file. Asterisk (*) means all. Just like mincss plugin you can always set the specific file you want to target for minification by changing the asterisk to the name of the file you want to compress.
uglify:{
    	options: {
    		manage: false,
    		preserveComments: 'all' //preserve all comments on JS files
    	},
    	my_target:{
    		files: {
    			'js/main.min.js' : ['js/*.js']
    		}
    	}
    }
To enable it, load the task plugin via: grunt.loadNpmTasks(‘grunt-contrib-uglify’);
To run this task simply type grunt uglify in your terminal or command prompt and you’ll see a minified version of the file that was set on the my_target option.
Default Task
To specify default tasks you need to set the grunt.registerTask(‘default’, [”]); code. Every time Grunt is run, it will do the tasks that you specify in the array option.
In our case we set up grunt.registerTask(‘default’, [‘uglify’,’cssmin’]); so that means each time we type grunt command on terminal or command prompt, it will automatically run the uglify and cssmin plugin tasks.
Conclusion
In this article we’ve worked on settings of both npm and grunt.js. Hopefully, this simplified look at npm and Grunt will begin to give you some ideas about how to use Grunt for your workflow.
In the next article, we will explore more Grunt.js commands and plugins that we can use with a Bootstrap 4 theme. We’ll also look on how we can use Compass and Sass to convert our scss files into one CSS file.
If you want get more ideas on how to use Grunt, you can always visit the documentation here.
Continue reading: Bootstrap 4 Tutorial: Working with npm, Grunt.js and Sass (Part 2).