Website Performance Guide for Beginners: Tips to Optimize Your Load Time
A fast website is the quickest way to increase user engagement. Your total page load time affects your site’s UX and your position in Google too.
So what can you do to improve page speed and reduce lengthy load times?
Well, a lot! And in this post I’ll share a few of the hardest-hitting tweaks you can make. If you follow through with these tweaks on your website then I’m certain you’ll see greater performance in the long run.
Testing Your Site Speed
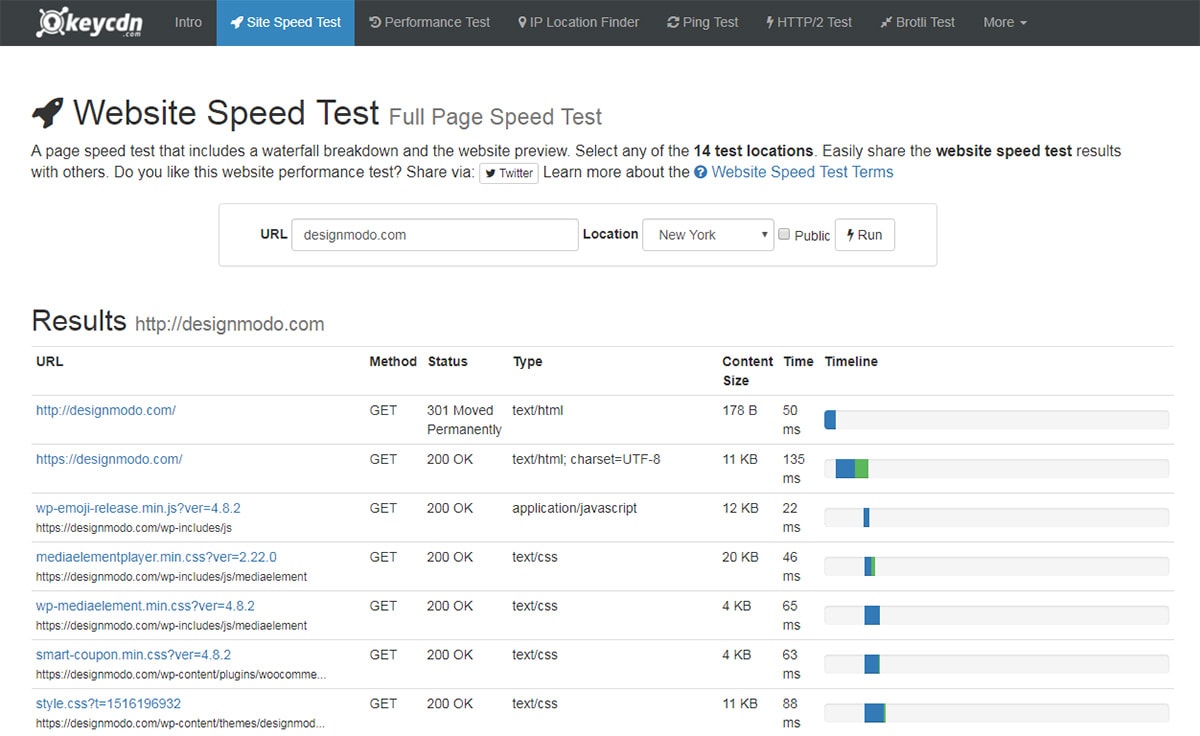
The very first step before working to improve performance is to measure your current performance.
You can do this with a speed testing tool that’ll ping your site from remote servers around the world. This way you can get an idea of just how fast your site is loading for different users.
With Postcards Email Builder you can create and edit email templates online without any coding skills! Includes more than 100 components to help you create custom emails templates faster than ever before.
Free Email BuilderFree Email TemplatesTry getting a few readings at different times and try to select a good variety of countries to ping.
Use this reading as a baseline for your site’s current speed. This way you can measure improvements against that baseline to see if you’re really making progress.
Page Size: Reducing Your Total Load
Once you’ve got a baseline to test against you can start optimizing.
Naturally, the first place to start is with on-page optimization. Your goal here is to reduce page size by even a few dozen KBs. If you can get it down by a few MBs, even better.
There are a few big ways you can reduce your total page size:
- Optimize images
- Minify your code
- Reduce total number of HTTP requests
For that last point, you’ll want to make sure all your scripts can work together if compressed. There’s plenty of tools online you can try, or even a command line method to run against your JS files.
Optimizing images and minifying your code is much easier.
When you optimize an image you’re keeping the same visual data but compressing the contents so the filesize is smaller. This means you can have two images that look exactly the same, the original at 353 KB and a compressed version much smaller(let’s say 110 KB).
With Startup App and Slides App you can build unlimited websites using the online website editor which includes ready-made designed and coded elements, templates and themes.
Try Startup App Try Slides AppOther ProductsThe difference may not seem like much. But if you have dozens of images on a single page then compressing all of them can reduce the total page size by 500 KB or even 1 MB. Now apply that to your whole site.
Minifying your code has a similar goal. But when you minify code you’re removing the white space to cram everything together.
This does make your code harder to read. But this can reduce your HTML/CSS/JS files down to 50% their original size(or even smaller) with just one step.
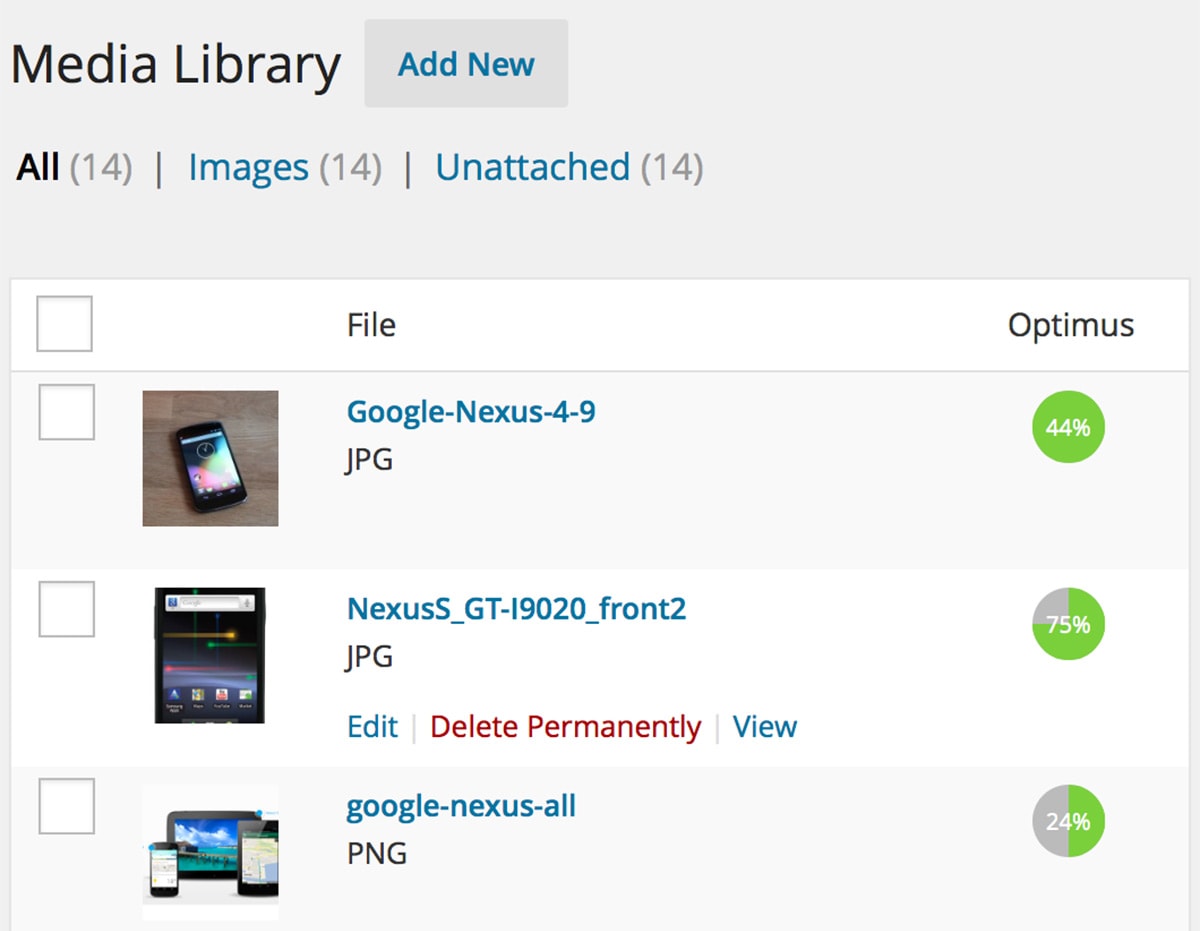
If you run on WordPress there are two awesome plugins that can do this stuff for you.
Autoptimize will automatically compress your HTML/CSS/JS files and minify them to reduce size. And Optimus will automatically compress images in WordPress, even the ones you’ve already uploaded.
These changes may not seem like much but they’ll go a long way in optimizing your pages if you use them all together.
Speed Up Your DNS
When someone visits your site the browser requests a DNS address from the domain name.
This is a fairly complex process to understand but a very easy process to setup. And there are guides online to help you along.
But to simplify, if you have a really fast DNS then you’re cutting down total load times almost immediately.
When you register a domain name you typically work with the registrar’s DNS. So one registrar may have a faster DNS service than another, but most webmasters don’t bother paying for a separate DNS.
However, this is something I really recommend. I put it off for a while myself but the changes in initial load times can be massive.
Now there’s also a couple DNS-y things you can do inside your code to help with load times: DNS Prefetch and Preconnect.
These are two properties defined in the HTML specs as resource hints. If you can’t stand the boring W3C documentation you might like this handy guide instead.
Basically, these two attributes define how the browser loads and saves content on your page. You can find lots of code snippets online to work with but here’s a quick rundown of each:
- DNS Prefetch can pull resources like extra scripts, images, or videos and save them in the cache for later use
- Preconnect lets you setup DNS/TLS connections early to ideally reduce load times
If you know your way around basic HTML then definitely try adding these resource attributes into your code. They may seem small but, as always, the little things add up.
Leverage Browser Caching
Caching is the process of storing local copies of content from your site. These copies may be stored on the visitor’s computer, on your web server, or both.
The benefit of caching is super simple: flat files can load faster than dynamic files.
For example, WordPress content is pulled from a database which takes extra time to respond. But if your pages are cached then visitors will bypass the database and get flat copies of the pages.
The best part is how easily you can add caching to your site.
This is recommended for every type of website that runs on a database. From ecommerce shops to WordPress blogs and all the other CMS’ out there, caching is huge for performance.
You can also set caching on your server by targeting specific filetypes and declaring how long they should remain cached. This is called browser caching and you can set it up with just a few lines in your .htaccess file.
The syntax is easy enough to copy/paste and you can define any filetypes like images or static text files in CSS/JS format. Here’s an example setting the Expires HTTP headers for various filetypes:
# BEGIN Expires
<ifModule mod_expires.c>
ExpiresActive On
ExpiresByType image/gif "access plus 2592000 seconds"
ExpiresByType image/jpeg "access plus 2592000 seconds"
ExpiresByType image/png "access plus 2592000 seconds"
ExpiresByType text/css "access plus 604800 seconds"
ExpiresByType text/javascript "access plus 216000 seconds"
ExpiresByType application/x-javascript "access plus 216000 seconds"
</ifModule>
# END Expires
But browser caching is very powerful and highly recommended by Google as a way to radically improve performance.
If you don’t already have caching live on your site then make it your first priority. It’s so easy and doesn’t cost a thing. Plus you’ll see the benefits almost immediately.
To learn more about how this works check out Google’s detailed guide including info on HTTP headers like Cache-Control.
Add In A CDN
If you’re serving a sizeable amount of international traffic then you’ll end up with a VPS or webhost under heavy load.
One way to reduce load times is by hosting your static assets through a CDN, short for a Content Delivery Network.
Basically this is a network of servers positioned around the world that mirror your website’s static content like scripts, images, and stylesheets. This way you can deliver files faster to people based on their location.
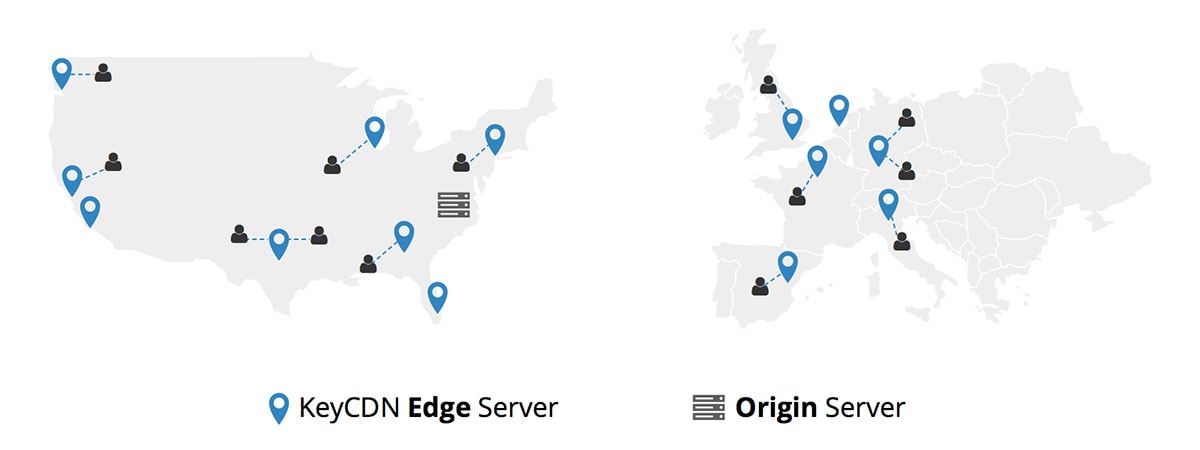
If someone from Thailand connects to your website hosted in the US they’ll be waiting longer for it to load compared to someone in Canada. With a CDN hosting your content the person from Thailand may actually see your site faster if they’re near a CDN node(fancy name for server).
Every CDN is different and you need to consider what’s be best for your site. I suggest looking into three factors:
- Total number of nodes
- Location of those nodes
- Pricing
How much traffic you get & the location of that traffic will play a big role in picking a CDN.
But this is one of the better investments for your site because you’ll see the payoff almost immediately. And WordPress users can easily configure most CDNs with CDN Enabler so you can be up & running in 5 minutes or less.
File Compression
At the time of this writing, I can safely say that all modern web browsers support GZIP compression.
It’s the most common way to compress text-based assets like stylesheets and scripts to greatly reduce their size. You just have to make sure your web server supports GZIP before adding those files into your page.
The idea behind file compression is just like image compression: you’re keeping the same data but making it smaller.
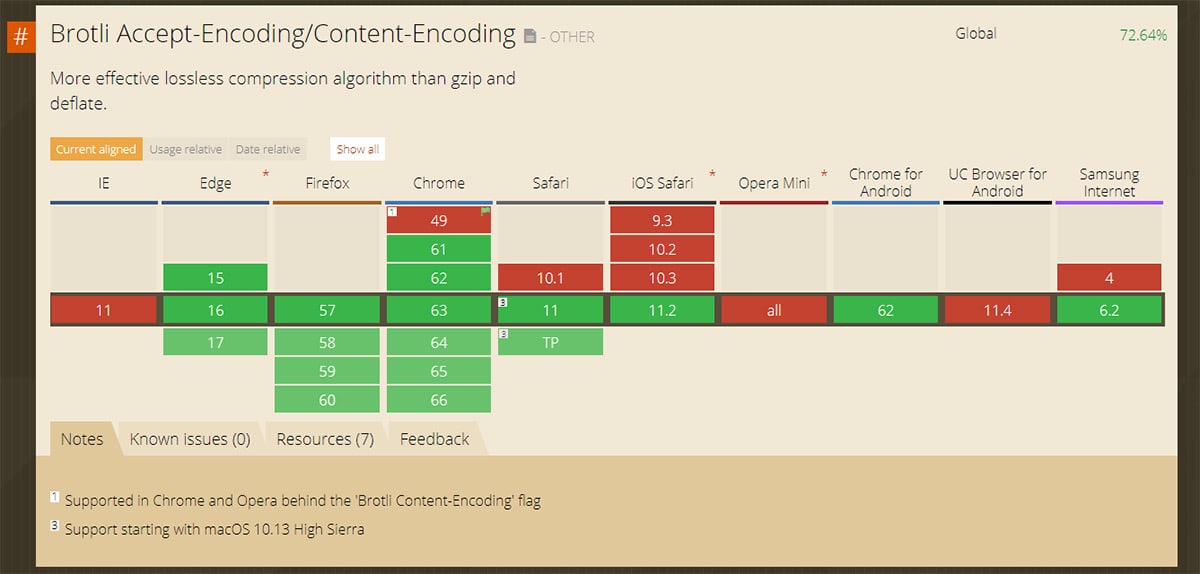
Aside from GZIP there is a newer compression method called Brotli. This is fully open sourced and it’s a general compression algorithm that can handle pretty much anything.
There’s actually a brief guide to Brotli compression and how it stacks up against similar methods.
With Brotli’s fantastic speed and widespread support I recommend this to webmasters who are willing to play around with compression to see massive gains in speed.
Both GZIP and Brotli are great options to reduce file size and make your websites a whole lot lighter.
If you’re not sure where to start check out this repo for some tools you can use to compress files for the web.
Wrapping Up
Out of all these tips I’m sure there’s something here you’ve never tried before. And there’s no better time to start working on your site performance than right now.
Try out some of these changes and see how they affect your load times.
Be sure to keep track of changes and if you notice anything that makes a huge impact on your performance, be sure to add that into all of your web projects going forward.