Wireframing & Prototyping: The Past, Present, and Future
Knowing the origins of wireframing and prototyping will help you put everything into a historical context, allowing you to comprehend the practice and predict how it will evolve in the future. This piece will be somewhat of a modern history lesson, covering digital UX design in its past, present, and future.
Present: The Current State of Design
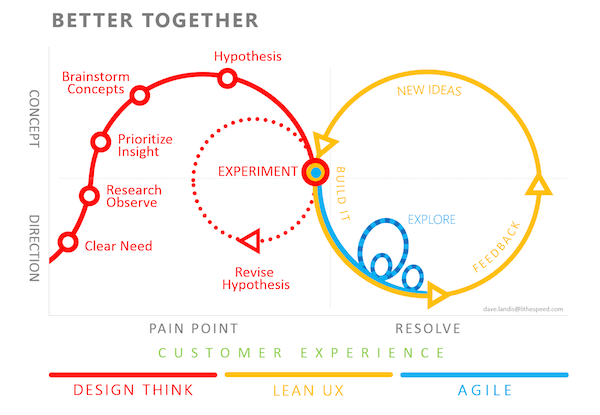
At the moment, two of the most popular design methodologies are Lean UX and Agile UX. Both may sound similar, but their approaches to the design process differ in terms of scope. Lean UX is more of a business approach, while Agile UX is more of a project approach.
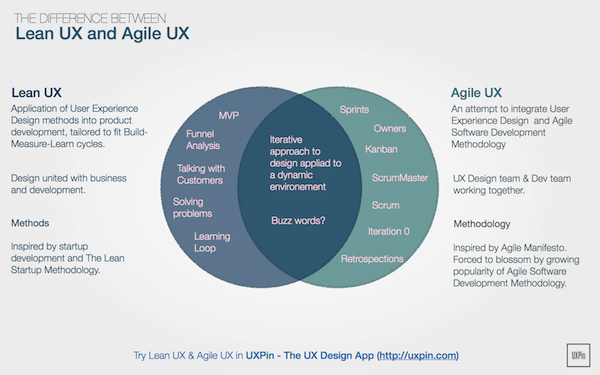
Source: Lean UX vs. Agile UX — Is There a Difference?
The old way of doing things — the Waterfall method where designers hand off a fully fleshed-out comp to a developer and say “good luck” — is coming to an end. In a post heralding the end of the “PSD-era,” Brad Frost, Web Designer, Blogger, and Speaker, writes that the Waterfall method makes less and less sense given the variety of devices on the market.
With Postcards Email Builder you can create and edit email templates online without any coding skills! Includes more than 100 components to help you create custom emails templates faster than ever before.
Free Email BuilderFree Email TemplatesIn the vacuum left by the Waterfall method, two alternative schools of thought are filling its place. While both agree that the process should be more collaborative, there are subtle differences between the two. In an article for Web, UXPin CEO Marcin Treder takes a brief look at each. As you’ll see below, the two processes are more complementary than they are conflicting.
1. Agile UX
A methodology following the Agile Manifesto, Agile UX is essentially a movement to unify designers and developers into the Agile development process. Its supporters follow these guidelines:
- People, personal interactions, and teamwork are valued over processes and tools.
- Producing working software is a better goal than comprehensive documentation.
- Working with the customer is more important than contract negotiation.
- Adapt to change instead of following a rigid plan.
At the moment, this line of thinking is “considered to be the gold standard for the development of digital products.”
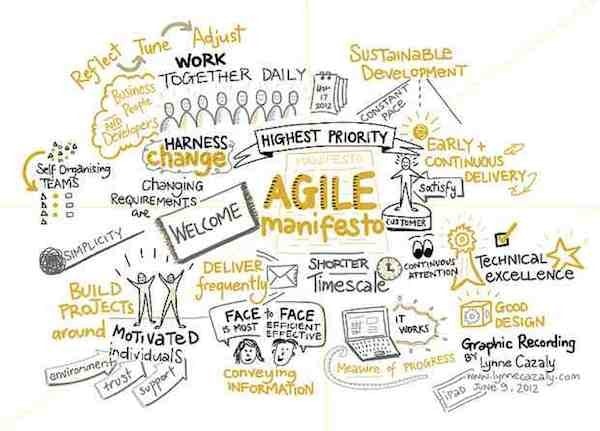
Source: The Visual Agile Manifesto
While the Agile methodology doesn’t directly address UX design, it does mandate a paradigm shift in the way we collaborate with people on design projects. As discussed in the free Ultimate Guide to Prototyping, Agile UX gives us methods like the Design Studio and Cross-Functional Pairing that help designers replace documentation with meaningful interaction. Agile UX replaces the long waterfall phases with collaborative sprints involving designers, developers, and product managers.
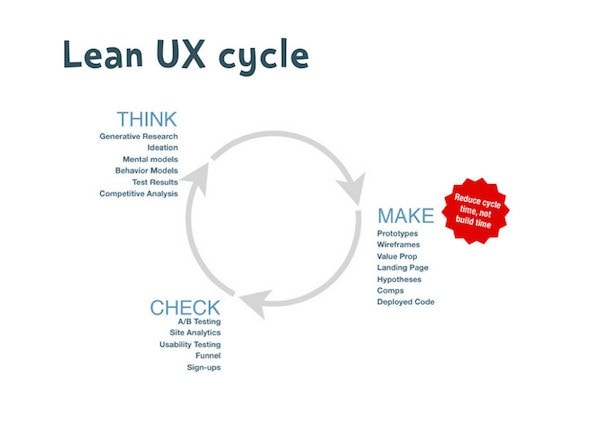
2. Lean UX
Originating from the Lean Startup methodology, the Lean UX school of thought believes that a company must release a product that fills a previously researched niche, and it must do it as quickly as possible (with minimized waste) in order to survive. While Agile is more focused on getting the product to market, Lean UX shows us that shipping the product is only the start.
With Pulsetic you’ll be instantly notified the moment your website, API, or server becomes unavailable. Monitor uptime from multiple global locations and respond to incidents before your users are affected.
Create beautiful status pages in minutes to keep customers informed during outages and build trust with transparent communication.
Start Monitoring for FreeSource: Lean UX Cycle
Some of Lean UX’s core principles include:
- Validating hypotheses with customers (“getting out of the building”)
- Releasing minimum viable products that solve user problems
- Rapid prototyping (“learning loops”) done collaboratively
- Nimble prototypes over heavy wireframes and spec sheets
These strategies have been developed as a type of lifecraft to keep the product afloat in a time of flooded markets.
3. How They Fit Together
Agile UX is more concerned with the “how” of product design while Lean UX focuses on the “why.” While Agile helps UX designers revamp outdated methods of designing and collaborating, Lean UX gives us new ways to research the product and measure quality.
Rather than conducting research before you build the prototype, Lean UX advises that you continuously research metrics gathered through methods like A/B testing, customer interviews, and usability testing.
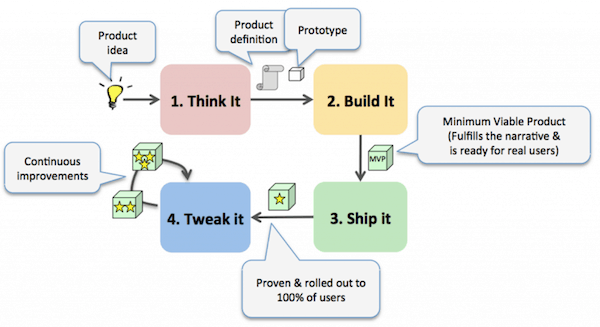
Source: How Spotify Builds Products
Because Lean UX is an approach to the overall business strategy, you can still create your product using Agile processes. Brainstorm with your team, sketch out concepts and requirements, build quick prototypes, and start testing them. This is exactly what Spotify does, as we pointed out in The Guide to Minimum Viable Products.
There’s a lot of common ground to be shared between the two: both champion collaboration over documentation, and both emphasize short sprints over ambitious development timelines.
In fact, Jeff Gothelf, the godfather of Lean UX, even says that Lean UX is “inspired by Lean and Agile development theories.” The bottom line is that it’s not really that important whether you choose Agile or Lean UX, but that the “work smarter, not longer” approach behind both methodologies are driving today’s rapid prototyping movement.
Present: The Current State of Prototyping
While most people remain grounded supporters of prototyping, lately more and more designers are doubting the value of static wireframing. What we’re seeing now, as a result, is more people merging wireframes and prototypes as a way to bypass the wireframing stage and get started on interaction design earlier.
As we discussed in The Ultimate Guide to Prototyping, this is in large part due to the recent rise of design tools that let you go from wireframe to prototype with just a few clicks. In this Quora discussion thread about wireframing, a handful of experts all mention the benefits of “interactive wireframes” (lo-fi prototypes) over static wireframes. Their reasons vary, but all seem to echo this “two birds with one stone” approach to combining wireframes and prototypes.
With that in mind, the current state of prototyping favors practicality over pixel perfection. In the near future, we’ll likely see lo-fi prototypes replacing wireframes as a design milestone, and hi-fi prototypes continuing to be used for usability testing and presentations.
Past: A Prototyping Timeline
You have to love a comprehensive timeline that begins in 1970. The history of software development may not be long, but it is dense, with the future being written every day. Here we’ve outlined the crucial events that shaped the birth of the information age — and where prototyping fits into it all.
1970 — The Waterfall method dominates software development.
1975 — The importance of information architecture is recognized and developed.
1980 — The first, basic digital prototypes — resembling flow charts — arise thanks to visual programming advances.
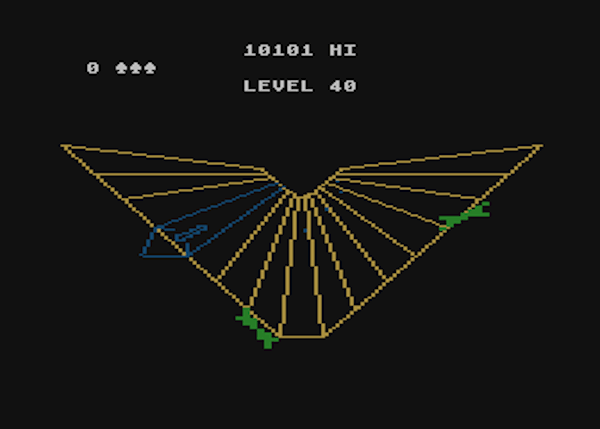
Source: Atari Prototypes: Tempest (1983)
1985 — Paper prototyping is integrated for usability testing and concept sharing.
1985 — The Waterfall method is modified to incorporate Iterative and Incremental Development (IID).
1986 — The first visualization and design software is developed.
1986 — Adobe Illustrator
1987 — MS PowerPoint
1990 — Adobe Photoshop
1992 — MS Visio (originally Shapeware; acquired by MS in 2000)
1988 — The Spiral Model of software development is popularized.

Source: Boehm’s Spiral Revisited
1991 — IBM introduces the Rapid Application Development (RAD) method of software development.
1995 — Layouts become more comprehensive to showcase page or UI designs.
2000 — Prototyping software emerges to meet the growing need.
2000 — Omnigraffle
2003 — Axure
2003 — iRise
2001 — The Agile Manifesto is released, birthing the later Agile UX movement.
2005 — Web-based (SaaS) prototyping becomes more common, opening the door for low-fidelity wireframing apps, which later integrate collaboration and product management.
2005 — MockupScreens
2006 — Gliffy
2007 — Jumpchart
2008 — Balsamiq
2008 — Protoshare
2008 — Justinmind
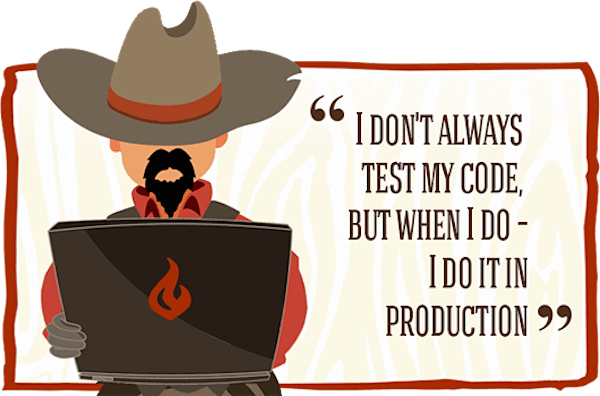
Source: Working Locally Instead of Cowboy Coding
2008 — Competition among startups leads to the Lean UX movement.
2010 — Technological advances enable high-fidelity SaaS prototyping without coding.
2011 — UXPin (paper, mobile, web, responsive)
2011 — InVision (mobile, web)
2012 — Flinto (mobile)
2012 — POP – Prototyping on Paper (mobile)
2013 — Marvel (mobile, web)
Future: The Age of Prototyping
Our speculation of the future begins where our discussion of the present ended: wireframes and prototypes merging together in a way where lo-fi prototypes take over the outlining and organizational purposes of wireframes.
We’ve read that 2014 has been referred to by some as the Year of Interaction Design Tools. In the post, Emelyn Baker, Designer at Bloc explains the “blossoming” community of prototyping tools and lists the ones available today, including our own UXPin. The surprising number of tools on the market — most of which blur the line between wireframes, mockups, and prototypes — is just a glimpse of the interactive future.
Source: 2014 — The Year of Interactive Design Tools
The old ways are only getting older, and static designs and the Waterfall method are slowly becoming things of the past (in fact, even POP is digitizing paper prototyping). The new wave of prototyping tools brings with it a new era of democratized design. As discussed in The Ultimate Guide to Prototyping, specialized prototyping apps have popularized two critical updates to the design process:
- Rapid Prototyping — The future of prototyping will see more of the prototype, refine, repeat method for improved functionality earlier in the design process. Considering that some prototyping tools support the full spectrum of design (from static to interactive), there is now little excuse not to practice rapid prototyping.
- Collaboration without email — The communication features and presentation modes on many new prototyping tools narrows the gaps between designers, developers, and stakeholders. As more people recognize the flaws in the Waterfall method, collaboration and even participatory design will only become more widespread thanks to technology.
When discussing the future of prototyping, another hot topic is “microinteractions.” To summarize, a microinteraction is a use case with a single goal — for example, unlocking a smartphone — and the trigger, rules, and feedback involved in that one task. Microinteractions shift the focus from the UX of the whole product to the UX of individual actions and moments, a level of detail made possible in part thanks to specialized prototyping tools.
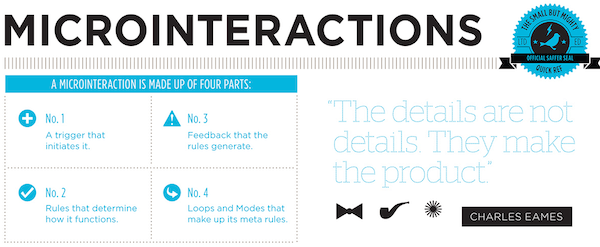
Source: Microinteractions
The logic behind microinteractions is that the UI details themselves (rather than the sum of all details) make the difference between a product you tolerate and one that you love. In fact, John Pavlus, Design Writer at FastCo Design, calls microinteractions the “future of UX.” Microinteractions are a magnifying glass for interaction design, bringing into focus the delightful moments that create unforgettable user experiences. As more focus is placed on the micro-moments of how products look and feel, prototyping will become mandatory for perfecting these small, humanizing details.
Takeaway
We must evolve or become extinct, so survival depends on reading the signals and adapting early. Wireframing still has its place, but its function now as a blueprint for prototyping is different than its function 5 years ago as a formal design deliverable, and that function was different than 10 years ago when wireframes were mostly for specifying products.
Source: The Future of UX Design
The practice of prototyping, too, has changed from being a small building block of production-ready code to a fast way of crafting and testing experiences. Through iteration, we have overcome the fear of throwaway design and code. So, in that spirit, embrace prototyping for what it is and what it’s becoming. Embrace collaboration, early interactivity, and flexible iterations.
Good luck prototyping!
For more practical advice on low or high fidelity prototyping, download the free Ultimate Guide to Prototyping. Learn how and when to use different prototyping tools and tactics, with best practices from ZURB, Google Ventures, IDEO, and many more. Tips are also included from experts like Jeff Gothelf, Todd Zaki Warfel, and others.
You may also want to read:
Wireframing, Prototyping, Mockuping – What’s the Difference?