Create a Retro Navigation Menu with CSS3
Difficulty: Intermediate
Estimated completion time: 50 minutes
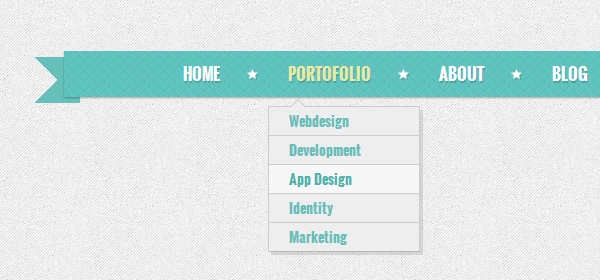
In this tutorial you’ll learn how to create a vintage-looking navigation menu using pure CSS3. I hope you’ll enjoy this tutorial and you’ll learn some new techniques.
Resources needed:
- Pixel Patterns
- UI Icons
- Optional (for the background): Subtle Patterns
<div class="container">
    <ul class="nav">
        <li><a href="#">Home</a></li>
        <li>
            <a href="#">Portfolio</a>
            <ul>
                <li><a href="#">Webdesign</a></li>
                <li><a href="#">Development</a></li>
                <li><a href="#">App Design</a></li>
                <li>
                    <a href="#">Identity</a>
                    <ul>
                        <li><a href="#">Level 2</a></li>
                        <li><a href="#">Level 2</a></li>
                        <li>
                            <a href="#">Level 2</a>
                            <ul>
                                <li><a href="#">Level 3</a></li>
                                <li><a href="#">Level 3</a></li>
                                <li><a href="#">Level 3</a></li>
                                <li><a href="#">Level 3</a></li>
                            </ul>
                        </li>
                        <li><a href="#">Level 2</a></li>
                    </ul>
                </li>
                <li><a href="#">Marketing</a></li>
            </ul>
        </li>
        <li><a href="#">About</a></li>
        <li><a href="#">Blog</a></li>
        <li><a href="#">Services</a></li>
        <li><a href="#">Contact</a></li>
    </ul>
</div>
We are going to use a font from Google Web Fonts (Oswald), so you’ll also have to include this line inside the head of your HTML file:
<link href='https://fonts.googleapis.com/css?family=Oswald:700' rel='stylesheet' type='text/css'>
Step 2: Background Pattern
As you can see from the preview image, the menu has a subtle blue pattern as background, but I said that we will use only CSS3. So, how is that possible? We are going to use a technique called Data URI scheme. This allows you to encode a resource into base 64 code and include that code in the CSS file. What is the main advantage of this technique? It will reduce the amount of HTTP requests.
Let’s open up Photoshop and load the pixel patterns. Create a new file (CTRL/Command + N) with the size 10 x 10 pixels. Fill the background layer with the color #65c0bb and duplicate it (right click > Duplicate Layer). Select the background layer, go to Blending Options > Pattern Overlay and apply these settings:
With Postcards Email Builder you can create and edit email templates online without any coding skills! Includes more than 100 components to help you create custom emails templates faster than ever before.
Free Email BuilderFree Email Templates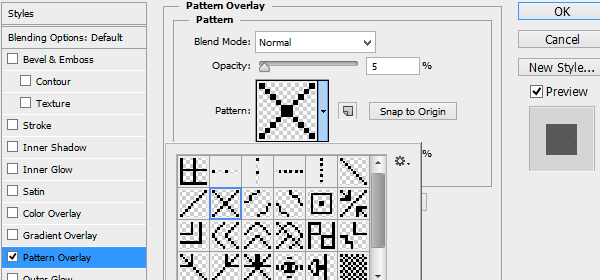
Select the duplicated layer and go to Filter > Noise > Add Noise:

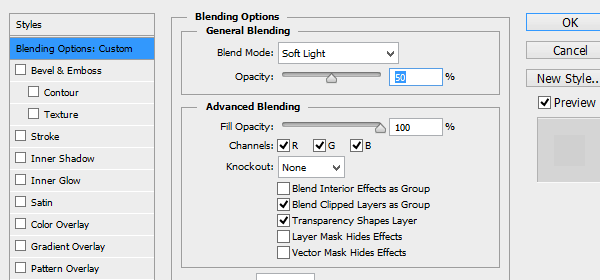
Then, set the blending options of the layer to “Soft Light” and lower the opacity to 50%:
Save the file as a PNG image and go to this website which has a very useful tool that will allow us to convert the image into code. Upload the image (select “Browse”) and hit the “Convert” button. Keep the page opn or save the line of code with the background-image property, as we’ll need it for the next step.
We’ll start with some stylesheet reset code:
.nav, .nav ul {
	margin: 0;
	padding: 0;
	list-style: none;
	line-height: 1;
}
Next, we’ll modify the main navigation bar. We’ll make it 900 pixels wide, center the text and add some shadows. Also, we’ll set the background, so this is where we need the code generated from our pattern:
With Startup App and Slides App you can build unlimited websites using the online website editor which includes ready-made designed and coded elements, templates and themes.
Try Startup App Try Slides AppOther Products
.nav {
	position: relative;
	margin: auto; /* Centering the menu */
	height: 46px;
	width: 900px;
	text-align: center;
	box-shadow: 0 1px 2px rgba(0, 0, 0, .3);
	background: #65c0bb;
	background-image: url(data:image/png;base64,iVBORw0KGgoAAAANSUhEUgAAAAoAAAAKCAYAAACNMs+9AAAACXBIWXMAAAsTAAALEwEAmpwYAAAKT2lDQ1BQaG90b3Nob3AgSUNDIHByb2ZpbGUAAHjanVNnVFPpFj333vRCS4iAlEtvUhUIIFJCi4AUkSYqIQkQSoghodkVUcERRUUEG8igiAOOjoCMFVEsDIoK2AfkIaKOg6OIisr74Xuja9a89+bN/rXXPues852zzwfACAyWSDNRNYAMqUIeEeCDx8TG4eQuQIEKJHAAEAizZCFz/SMBAPh+PDwrIsAHvgABeNMLCADATZvAMByH/w/qQplcAYCEAcB0kThLCIAUAEB6jkKmAEBGAYCdmCZTAKAEAGDLY2LjAFAtAGAnf+bTAICd+Jl7AQBblCEVAaCRACATZYhEAGg7AKzPVopFAFgwABRmS8Q5ANgtADBJV2ZIALC3AMDOEAuyAAgMADBRiIUpAAR7AGDIIyN4AISZABRG8lc88SuuEOcqAAB4mbI8uSQ5RYFbCC1xB1dXLh4ozkkXKxQ2YQJhmkAuwnmZGTKBNA/g88wAAKCRFRHgg/P9eM4Ors7ONo62Dl8t6r8G/yJiYuP+5c+rcEAAAOF0ftH+LC+zGoA7BoBt/qIl7gRoXgugdfeLZrIPQLUAoOnaV/Nw+H48PEWhkLnZ2eXk5NhKxEJbYcpXff5nwl/AV/1s+X48/Pf14L7iJIEyXYFHBPjgwsz0TKUcz5IJhGLc5o9H/LcL//wd0yLESWK5WCoU41EScY5EmozzMqUiiUKSKcUl0v9k4t8s+wM+3zUAsGo+AXuRLahdYwP2SycQWHTA4vcAAPK7b8HUKAgDgGiD4c93/+8//UegJQCAZkmScQAAXkQkLlTKsz/HCAAARKCBKrBBG/TBGCzABhzBBdzBC/xgNoRCJMTCQhBCCmSAHHJgKayCQiiGzbAdKmAv1EAdNMBRaIaTcA4uwlW4Dj1wD/phCJ7BKLyBCQRByAgTYSHaiAFiilgjjggXmYX4IcFIBBKLJCDJiBRRIkuRNUgxUopUIFVIHfI9cgI5h1xGupE7yAAygvyGvEcxlIGyUT3UDLVDuag3GoRGogvQZHQxmo8WoJvQcrQaPYw2oefQq2gP2o8+Q8cwwOgYBzPEbDAuxsNCsTgsCZNjy7EirAyrxhqwVqwDu4n1Y8+xdwQSgUXACTYEd0IgYR5BSFhMWE7YSKggHCQ0EdoJNwkDhFHCJyKTqEu0JroR+cQYYjIxh1hILCPWEo8TLxB7iEPENyQSiUMyJ7mQAkmxpFTSEtJG0m5SI+ksqZs0SBojk8naZGuyBzmULCAryIXkneTD5DPkG+Qh8lsKnWJAcaT4U+IoUspqShnlEOU05QZlmDJBVaOaUt2ooVQRNY9aQq2htlKvUYeoEzR1mjnNgxZJS6WtopXTGmgXaPdpr+h0uhHdlR5Ol9BX0svpR+iX6AP0dwwNhhWDx4hnKBmbGAcYZxl3GK+YTKYZ04sZx1QwNzHrmOeZD5lvVVgqtip8FZHKCpVKlSaVGyovVKmqpqreqgtV81XLVI+pXlN9rkZVM1PjqQnUlqtVqp1Q61MbU2epO6iHqmeob1Q/pH5Z/YkGWcNMw09DpFGgsV/jvMYgC2MZs3gsIWsNq4Z1gTXEJrHN2Xx2KruY/R27iz2qqaE5QzNKM1ezUvOUZj8H45hx+Jx0TgnnKKeX836K3hTvKeIpG6Y0TLkxZVxrqpaXllirSKtRq0frvTau7aedpr1Fu1n7gQ5Bx0onXCdHZ4/OBZ3nU9lT3acKpxZNPTr1ri6qa6UbobtEd79up+6Ynr5egJ5Mb6feeb3n+hx9L/1U/W36p/VHDFgGswwkBtsMzhg8xTVxbzwdL8fb8VFDXcNAQ6VhlWGX4YSRudE8o9VGjUYPjGnGXOMk423GbcajJgYmISZLTepN7ppSTbmmKaY7TDtMx83MzaLN1pk1mz0x1zLnm+eb15vft2BaeFostqi2uGVJsuRaplnutrxuhVo5WaVYVVpds0atna0l1rutu6cRp7lOk06rntZnw7Dxtsm2qbcZsOXYBtuutm22fWFnYhdnt8Wuw+6TvZN9un2N/T0HDYfZDqsdWh1+c7RyFDpWOt6azpzuP33F9JbpL2dYzxDP2DPjthPLKcRpnVOb00dnF2e5c4PziIuJS4LLLpc+Lpsbxt3IveRKdPVxXeF60vWdm7Obwu2o26/uNu5p7ofcn8w0nymeWTNz0MPIQ+BR5dE/C5+VMGvfrH5PQ0+BZ7XnIy9jL5FXrdewt6V3qvdh7xc+9j5yn+M+4zw33jLeWV/MN8C3yLfLT8Nvnl+F30N/I/9k/3r/0QCngCUBZwOJgUGBWwL7+Hp8Ib+OPzrbZfay2e1BjKC5QRVBj4KtguXBrSFoyOyQrSH355jOkc5pDoVQfujW0Adh5mGLw34MJ4WHhVeGP45wiFga0TGXNXfR3ENz30T6RJZE3ptnMU85ry1KNSo+qi5qPNo3ujS6P8YuZlnM1VidWElsSxw5LiquNm5svt/87fOH4p3iC+N7F5gvyF1weaHOwvSFpxapLhIsOpZATIhOOJTwQRAqqBaMJfITdyWOCnnCHcJnIi/RNtGI2ENcKh5O8kgqTXqS7JG8NXkkxTOlLOW5hCepkLxMDUzdmzqeFpp2IG0yPTq9MYOSkZBxQqohTZO2Z+pn5mZ2y6xlhbL+xW6Lty8elQfJa7OQrAVZLQq2QqboVFoo1yoHsmdlV2a/zYnKOZarnivN7cyzytuQN5zvn//tEsIS4ZK2pYZLVy0dWOa9rGo5sjxxedsK4xUFK4ZWBqw8uIq2Km3VT6vtV5eufr0mek1rgV7ByoLBtQFr6wtVCuWFfevc1+1dT1gvWd+1YfqGnRs+FYmKrhTbF5cVf9go3HjlG4dvyr+Z3JS0qavEuWTPZtJm6ebeLZ5bDpaql+aXDm4N2dq0Dd9WtO319kXbL5fNKNu7g7ZDuaO/PLi8ZafJzs07P1SkVPRU+lQ27tLdtWHX+G7R7ht7vPY07NXbW7z3/T7JvttVAVVN1WbVZftJ+7P3P66Jqun4lvttXa1ObXHtxwPSA/0HIw6217nU1R3SPVRSj9Yr60cOxx++/p3vdy0NNg1VjZzG4iNwRHnk6fcJ3/ceDTradox7rOEH0x92HWcdL2pCmvKaRptTmvtbYlu6T8w+0dbq3nr8R9sfD5w0PFl5SvNUyWna6YLTk2fyz4ydlZ19fi753GDborZ752PO32oPb++6EHTh0kX/i+c7vDvOXPK4dPKy2+UTV7hXmq86X23qdOo8/pPTT8e7nLuarrlca7nuer21e2b36RueN87d9L158Rb/1tWeOT3dvfN6b/fF9/XfFt1+cif9zsu72Xcn7q28T7xf9EDtQdlD3YfVP1v+3Njv3H9qwHeg89HcR/cGhYPP/pH1jw9DBY+Zj8uGDYbrnjg+OTniP3L96fynQ89kzyaeF/6i/suuFxYvfvjV69fO0ZjRoZfyl5O/bXyl/erA6xmv28bCxh6+yXgzMV70VvvtwXfcdx3vo98PT+R8IH8o/2j5sfVT0Kf7kxmTk/8EA5jz/GMzLdsAAAAgY0hSTQAAeiUAAICDAAD5/wAAgOkAAHUwAADqYAAAOpgAABdvkl/FRgAAAQhJREFUeNoEwQ0SkzAQgNEvfxAaaLV6Mm/rjDdyHKFFQhp21/fcj18/bUwJGSNBPdqFR4qgF02NFDy0A59zoRyN2X3w/kMOERPjcp1OYDtWNC9EP3RkvlFrY0mOKpWTgEpgcjsxz2Rp+Kl5mnZSGKj7TpmM7oRJXtiUmBH+eCXuwYgWIAiPr4Xf74pFGNN3zIQ9CMkUrw7uQaE7XkdgEKMcmVMv+gm3PkAa8YsKTZUSE5zCPS/0L3B8NvzoeOeTXo34toFoHu0bLhfMR+4OapnZXn+Zx4LPF/6hhrOK3iIajPUSnCrx8tyWJ+u/g/UE3+qGjYHnNfIMnew6qw6QOs1O4rcJ+wj/BwAKCJX7bI4ewgAAAABJRU5ErkJggg==);
}
For now, we’ll hide the submenus:
.nav ul {
	display: none;
}
Now let’s format the links a little bit:
.nav&amp;gt;li {
margin: 0;
line-height: 1;
padding: 0;
display: inline;
position: relative;
margin: 0 12px;
}
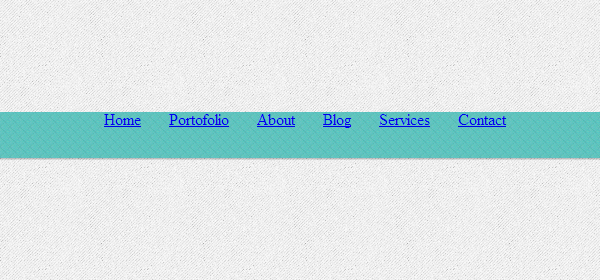
The menu should look like this:
Step 4: The Ribbons
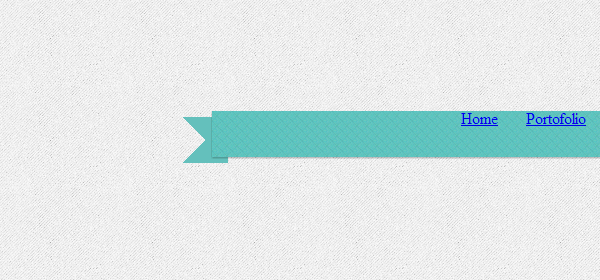
We’ll create the ribbons using pseudo-elements and some border tricks:
.nav::after, .nav::before {
content: &amp;quot;&amp;quot;;
display: block;
position: absolute;
top: 6px;
height: 0px;
width: 0px;
border: 23px solid #65c0bb;
z-index: -1;
}
/* The left ribbon */
.nav::before {
border-left-color: transparent;
left: -30px;
}
/* The right ribbon */
.nav::after {
border-right-color: transparent;
right: -30px;
}
Step 5: The Main Links
The main links are going be white, with some text shadow to enhance the retro effect. On mouse over, they’ll change their color to a muted yellow:
.nav>li>a {
	display: inline-block;
	padding: 15px 20px;
	position: relative;

	font-family: 'Oswald', sans-serif;
	font-size: 16px;
	text-transform: uppercase;
	text-decoration: none;
	color: #fff;
	text-shadow: 1px 2px rgba(0, 0, 0, .2);

	-webkit-transition: color .3s linear;
	   -moz-transition: color .3s linear;
	     -o-transition: color .3s linear;
	    -ms-transition: color .3s linear;
	        transition: color .3s linear;
}

.nav>li>a:hover, .nav>li:hover>a {
	color: #eae8a5;
}
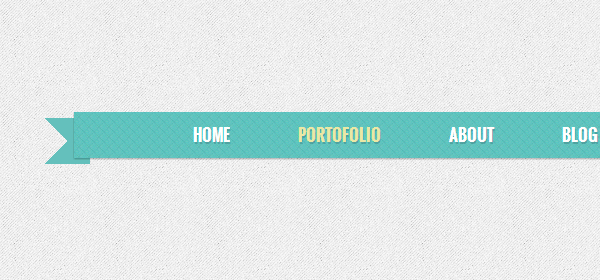
Next, we have to create the stars that separate the links. Open Photoshop again and create a new 15 x 15 pixels file. Make sure your file has the background transparent. Open the UI Icons PSD file that you downloaded and select the star icon layer. Copy the layer into your new file. Go to Edit > Transform Path > Scale and scale down the layer to 80% (both width and height). Then, right-click the layer and select Clear Layer Style. Next, select Blending Options and apply the following settings:
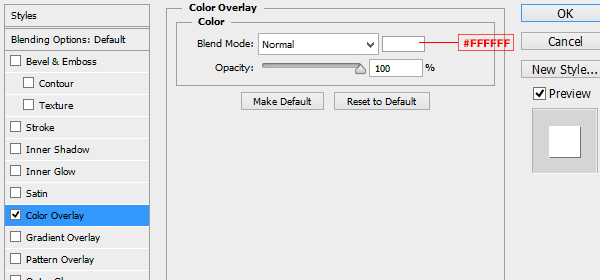
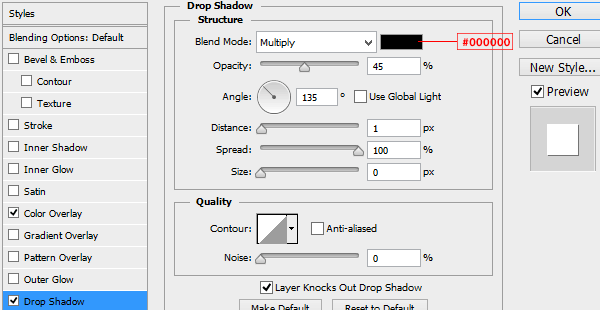
Save your file as a PNG image. Go to the Image to Data URI Convertor again and convert this image as well. The code obtained will be the background image for the pseudo-elements placed to the right of every link:
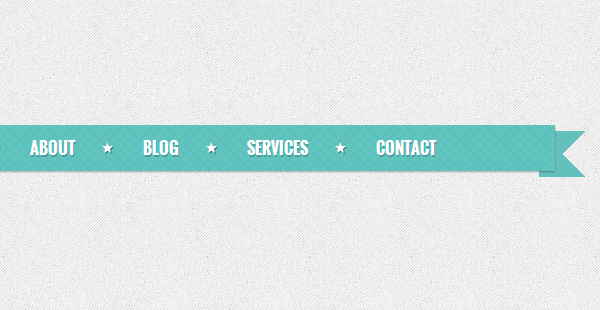
.nav>li>a::after {
	content: "";
	height: 15px;
	width: 15px;
	background-image: url(data:image/png;base64,iVBORw0KGgoAAAANSUhEUgAAAA8AAAAPCAYAAAA71pVKAAAACXBIWXMAAAsTAAALEwEAmpwYAAAKT2lDQ1BQaG90b3Nob3AgSUNDIHByb2ZpbGUAAHjanVNnVFPpFj333vRCS4iAlEtvUhUIIFJCi4AUkSYqIQkQSoghodkVUcERRUUEG8igiAOOjoCMFVEsDIoK2AfkIaKOg6OIisr74Xuja9a89+bN/rXXPues852zzwfACAyWSDNRNYAMqUIeEeCDx8TG4eQuQIEKJHAAEAizZCFz/SMBAPh+PDwrIsAHvgABeNMLCADATZvAMByH/w/qQplcAYCEAcB0kThLCIAUAEB6jkKmAEBGAYCdmCZTAKAEAGDLY2LjAFAtAGAnf+bTAICd+Jl7AQBblCEVAaCRACATZYhEAGg7AKzPVopFAFgwABRmS8Q5ANgtADBJV2ZIALC3AMDOEAuyAAgMADBRiIUpAAR7AGDIIyN4AISZABRG8lc88SuuEOcqAAB4mbI8uSQ5RYFbCC1xB1dXLh4ozkkXKxQ2YQJhmkAuwnmZGTKBNA/g88wAAKCRFRHgg/P9eM4Ors7ONo62Dl8t6r8G/yJiYuP+5c+rcEAAAOF0ftH+LC+zGoA7BoBt/qIl7gRoXgugdfeLZrIPQLUAoOnaV/Nw+H48PEWhkLnZ2eXk5NhKxEJbYcpXff5nwl/AV/1s+X48/Pf14L7iJIEyXYFHBPjgwsz0TKUcz5IJhGLc5o9H/LcL//wd0yLESWK5WCoU41EScY5EmozzMqUiiUKSKcUl0v9k4t8s+wM+3zUAsGo+AXuRLahdYwP2SycQWHTA4vcAAPK7b8HUKAgDgGiD4c93/+8//UegJQCAZkmScQAAXkQkLlTKsz/HCAAARKCBKrBBG/TBGCzABhzBBdzBC/xgNoRCJMTCQhBCCmSAHHJgKayCQiiGzbAdKmAv1EAdNMBRaIaTcA4uwlW4Dj1wD/phCJ7BKLyBCQRByAgTYSHaiAFiilgjjggXmYX4IcFIBBKLJCDJiBRRIkuRNUgxUopUIFVIHfI9cgI5h1xGupE7yAAygvyGvEcxlIGyUT3UDLVDuag3GoRGogvQZHQxmo8WoJvQcrQaPYw2oefQq2gP2o8+Q8cwwOgYBzPEbDAuxsNCsTgsCZNjy7EirAyrxhqwVqwDu4n1Y8+xdwQSgUXACTYEd0IgYR5BSFhMWE7YSKggHCQ0EdoJNwkDhFHCJyKTqEu0JroR+cQYYjIxh1hILCPWEo8TLxB7iEPENyQSiUMyJ7mQAkmxpFTSEtJG0m5SI+ksqZs0SBojk8naZGuyBzmULCAryIXkneTD5DPkG+Qh8lsKnWJAcaT4U+IoUspqShnlEOU05QZlmDJBVaOaUt2ooVQRNY9aQq2htlKvUYeoEzR1mjnNgxZJS6WtopXTGmgXaPdpr+h0uhHdlR5Ol9BX0svpR+iX6AP0dwwNhhWDx4hnKBmbGAcYZxl3GK+YTKYZ04sZx1QwNzHrmOeZD5lvVVgqtip8FZHKCpVKlSaVGyovVKmqpqreqgtV81XLVI+pXlN9rkZVM1PjqQnUlqtVqp1Q61MbU2epO6iHqmeob1Q/pH5Z/YkGWcNMw09DpFGgsV/jvMYgC2MZs3gsIWsNq4Z1gTXEJrHN2Xx2KruY/R27iz2qqaE5QzNKM1ezUvOUZj8H45hx+Jx0TgnnKKeX836K3hTvKeIpG6Y0TLkxZVxrqpaXllirSKtRq0frvTau7aedpr1Fu1n7gQ5Bx0onXCdHZ4/OBZ3nU9lT3acKpxZNPTr1ri6qa6UbobtEd79up+6Ynr5egJ5Mb6feeb3n+hx9L/1U/W36p/VHDFgGswwkBtsMzhg8xTVxbzwdL8fb8VFDXcNAQ6VhlWGX4YSRudE8o9VGjUYPjGnGXOMk423GbcajJgYmISZLTepN7ppSTbmmKaY7TDtMx83MzaLN1pk1mz0x1zLnm+eb15vft2BaeFostqi2uGVJsuRaplnutrxuhVo5WaVYVVpds0atna0l1rutu6cRp7lOk06rntZnw7Dxtsm2qbcZsOXYBtuutm22fWFnYhdnt8Wuw+6TvZN9un2N/T0HDYfZDqsdWh1+c7RyFDpWOt6azpzuP33F9JbpL2dYzxDP2DPjthPLKcRpnVOb00dnF2e5c4PziIuJS4LLLpc+Lpsbxt3IveRKdPVxXeF60vWdm7Obwu2o26/uNu5p7ofcn8w0nymeWTNz0MPIQ+BR5dE/C5+VMGvfrH5PQ0+BZ7XnIy9jL5FXrdewt6V3qvdh7xc+9j5yn+M+4zw33jLeWV/MN8C3yLfLT8Nvnl+F30N/I/9k/3r/0QCngCUBZwOJgUGBWwL7+Hp8Ib+OPzrbZfay2e1BjKC5QRVBj4KtguXBrSFoyOyQrSH355jOkc5pDoVQfujW0Adh5mGLw34MJ4WHhVeGP45wiFga0TGXNXfR3ENz30T6RJZE3ptnMU85ry1KNSo+qi5qPNo3ujS6P8YuZlnM1VidWElsSxw5LiquNm5svt/87fOH4p3iC+N7F5gvyF1weaHOwvSFpxapLhIsOpZATIhOOJTwQRAqqBaMJfITdyWOCnnCHcJnIi/RNtGI2ENcKh5O8kgqTXqS7JG8NXkkxTOlLOW5hCepkLxMDUzdmzqeFpp2IG0yPTq9MYOSkZBxQqohTZO2Z+pn5mZ2y6xlhbL+xW6Lty8elQfJa7OQrAVZLQq2QqboVFoo1yoHsmdlV2a/zYnKOZarnivN7cyzytuQN5zvn//tEsIS4ZK2pYZLVy0dWOa9rGo5sjxxedsK4xUFK4ZWBqw8uIq2Km3VT6vtV5eufr0mek1rgV7ByoLBtQFr6wtVCuWFfevc1+1dT1gvWd+1YfqGnRs+FYmKrhTbF5cVf9go3HjlG4dvyr+Z3JS0qavEuWTPZtJm6ebeLZ5bDpaql+aXDm4N2dq0Dd9WtO319kXbL5fNKNu7g7ZDuaO/PLi8ZafJzs07P1SkVPRU+lQ27tLdtWHX+G7R7ht7vPY07NXbW7z3/T7JvttVAVVN1WbVZftJ+7P3P66Jqun4lvttXa1ObXHtxwPSA/0HIw6217nU1R3SPVRSj9Yr60cOxx++/p3vdy0NNg1VjZzG4iNwRHnk6fcJ3/ceDTradox7rOEH0x92HWcdL2pCmvKaRptTmvtbYlu6T8w+0dbq3nr8R9sfD5w0PFl5SvNUyWna6YLTk2fyz4ydlZ19fi753GDborZ752PO32oPb++6EHTh0kX/i+c7vDvOXPK4dPKy2+UTV7hXmq86X23qdOo8/pPTT8e7nLuarrlca7nuer21e2b36RueN87d9L158Rb/1tWeOT3dvfN6b/fF9/XfFt1+cif9zsu72Xcn7q28T7xf9EDtQdlD3YfVP1v+3Njv3H9qwHeg89HcR/cGhYPP/pH1jw9DBY+Zj8uGDYbrnjg+OTniP3L96fynQ89kzyaeF/6i/suuFxYvfvjV69fO0ZjRoZfyl5O/bXyl/erA6xmv28bCxh6+yXgzMV70VvvtwXfcdx3vo98PT+R8IH8o/2j5sfVT0Kf7kxmTk/8EA5jz/GMzLdsAAAAgY0hSTQAAeiUAAICDAAD5/wAAgOkAAHUwAADqYAAAOpgAABdvkl/FRgAAAQVJREFUeNqkkz1KxFAUhb+kk7HTKt00prY1QTcQUlgkILgC04i1IEyRcposQBA3EGKjWYKYKjswTCeIIkmROTbDEIYk/syB1xze9zicd68hiX9LEkMPSDof4wZhSXuSPoIgcIZgcyTUGbDred4lsPOn2JKeJamqqlfgcDS2pJmkt85Zq2maz44/64ONsizvNaI8z59M04wAp7ewoihu+8A0TR+BK+B4sG1J+5KWG+zStu1rwPmpbQcwABaLRbXyjDAMp8BL92If7LZt+x7H8Z1lWfMkSZK6rr9c150C1uhXSbrxff8UuAAOAKIocrIsewBOfjNhR8Bkw5us/DVsbLMYJlvoewCv5RDZT1L00AAAAABJRU5ErkJggg==);
	position: absolute;
	right: -20px;
	top: 16px;
	display: block;
}
The last link doesn’t need a star icon to its right, so we won’t display its pseudo-element:
.nav>li:last-child>a::after {
	display: none;
}
First, search and delete these lines:
.nav ul {
	display: none;
}
Next, we are going to make some basic general styling. All the submenus will be hidden (pushed 9999 pixels to the left) and their initial opacity will be 0. That’s because we want to obtain a subtle fade effect using CSS3 transitions.
.nav ul {
	position: absolute;
	left: -9999px;
	padding-top: 10px;
	border-bottom: 1px solid #ccc;
	opacity: 0;
	-webkit-transition: opacity .3s linear;
	-moz-transition: opacity .3s linear;
	-o-transition: opacity .3s linear;
	-ms-transition: opacity .3s linear;
}
The first level submenus will appear under its parent link:
.nav>li:hover>ul {
	left: 0;
	opacity: 1;
	top: 30px;
}
The rest of the submenus must appear to the left of their parent link:
.nav ul li:hover>ul {
	left: 150px;
	opacity: 1;
	top: -11px;
	padding-left: 12px;
	border-bottom: 0;
	box-shadow: none;
}
Right now, the dropdown menu looks like this:
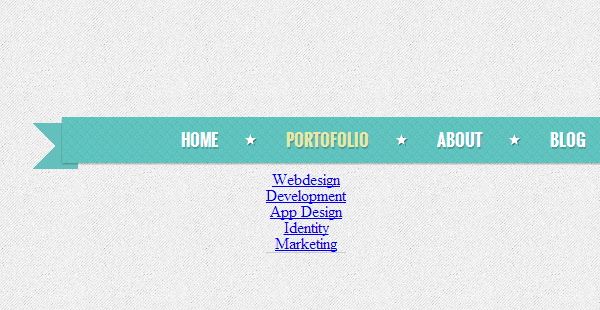
Not very nice, huh? Well, hang in there, we still have a pretty long way to go. First, let’s deal with the list elements which contain the links:
.nav ul li {
	display: block;
	position: relative;
	border-top: 1px solid #ccc;
	border-left: 1px solid #ccc;
	border-right: 1px solid #ccc;
	width: 150px;
	text-align: justify;
	z-index: 9;
	background: #eee;
	box-shadow: 3px 4px 0 rgba(0, 0, 0, .1);
	-webkit-transition: background .3s linear;
	-moz-transition: background .3s linear;
	-ms-transition: background .3s linear;
	-o-transition: background .3s linear;
}
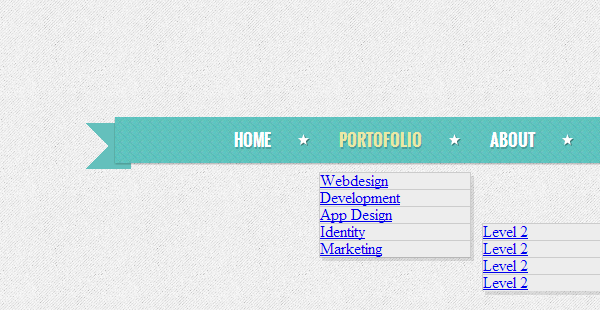
I’ll explain a little bit what I’ve done. I gave the list elements a fixed width of 150 pixels, a light grey background, some borders and crisp shadows for the retro look. Also, they inherited the property for centered text from their parent, so I had to overwrite it, using text-align: justify.
Next, let’s add some style to the links:
.nav ul li a {
	font-family: "Oswald", sans-serif;
	font-size: 14px;
	text-decoration: none;
	display: block;
	padding: 7px 12px 7px 20px;
	color: #65c0bb;
	-webkit-transition: color .3s linear;
	-moz-transition: color .3s linear;
	-ms-transition: color .3s linear;
	-o-transition: color .3s linear;
}
Also, let’s take care of their hover state:
.nav ul li:hover>a, .nav ul li a:hover {
	color: #4db6b0;
}

.nav ul li:hover {
	background: #f7f7f7;
}
Now the menu looks like this:
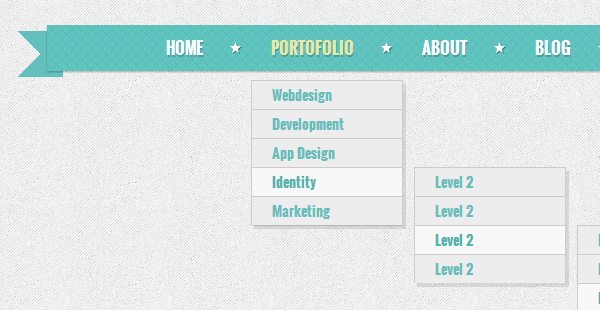
It looks quite good, but there seems to be a problem: the first submenu has a bottom border, but the second doesn’t. So, let’s fix that:
.nav ul ul li:last-child {
	border-bottom: 1px solid #ccc;
}
You are probably wondering why I didn’t set the border for the unordered list. That’s because the unordered list has a 12 pixels padding to its left and the border would be longer than necessary. This is how it would look if I’d set a border for it:
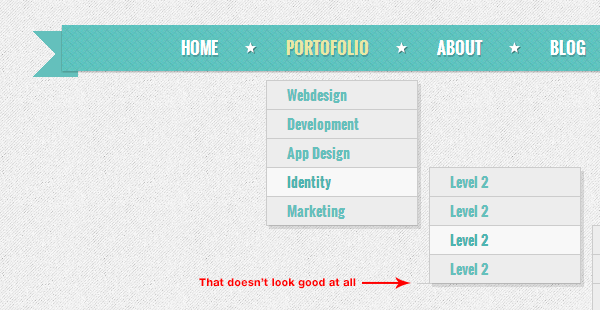
Here’s how it looks instead:
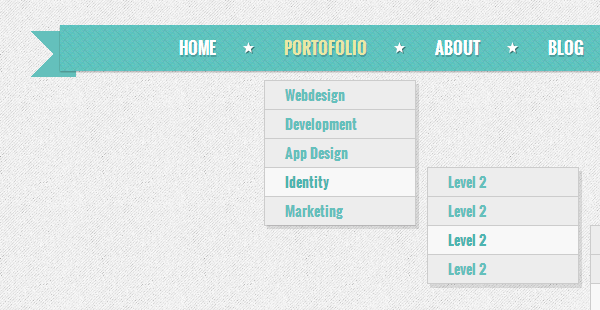
Another bug pops up: the shadow of the second level submenu is bigger than the one of the first level submenu. Let’s solve this one as well:
.nav ul ul li {
	box-shadow: 3px 3px 0 rgba(0, 0, 0, .1);
}
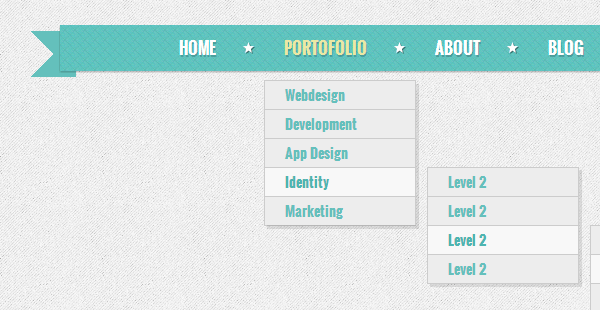
The menu looks quite nice now, but it still feels like something’s missing. That’s right, in the preview image the submenus had some little arrows pointing to their parent links. We’re going to create them by using pseudo-elements. The pseudo-elements will be just some 9 by 9 pixels squares, rotated by 45 degrees. Their background and border must match those of the submenus. First, some base styling (we’re going to set their dimensions and positioning context):
.nav ul::after, .nav ul::before {
	content: "";
	display: block;
	z-index: 1;
	position: absolute;
	height: 9px;
	width: 9px;
}
First, let’s deal with first level submenu:
.nav>li>ul::after {
	border: 1px solid #ccc;
	background: #eee;
	border-right: 0;
	border-bottom: 0;
	top: 5px;
	left: 25px;
	-webkit-transform: rotate(45deg);
	-moz-transform: rotate(45deg);
	-o-transform: rotate(45deg);
	-ms-transform: rotate(45deg);
}
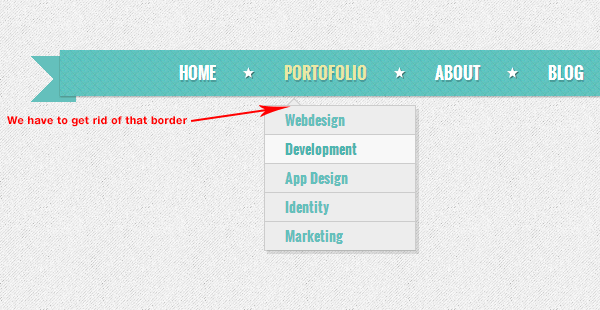
It looks nice, but that border is a little bit annoying. We can get rid of that by overlaping it with another pseudo-element which matches the background of the submenu:
.nav>li>ul::before {
	height: 1px;
	width: 12px;
	background: #eee;
	border-right: 0;
	border-bottom: 0;
	top: 10px;
	left: 24px;
	z-index: 99;
}
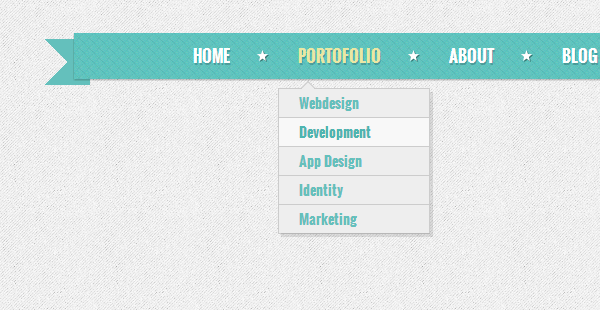
Let’s do the same thing for the higher level submenus:
.nav ul ul::after {
	border: 1px solid #ccc;
	background: #eee;
	border-right: 0;
	border-bottom: 0;
	top: 20px;
	left: 8px;
	position: absolute;
	-webkit-transform: rotate(-45deg);
	-moz-transform: rotate(-45deg);
	-o-transform: rotate(-45deg);
	-ms-transform: rotate(-45deg);
}

.nav ul ul::before {
	height: 10px;
	width: 1px;
	background: #eee;
	z-index: 99;
	top: 20px;
	left: 12px;
}
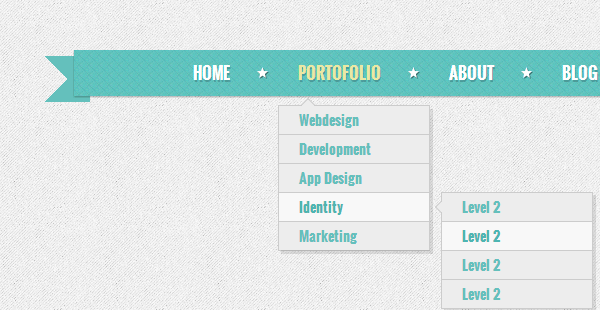
Well, that’s it! I hope you liked the tutorial and you learned some new things!
