How to Create an Uptime Status Badge and Insert It into Your Website
A status badge is an essential add-on widget component of a website as it provides a brief visual insight into a website’s real-time performance and operational status. Many online businesses spend most of their budget and time on online marketing and conversion efforts while disregarding website operational status and performance.
No matter how innovative or efficient your marketing efforts are when your website or application status and performance are neglected; everything will be in vain. You will not only lose potential customers or website visitors due to a series of unnoticed service outages, but you might also face a high volume of customers’ or users’ email support and tickets about the same subject that will surely take time to answer.
Website uptime status and operational performance are vital elements in every online business operation. These factors can contribute not only to your search engine rankings but also to your customer conversion rates. Having a website status badge on your website will give you and your users or visitors a small amount of color-categorized metadata or metrics about your website’s concurrent operational status and quickly find out if there are ongoing outages or maintenance. Read our previous article to see some good examples of status badges on websites.
What is a Website Uptime or Downtime?
Website “uptime” is the time the website is up or online for website visitors or users to visit and utilize. If the website is unavailable or unreachable, it’s called “downtime,” which is the opposite of website uptime. Uptime is determined by the amount of time the website is online or live in a period which could vary from the year, month, or week.
The goal of every website server is to achieve 100 percent uptime, which most of the time is unattainable, but 99.999 percent uptime (also known as “five-nines availability”) is considered to be the industry standard if you want your website to rank higher on Search Engines.
What is a Website Status Badge?
There are times when users or website visitors don’t visit your website status pages as intended. This means that they may not know anything about the ongoing outages, downtimes, or any other issues your website or application is experiencing when it happens.
With Postcards Email Builder you can create and edit email templates online without any coding skills! Includes more than 100 components to help you create custom emails templates faster than ever before.
Free Email BuilderFree Email TemplatesUnavoidable as it may seem, this may reflect poor management, trust concerns from potential or regular customers, and a low conversion rate. By simply adding a website uptime badge to your website or application, you can prevent these issues because the status badge constantly displays your real-time website uptime and performance status.
A website status badge is a small visual representation of a website’s uptime and operational status summary, which serves as a quick website monitoring tracker. Most uptime monitoring service platforms allow their users to easily embed a website uptime badge widget to display the website or application’s real-time uptime status and operational performance, so users or visitors can quickly check to see if there are any ongoing outages or planned maintenance.
In a nutshell, below are some of the benefits of having a status badge on your website or application:
- Prevent the loss of revenue. Websites are regularly accessed worldwide, which means that anyone can try to access your website. Users or potential customers who cannot access your website or application without knowing why will typically leave when your website is unreachable or down.
- Quickly monitor your downtimes. Your website may experience short-term outages that go unnoticed which impact your search engine ranking. Google spiders regularly crawl on your website, and uptime status is essential in indexing.
- Operational performance improvement. Knowing how your website performs briefly is one way to determine which areas need to be improved instantaneously.
- Avoid possible cyber-attacks. Frequent downtime may indicate hacking. Malicious agents can send an abnormally large amount of traffic to the website, causing the servers to fail to process it and crash.
- Build trust and a better reputation. Slow service, frequent downtimes, and bad operational performance will impact the users or customer experience. The sooner you learn about the problem, the sooner you can take action.
Adding a status badge to your website
There are several tools, platforms, and services available online that you can use to embed a website status badge to your website or application. In this tutorial, I will introduce you to Pulsetic.
Pulsetic is a platform for uptime monitoring that allows users to manage incident reports by sending incident alerts via phone call, SMS, email, or Slack when a user’s website is unavailable. It has four pricing plans that are available on monthly or annual subscriptions.
G2 reviewers have awarded Pulsetic an impressive 4.8-star rating, highlighting its standout performance in comparison to its competitors.
It comes with status badge features where you can display your current website’s uptime and operational status from your website. Whether your website is operational or not, the status shown on the badges will change in real-time.
With Startup App and Slides App you can build unlimited websites using the online website editor which includes ready-made designed and coded elements, templates and themes.
Try Startup App Try Slides AppOther ProductsPulsetic status badges come in different styles and can be customized to match your brand design. With Pulsetic, you are free to customize the look and feel of your status badge from button style to custom text. It also allows you to add your custom CSS code to get the custom design you want to achieve.
Creating a Pulsetic Account
We need to sign up for a free Pulsetic account to create a status badge. To get started, go to https://pulsetic.com/ and click on the “Signup” button in the upper-right section of the homepage, and we will be redirected to the signup page.
Next, fill up the signup form with your information.
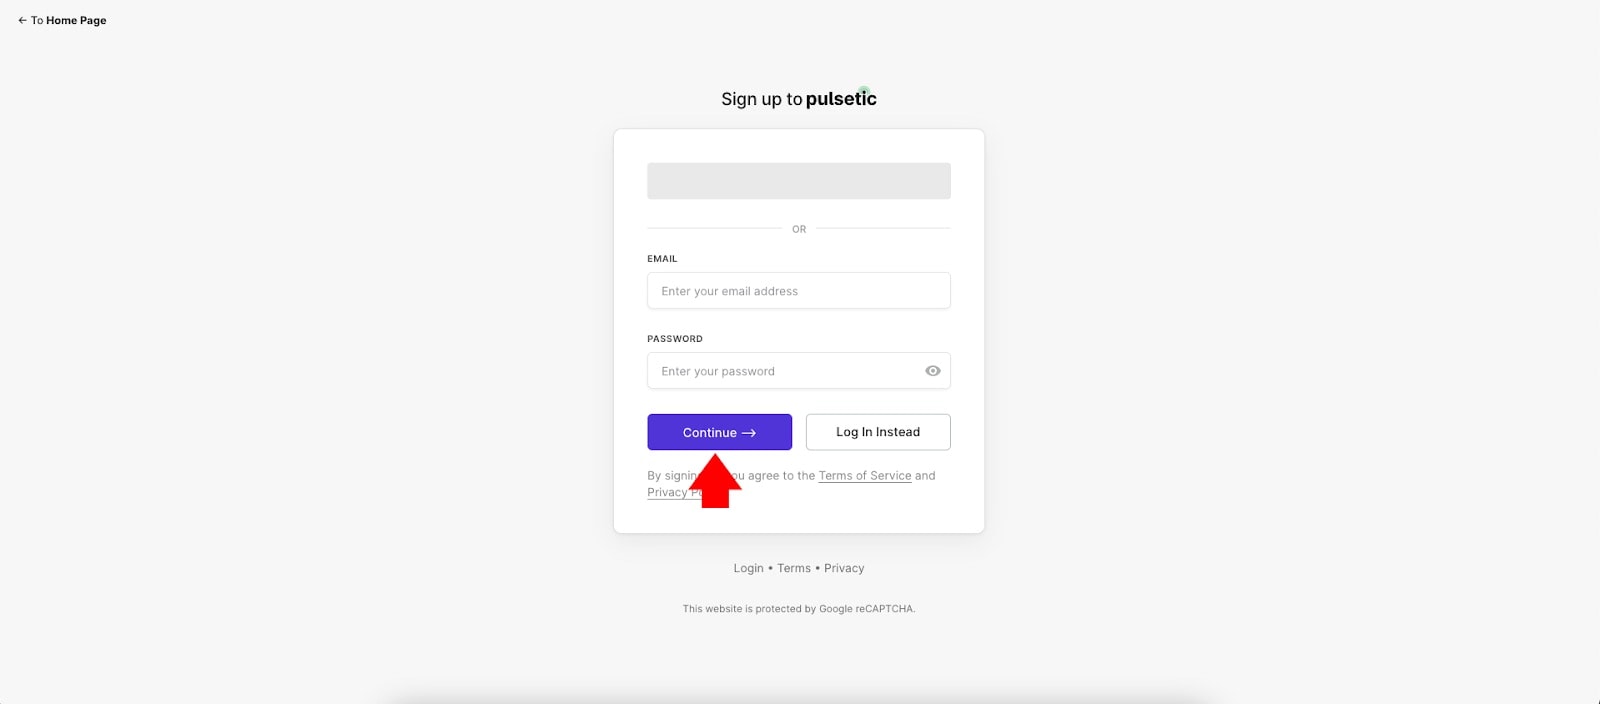
Following your email verification, we will see a dashboard similar to the one shown below.

Adding Website to Pulsetic’s Monitors List
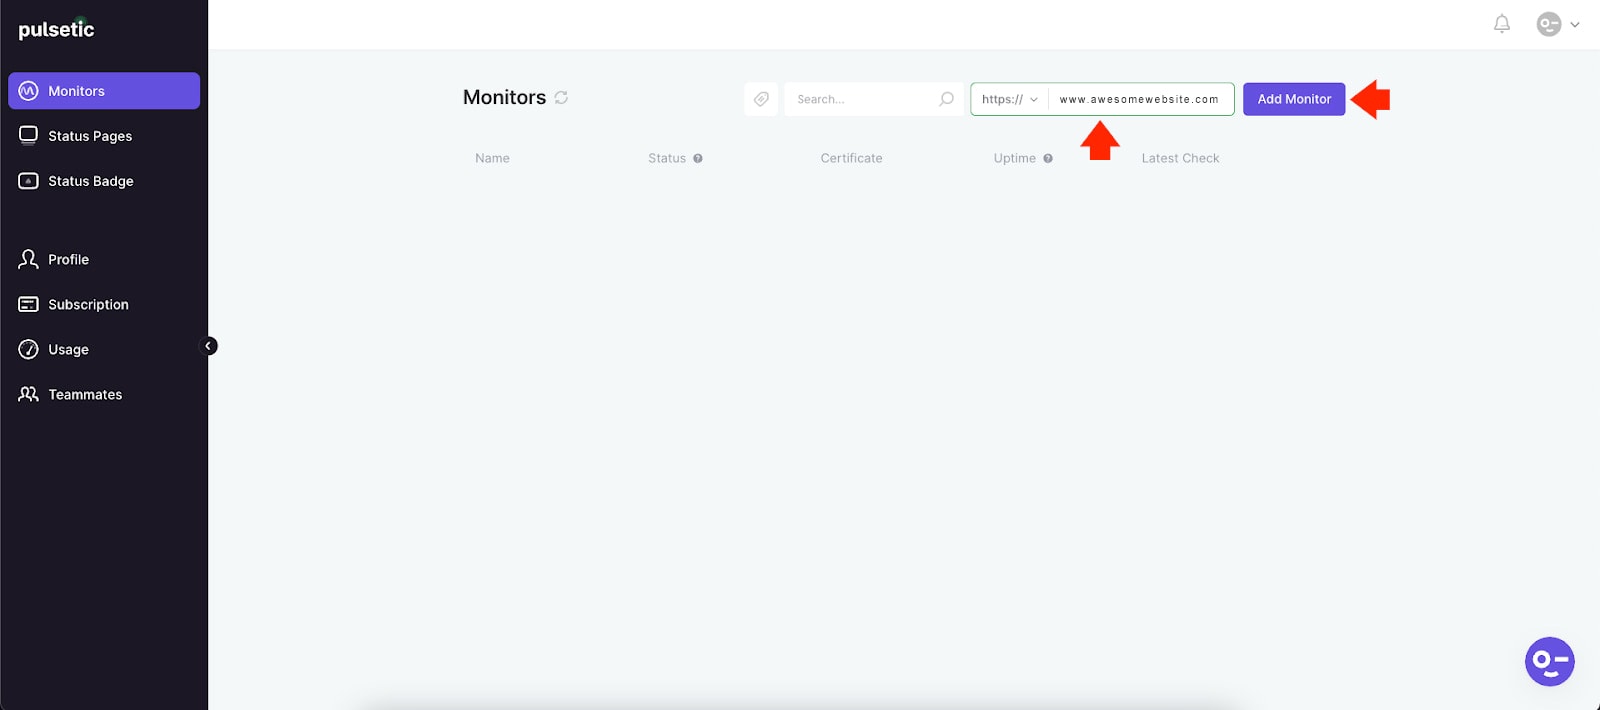
At this point, we need to add our website to the monitor’s list so we can select it when we create our status badge. From the Monitors Dashboard, enter the website URL and click on the “Add Monitor” button located in the upper right corner of the screen, as seen in the image below.
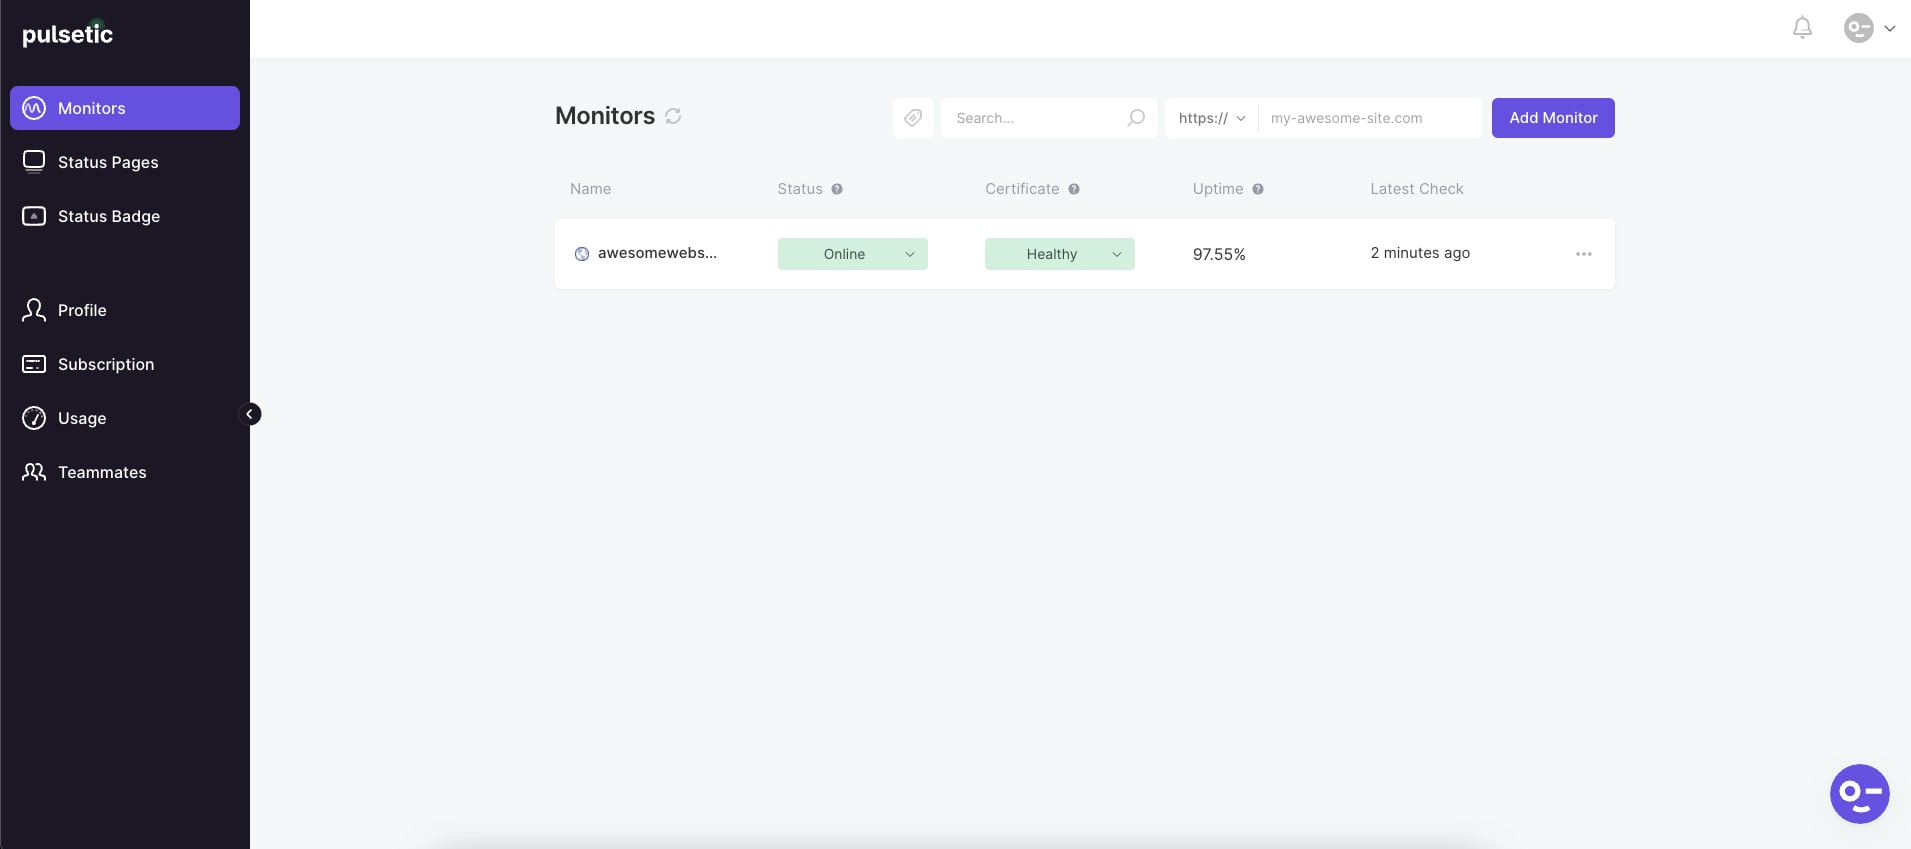
Once Pulsetic has verified your website or application, it will appear in the Monitors List, as seen in the image below.
Creating a status badge
Now that your website is added to the Monitors List, you can now create your status badge that is embeddable into your website or application. To do this, click on the Status Badge link on the left menu sidebar.

Next, you need to click on the Create Badge button located in the upper right corner of the Status Badge page. From the Website dropdown, select the website URL you added to the Monitor’s List.
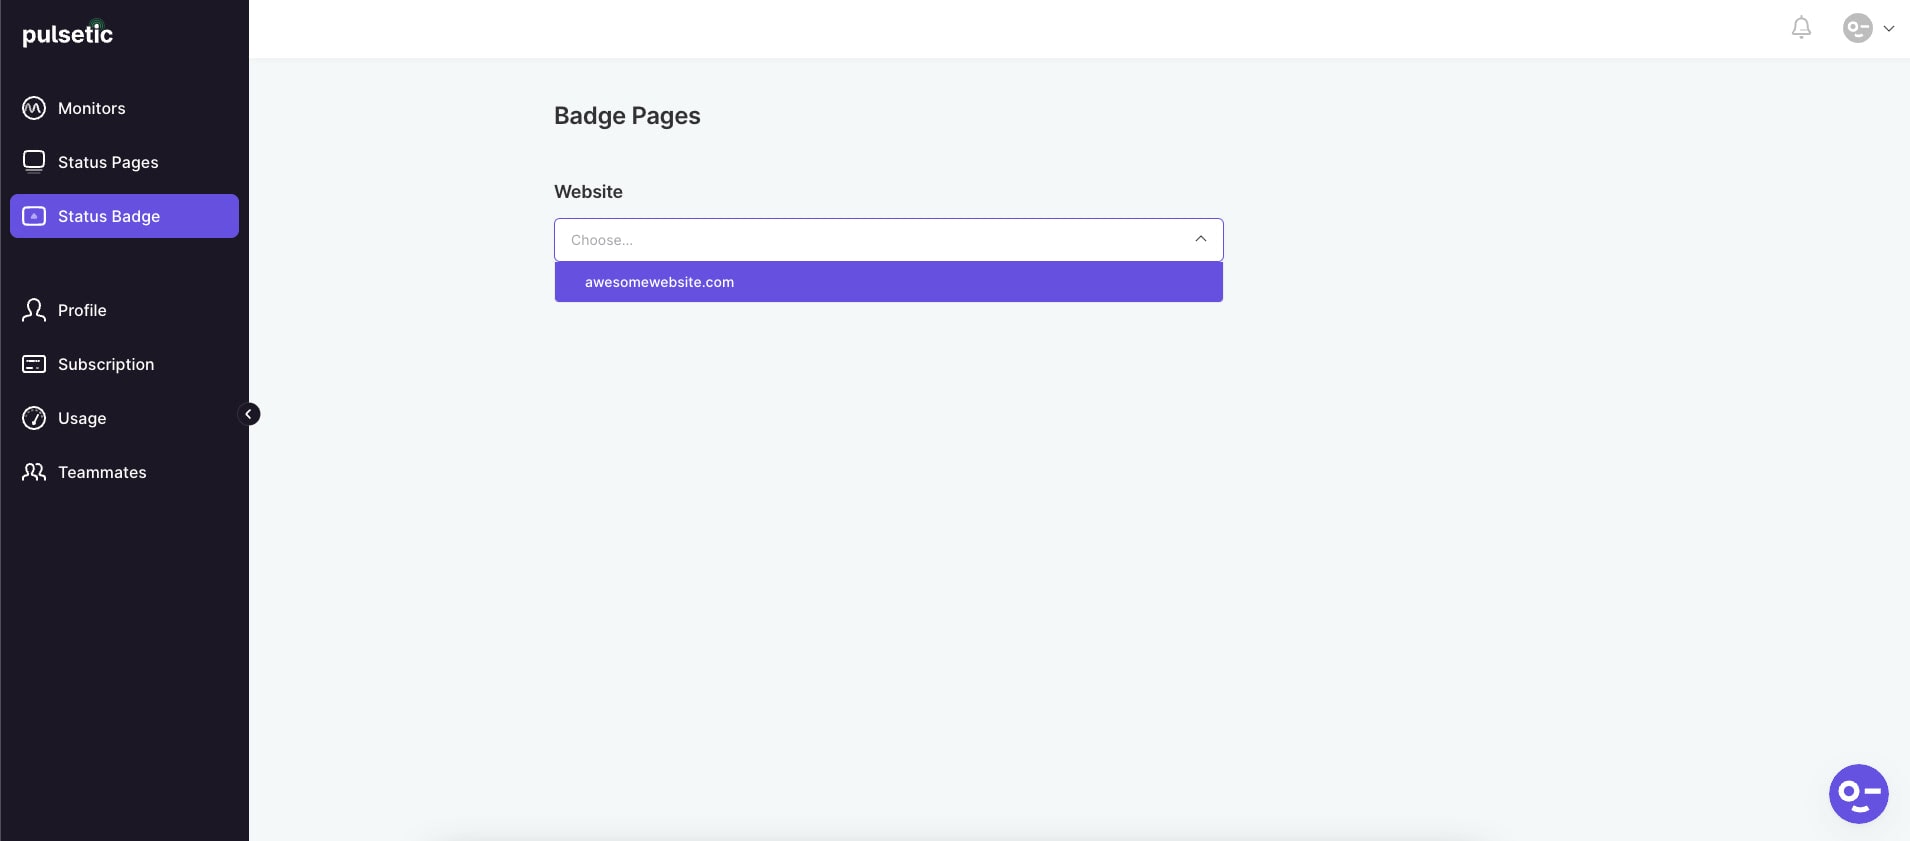
From here, you can now customize the design of your website status badge. Below is the list of properties you can customize on the Badge Page.
- Style – the presentation layout of your status badge. You can choose from button, status, and icon.
- Symbol – the icon on the left side of your status badge. You can choose from triangle, circle, and square.
- Roundness – the corner style of the status badge’s outer border edge. You can choose from square, rounded, and round.
- Font-Style – the status badge’s font family, font-weight, and text siz
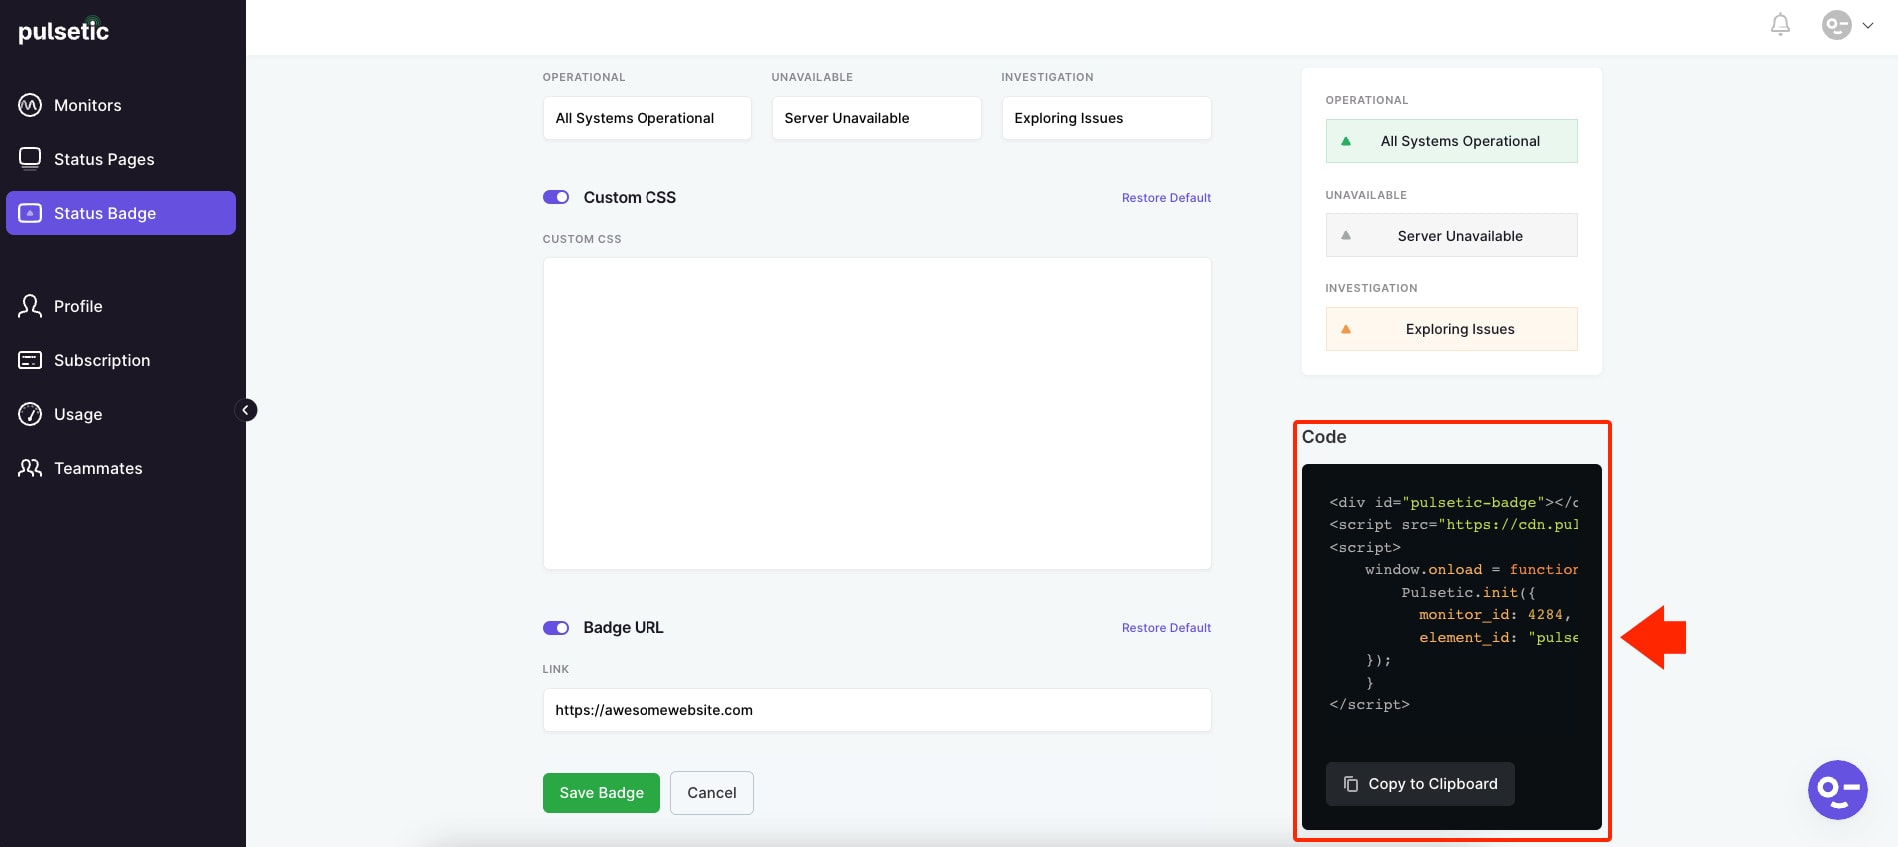
- Text Color – the color of the text on your status badge. You need to select the text color for the three statuses: operational, unavailable, and investigation.
- Symbol Color – the icon’s color on the left side of your status badge. Same with text color, you need to select the text color for the three statuses: operational, unavailable, and investigation.
- Frame Background Color – the color of the frame of your status badge. Likewise, you need to select the text color for the three statuses: operational, unavailable, and investigation.
- Custom Text – the text or label you want to appear for three statuses: operational, unavailable, and investigation. You can leave each field blank if you prefer the default labels.
- Custom CSS – enables you to add your own custom CSS styles that will override status badge default styles.
- Badge URL – the website URL where you want your status badge to appear.
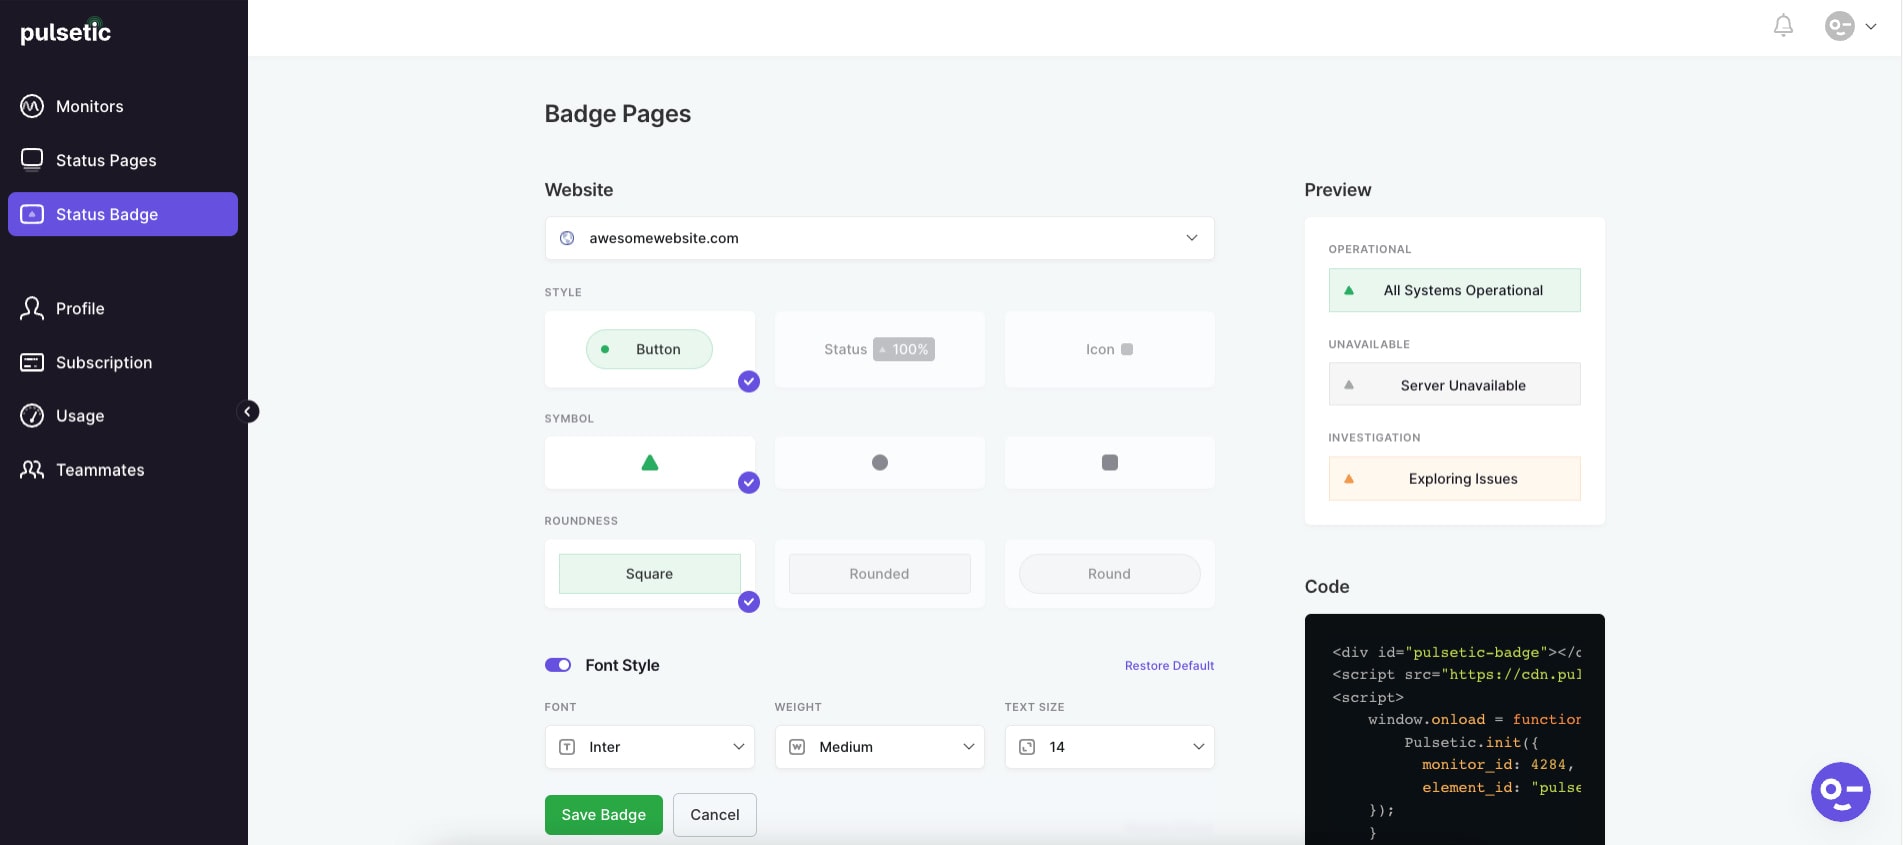
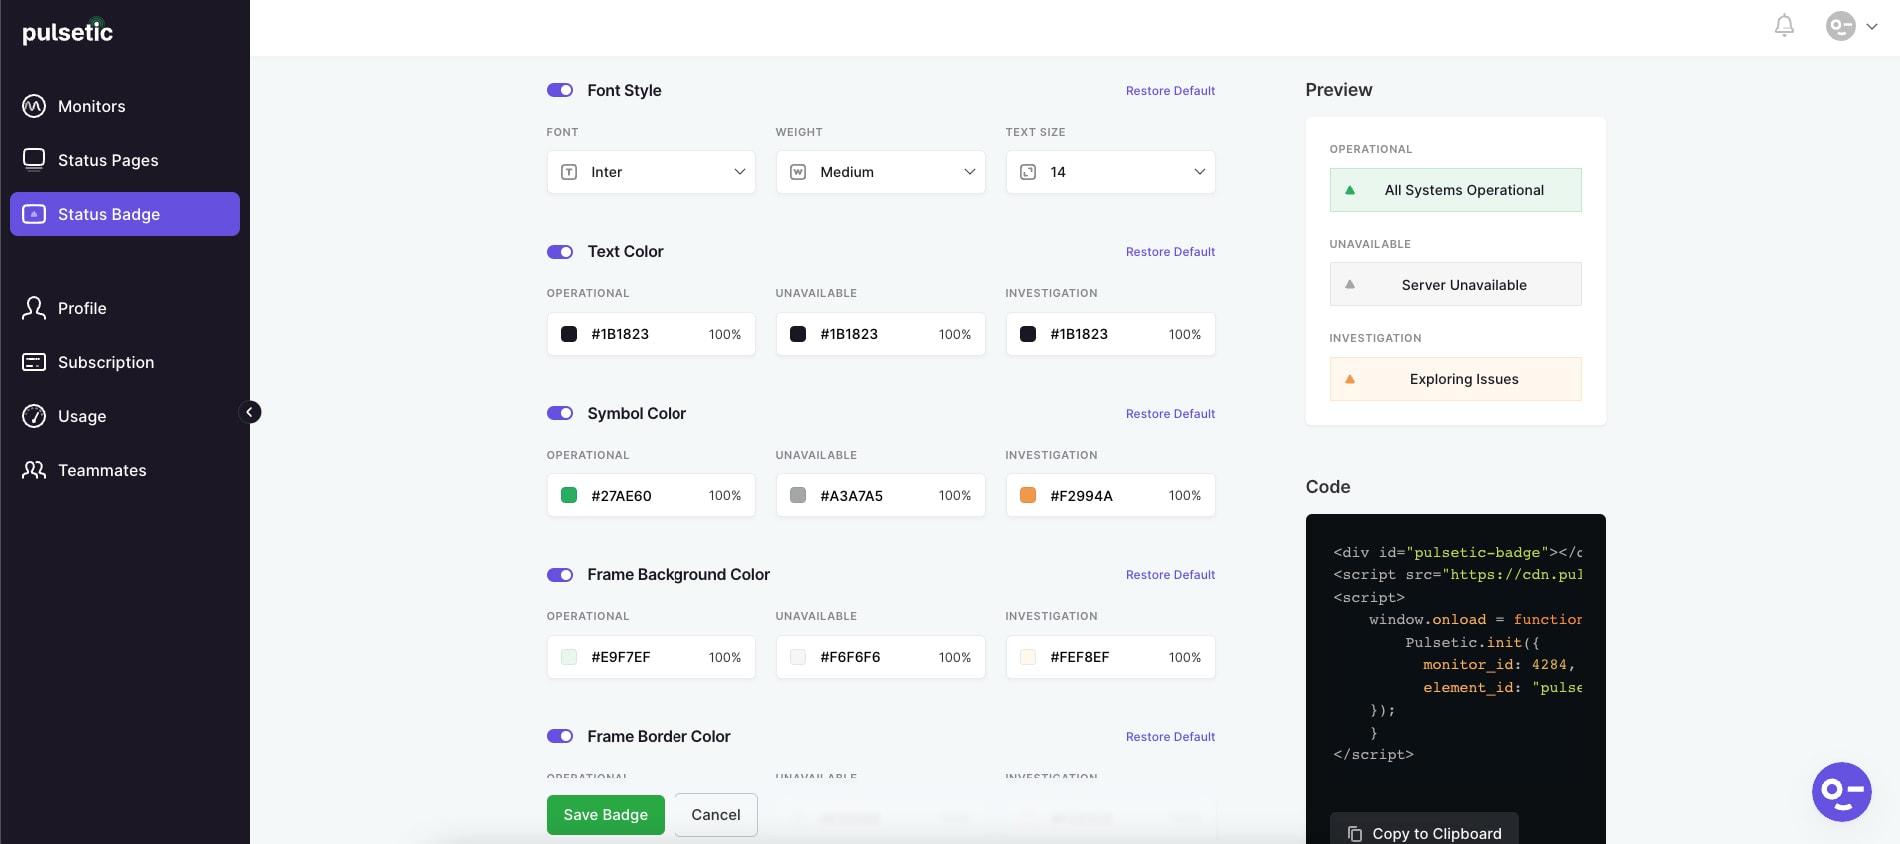
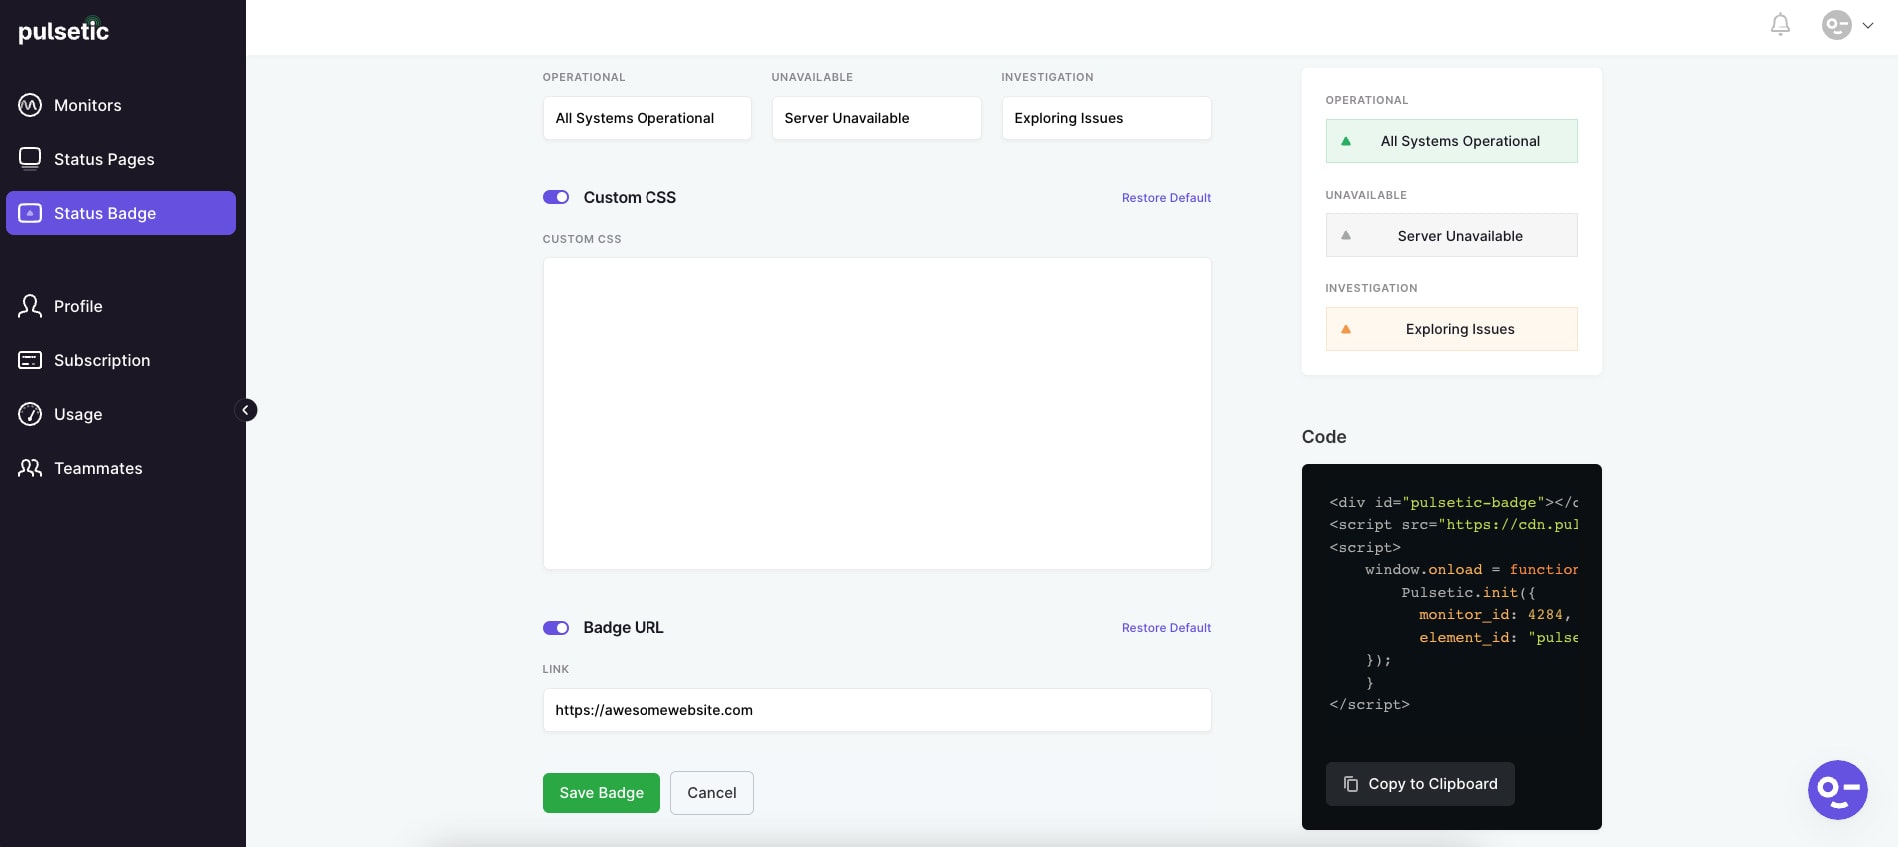
On the upper right corner of the screen, under the Preview section, you will see the real-time layout changes for each property modification. Don’t forget to click on the Save Badge button to save all your customizations.
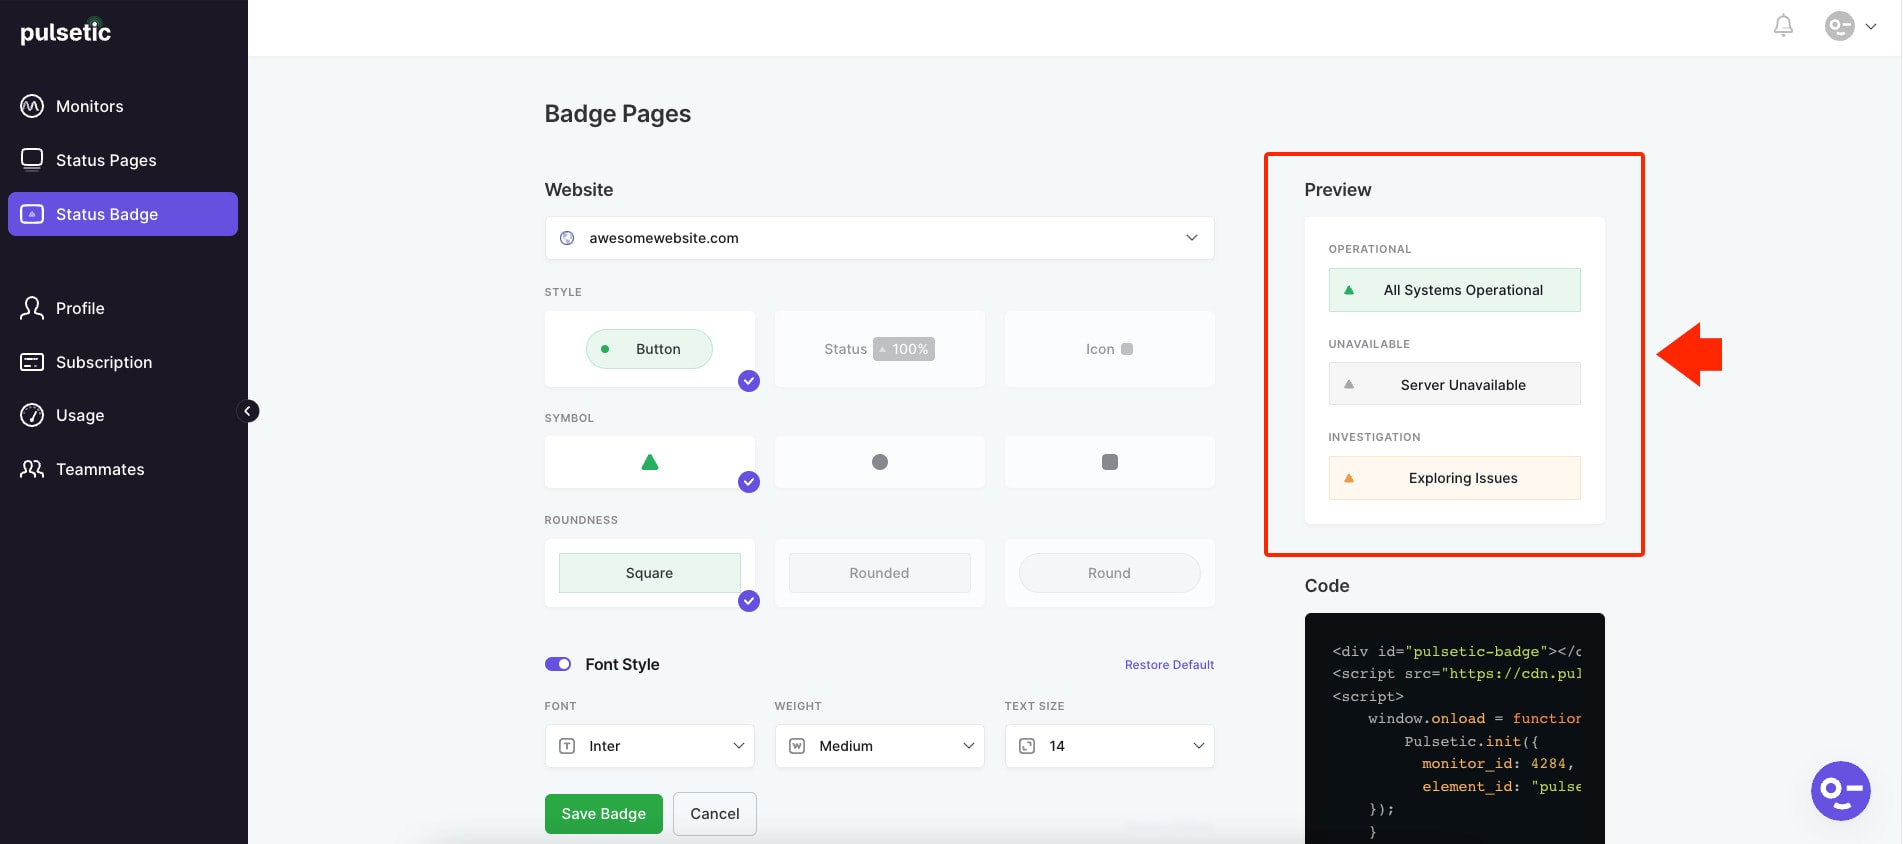
Note: If you wish to restore the default styles for each field, click on the Restore Default link under each field except for the Style, Symbol, and Roundness properties.
Embedding the status badge to your website
To add the Pulsetic status badge to your website or application, copy the code of the website URL you added from the Status Badge Page located on the lower corner of the Badge Page and paste it somewhere on your website. The code location might vary on the type of website or application your website is built on.
Once you’ve added the code to your website, you can now see the status badge on the section of your website where you added the code, similar to the image below.

Conclusion
Monitoring uptime performance regularly is the most effective way to keep your website up and running. Website downtime can be costly in revenue, search engine ranking, and branding. While no website is automatically immune to downtime and performance issues, you can quickly identify your ongoing website problems and take action quickly by using a status badge.
A status badge displays your current website’s uptime and operational status. Having it embedded in your website can help you minimize downtime and save you money, potential customers, and reputation.
There are so many website monitoring tools on the market that it can be challenging to select the best ones. Pulsetic is one of the best platforms on the internet for uptime monitoring service, which provides you with an uptime/downtime overview, performance metrics, and incident management reports while giving you downtime alerts by phone call, SMS, email, or Slack when your website is down at the top of the status badge feature.
The best thing about it is that it provides numerous customizable settings based on the needs or configuration of your website.


