How to Add a Countdown Timer to an Email (4 Steps Without Coding)
To add a countdown timer to an email, open your email in Postcards, drag in the countdown module, set the deadline date and time, and style it to match your brand. Then export the email to your email platform and send yourself a test.
In this blog, we walk you through these four steps in detail and cover how timers behave in Gmail, Outlook, and Apple Mail, and what readers see after the deadline passes.
What Is an Email Countdown Timer?
An email countdown timer is a clock inside your email that shows the days, hours, minutes, and seconds left until a deadline. Instead of reading “sale ends this week,” your reader sees “2 days, 14 hours, 37 minutes” and knows exactly how long they have.
Most email timers are animated GIFs that are created the moment someone opens the email. A reader who opens at 9 a.m. sees more time left than a reader who opens at 3 p.m., and each of them sees the correct time.
That’s the difference between a timer and a banner that says “Sale ends Friday.”
- The banner shows the same words to everyone.
- The timer changes with every open.
Here’s a countdown timer in a real email:
With Postcards Email Builder, you can create and edit email templates online without any coding skills! It includes more than 100 components and the AI Suite, which builds and translates full templates from a single prompt.
Free Email BuilderFree Email Templates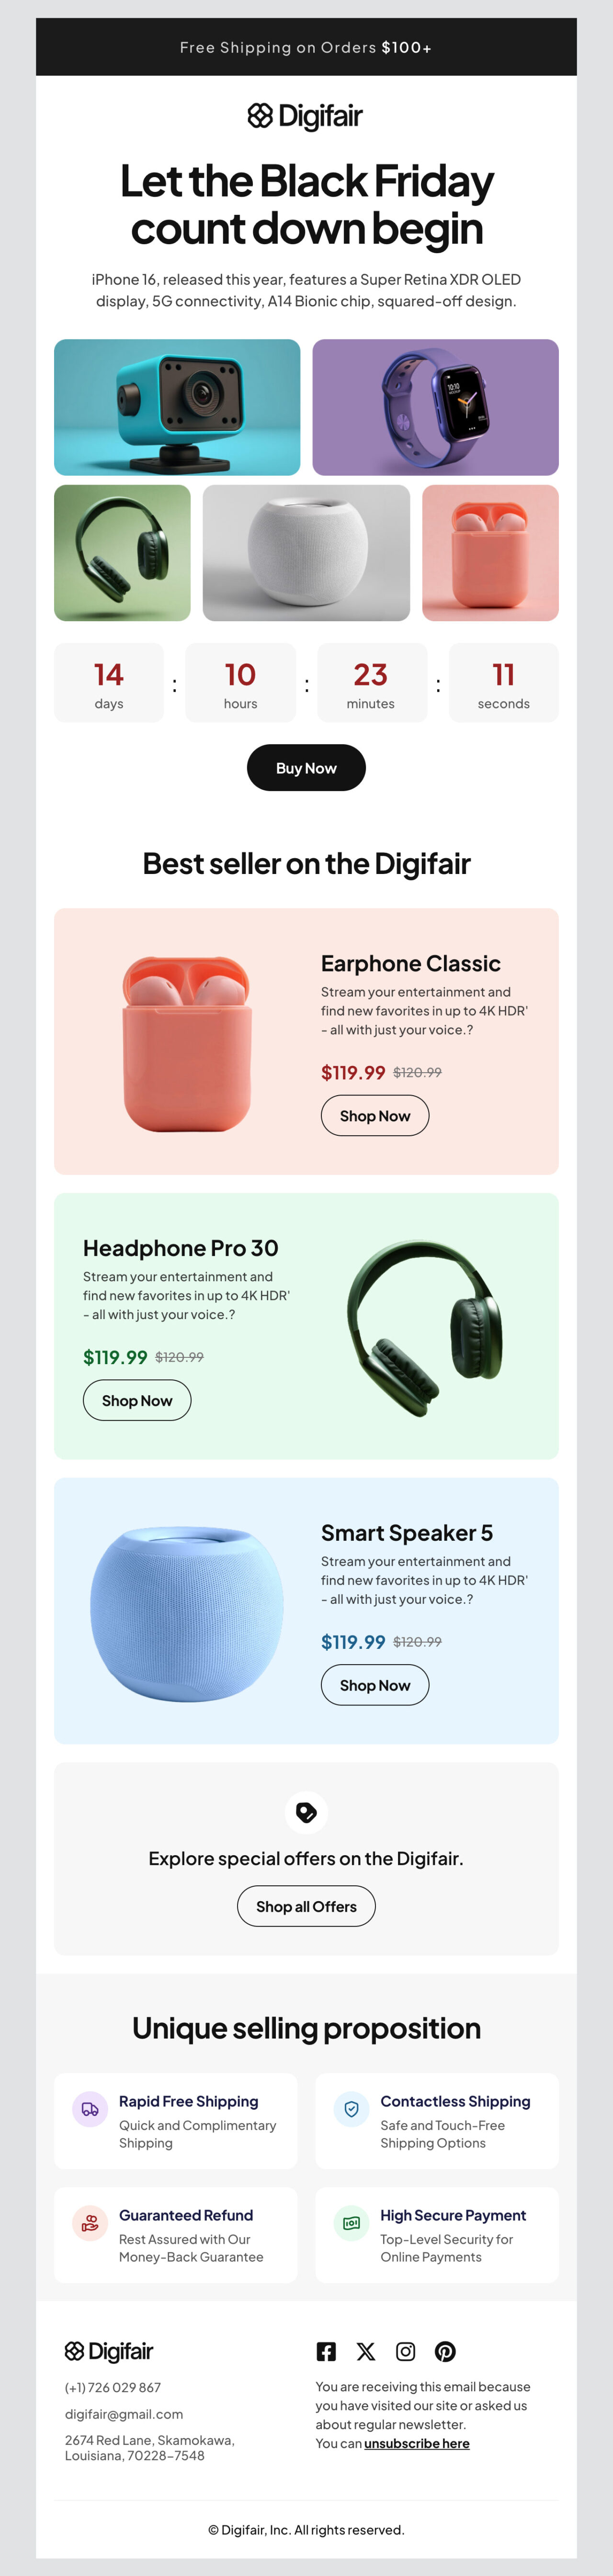
Edit this template in Postcards
This Digifair Black Friday template puts a large timer at the top on a clean white background, so readers see it first. Below it, a grid of tech products with “Shop Now” buttons gives readers something to buy before the clock runs out.
When Should You Use a Countdown Timer in Email?
Use a countdown timer in email when your offer or event ends at an exact time. For example:
- Flash sales that last 24 or 48 hours
- Black Friday and Cyber Monday deals
- Early-bird prices before the regular price starts
- Product launches with a preorder or launch date
- Webinars and live events with a set start time
- Fundraising campaigns with a donation deadline
- Course or event sign-ups that close on a set date
- Abandoned-cart discounts that expire
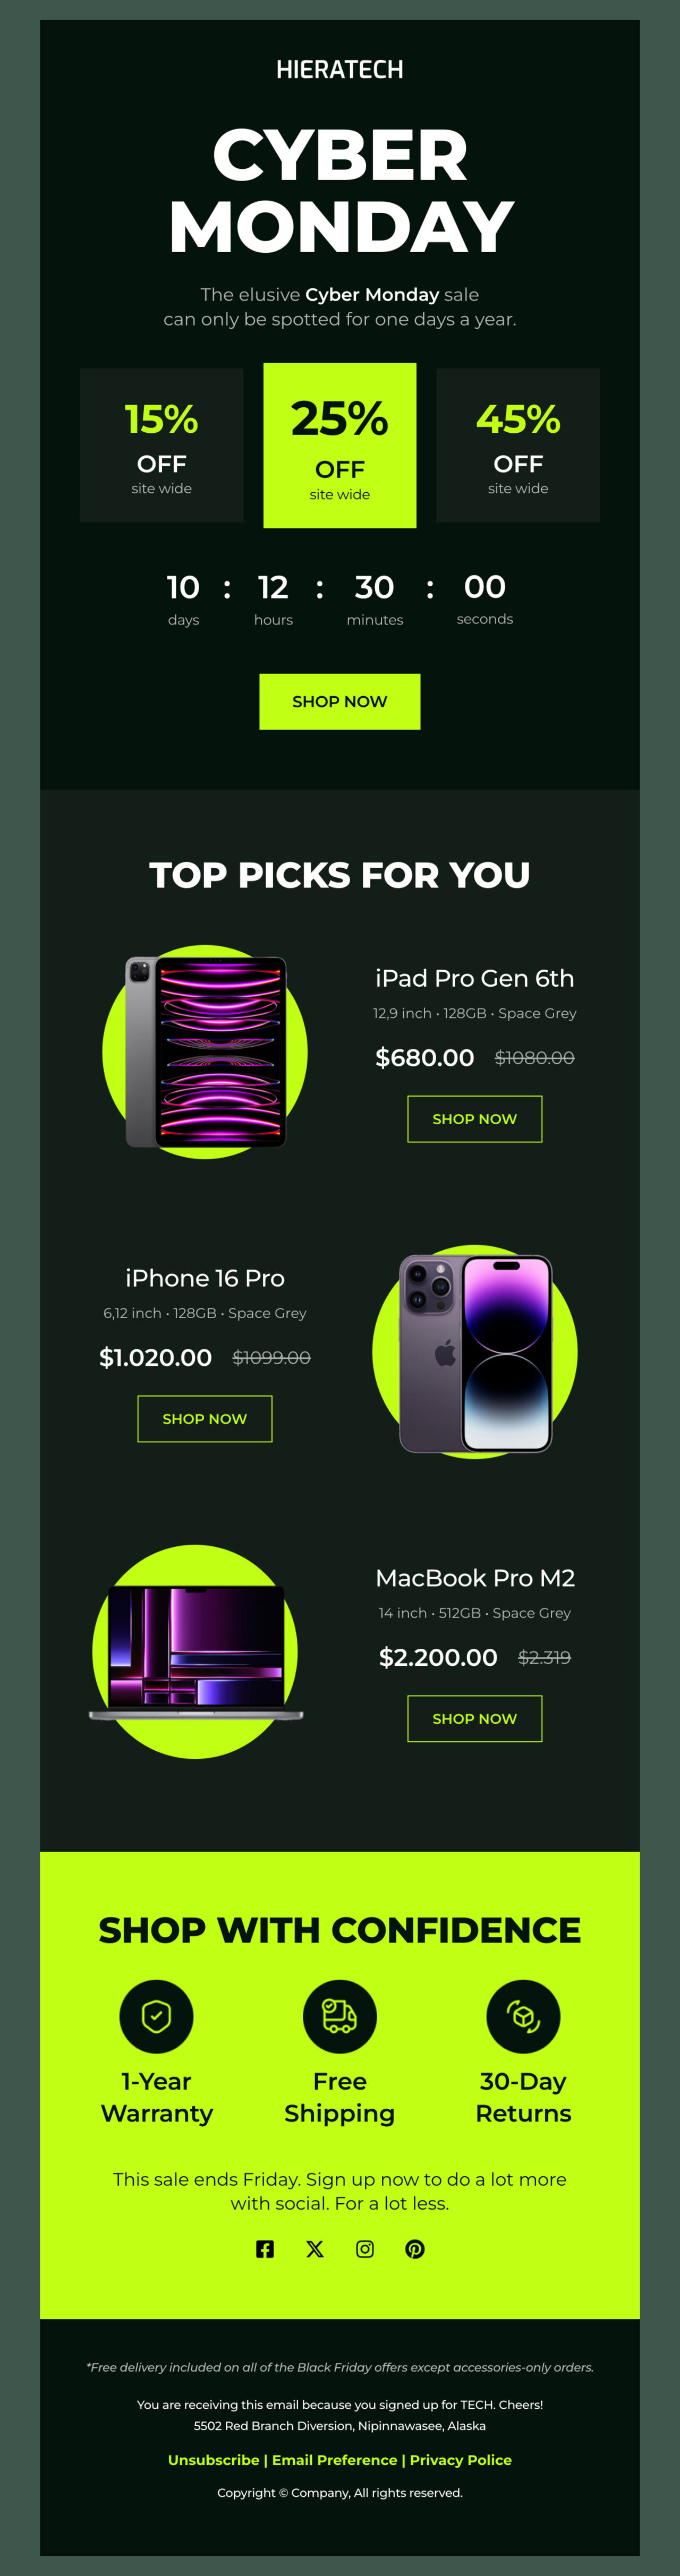
💡Tip: Timers fit Cyber Monday and Black Friday email campaigns really well because shoppers see dozens of deals, so every hour is important. The Hieratech Cyber Monday template, for example, puts the timer right under the discount banner, so readers see the deal and the time left together before they scroll to the products.
Edit this template in Postcards
What You Need Before You Start
You need four things to add a countdown timer to your email:
- A Postcards Plus or Pro plan: The free Start plan doesn’t include countdown timers. Compare Postcards paid plans.
- An exact deadline: Know the date, time, and time zone your offer ends.
- An email to add it to: A draft you’re already working on is fine.
- Access to your email platform: You’ll send the email from Mailchimp, Klaviyo, HubSpot, or another platform.
How to Add a Countdown Timer to Email With Postcards (Step by Step)
Drag the countdown module into your email, set the deadline, style it to match your brand, then export and test it.
Here’s how:
With Pulsetic you’ll be instantly notified the moment your website, API, or server becomes unavailable. Monitor uptime from multiple global locations and respond to incidents before your users are affected.
Create beautiful status pages in minutes to keep customers informed during outages and build trust with transparent communication.
Start Monitoring for FreeStep 1: Drag the Countdown Module Into Your Email
Open your email in Postcards and drag the countdown module into it, the same way you add a heading, image, or button:
- Open your email in the Postcards editor.
- Click on the + button in the top-left corner.
- Click Basic Modules.
- Find the Countdown module.
- Drag it into your email and drop it where you want the timer to appear.
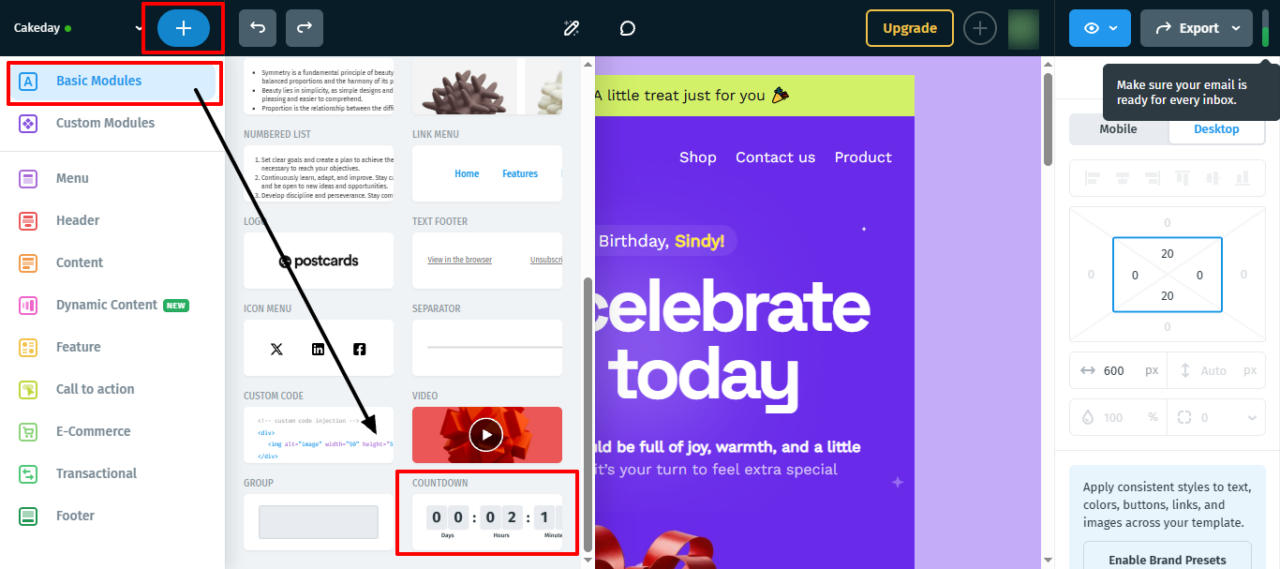
Put the timer right above your main button. That way, the reader sees how much time is left and where to click at the same time. Under the main image or next to the offer also works.
Step 2: Set the Deadline Date and Time
Click the timer and choose the exact moment it should count down to:
- Click the countdown block in your email.
- Open its settings.
- Choose the deadline date.
- Choose the deadline time and time zone.
Match the timer to the real end of your offer. If your sale ends at 11:59 p.m. on Friday, the timer should reach zero at 11:59 p.m. on Friday, not at midnight on Saturday.
Write the deadline in your email text too, like “Sale ends Friday at 11:59 p.m. EST.” Readers whose images don’t load will still see it.
If your subscribers live in different countries, name the time zone in the text. A reader in London who sees “ends at midnight” will assume London time, not New York time.
Step 3: Style the Timer to Match Your Brand
Change the timer’s look so it fits the rest of your design.
First, choose a display style:
- Flip clock: big numbers on split cards, like an old airport board. Good for sales and Black Friday.
- Pill: numbers in rounded boxes. Good for software launches, webinars, and events.
- Text: plain numbers with no boxes. Good for simple newsletters.
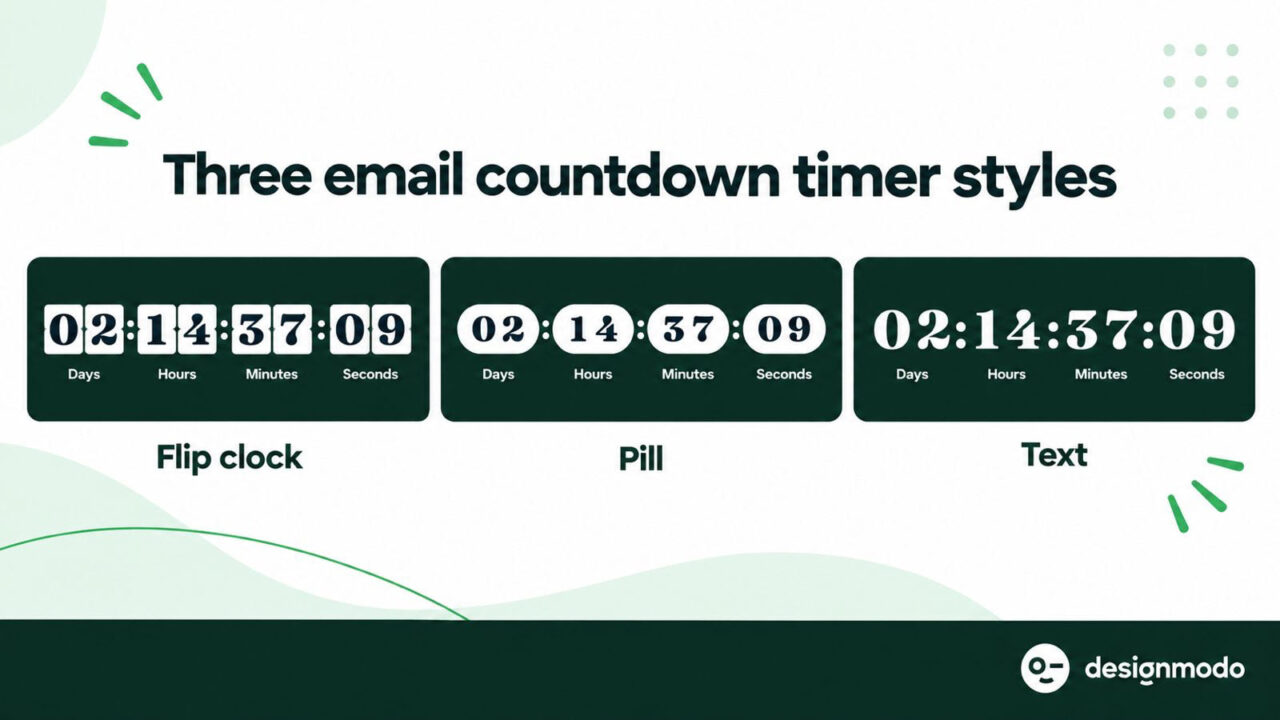
Then change the styling details:
- Colors: set the background and number colors from your brand palette.
- Font: use the same font, size, and weight as the rest of the email.
- Spacing: change the space around the timer and align it left, center, or right.
- Labels: rename the words under the numbers in any language. Spanish emails can use días, horas, minutos, segundos. German emails can use Tage, Stunden, Minuten, Sekunden.
Make sure the numbers are easy to read. Light gray numbers on white are hard to see on a phone. Dark numbers on a light background, or white numbers on a dark color, work on any screen.
Step 4: Export Your Email and Send a Test
Send the finished email to your email platform and test it before it reaches your subscribers.
Postcards connect with HubSpot, Mailchimp, Klaviyo, SendGrid, Brevo, Constant Contact, and other platforms, so you can send it straight to the one you already use. If you use Mailchimp, it’s the same export you’d use for Mailchimp email templates.
Then test the timer:
- Send a test email to a Gmail and an Outlook account.
- Open it on your computer and your phone, and note the time left.
- Wait a few minutes, then open it again.
- Check that the time went down and match your deadline.
- Switch your phone to dark mode and check that the numbers are still easy to read.
If the time looks wrong, check the time zone in the timer settings first. It’s the most common mistake.
Other Methods to Add a Countdown Timer to Email
You can also build a timer in a separate countdown tool and paste its code into your email platform. It works, but it adds another account and a copy-and-paste step to every campaign.
- A third-party timer tool: You design the timer on the tool’s website, copy its HTML embed code, and paste it into an HTML or Code block in your email platform. Mailchimp and Klaviyo don’t have a built-in countdown block, so this is the usual method there.
- A GIF you make yourself: You can make an animated countdown GIF, but it counts from when you made it, not from when the reader opens it. Everyone sees the same time, and it’s wrong for almost all of them.
- HTML, CSS, or JavaScript: Email apps block JavaScript, and CSS can’t read the current time, so code alone can’t show a live countdown. Live timers are images a server draws when the email opens.
💡Tip: With Postcards, the timer is part of the email you’re already building. You style it with the same controls and export it together with everything else.
Will Your Countdown Timer Work in Gmail, Outlook, and Apple Mail?
Yes, countdown timers show up in almost every email app. A few apps display them a little differently, but none break the timer.
- Gmail shows timers well. It stores copies of images, so a reader who opens the email a second time may briefly see an older time. The first open is almost always correct.
- Apple Mail has a feature called Mail Privacy Protection that can load images before the reader opens the email. When that happens, the timer shows the time left when Apple loaded it. If Apple loads the image at 3 p.m. with 4 hours left and the reader opens it at 5 p.m., the timer still starts from 4 hours, even though only 2 are left.
- Outlook for Windows is the one to watch. Older desktop versions, such as Outlook 2016 and earlier, show only the first frame of an animated GIF, so the timer doesn’t tick. It still shows the correct time left at the moment the email opens. Newer Microsoft 365 versions of Outlook play the animation.
- Phone apps and Yahoo Mail usually show timers without problems.
Even when a timer doesn’t tick, it shows the right time left when the email opens. And if you write the deadline in the text too, readers with images turned off still see it.
What Happens When the Countdown Ends?
When the countdown ends, the timer usually shows all zeros or a message like “This offer has ended.” Plan for this, because some people open emails hours or days after you send them.
Here’s what that looks like in a real welcome email from Base44:
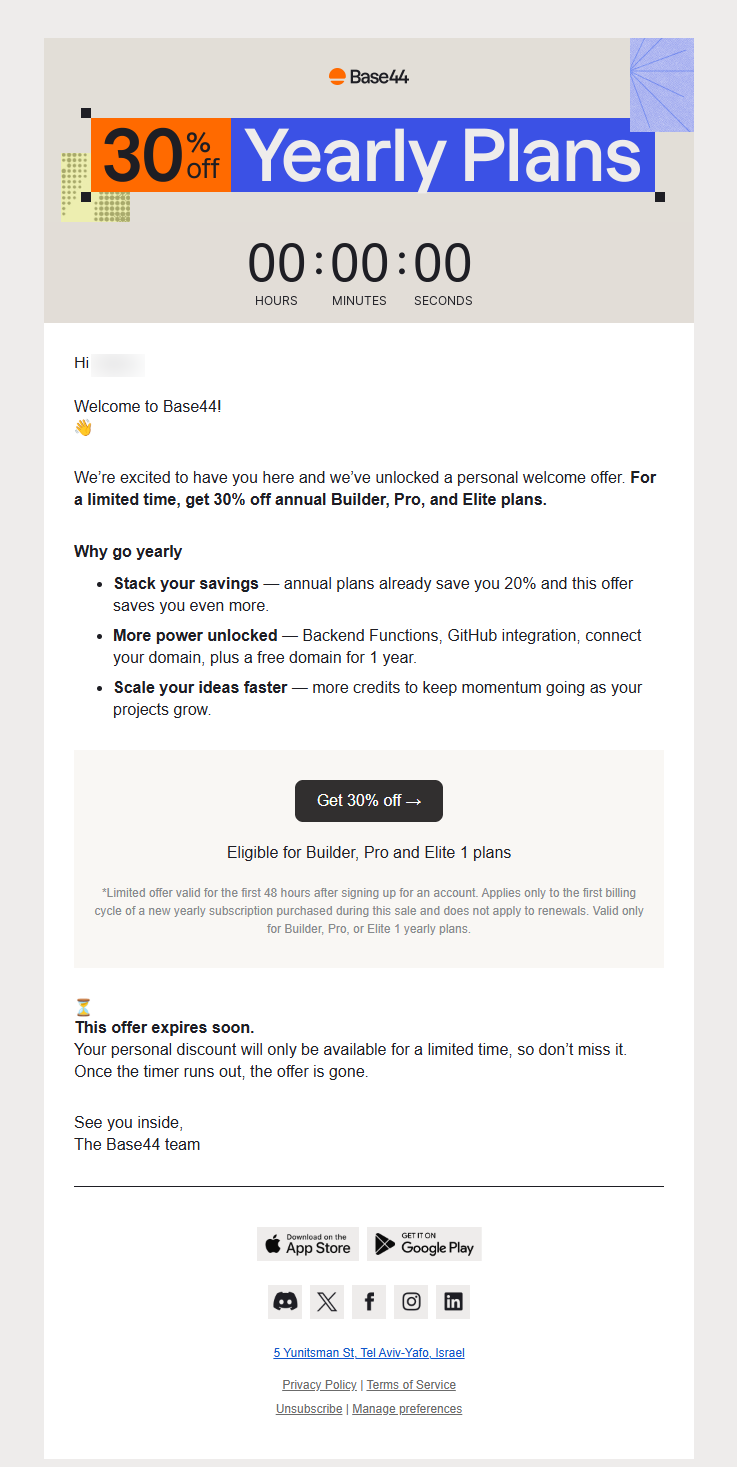
The offer has ended, so the timer shows 00:00:00, but nothing else in the email changed.
The “Get 30% off” button is still there, so a reader who opens late may click it and expect a discount. The text only says “for a limited time” and never gives the end date, so once the timer hits zero, the reader has no idea when the offer ended.
To avoid this, write the deadline in the text, and update the page your button links to once the offer ends.
Best Practices for Countdown Timers in Email
The best countdown timers use a real deadline, are placed next to the main button, and are easy for everyone to read.
Follow these tips to make sure you use countdown timers correctly:
- Put it next to your main button: Place the timer right above the button, near the top of the email, so readers don’t have to scroll to find it.
- Only use real deadlines: If your timer resets or your sale keeps getting “extended,” readers stop trusting you and ignore your next deadline email.
- Write the deadline in text too: Add a line like “Ends Friday at 11:59 p.m. EST” near the timer for readers who block images or use screen readers.
- Write alt text that states the deadline: Alt text is the short description that shows when an image doesn’t load. Write “Sale ends Friday at midnight EST” instead of “countdown timer.” It’s a basic part of accessible email design.
- Match your subject line to the deadline: A subject line like “Last 24 hours: 30% off everything” tells readers about the deadline before they open the email. Do the same with the preview text, the short line people see next to the subject line.
- Keep the rest of the email still: Use only one moving element. Too much movement distracts some readers, and emails can’t offer a pause button, so skip extra GIFs.
- Don’t add a timer to every email: If every email has a countdown, readers stop noticing it. Save timers for your biggest deadlines.
Design Your Next Countdown Campaign With Postcards AI Suite
Choose your next real deadline, like a weekend sale, a webinar, or an early-bird price, and build the email for it today. Open a Postcards template that already has a timer, or start from a blank email and add the countdown module. Then send yourself a test before it goes to your list.
FAQs
How do I add a countdown timer to an Outlook email?
Outlook doesn’t have a built-in countdown timer, so you create the timer in another tool and add it to your email. In Postcards, add the countdown module, set the deadline, and send the email through Postcards’ Outlook integration. Keep in mind that Outlook 2016 and earlier on Windows show a static timer that doesn’t tick, but it still shows the correct time left.
Is there a free countdown timer for emails?
Yes, some standalone timer tools have free plans, but they come with limits, such as how long a timer can run or which designs you can use. You create the timer on their website and paste the code into your email. In Postcards, countdown timers are included on the Plus and Pro plans.
Can I make an email countdown timer with HTML or CSS?
Not a live one. Email apps block JavaScript, and CSS can’t read the current time, so a live timer has to be an image that’s created when the email opens. Tools like Postcards create that image for you.
How do I make a countdown GIF for an email?
You can make one in a GIF tool, but it only counts down from when you made it, so readers see the wrong time. For a timer that shows the correct time for each reader, use a countdown module or timer tool that creates the image when the email opens.
Can I add a countdown timer in Mailchimp or Klaviyo?
Yes, but neither has a built-in countdown block. You can paste a third-party timer’s code into an HTML or Code block, or build the email with a timer in Postcards and export it to Mailchimp or Klaviyo.
Do countdown timers work in dark mode?
Usually, but some apps change colors in dark mode. Give the timer a solid background color with strong contrast, and check it in dark mode before you send.